dive.sendiri
Registered
So, I've seen some posts with questions about DIY bcd/sidemount bladders, but little to none useful responses.
Therefore I'm creating a post to share the story and inspire anyone who'd like to repeat that.
TLDR: To glue a decent airtight bladder at home with almost no tools is possible, and in face quite easy. PVC used for PVC boats(it has multiple layers with reinforcement in the middle) seems to be the best material.
1. Reasons
So as you know sidemount wing can be pricy compare to regular bcd, add regs on top of that and that makes an investment majority of recreational divers are not going to make.
Since I dive sidemount only and would like to share the benefits of 2 tanks with my friends on our dives, I just decided to make it myself. Another reason is an idea that to truly understand something one has to build it. Why the wing of sidemount is this shape, not other? Why the arrangement of webbing is as it is? I found that making my own wing is kinda helping to answer these questions.
2.The team
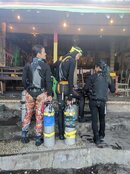
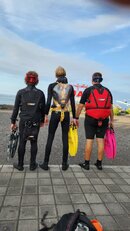
Fortunately my friends (and my wife) got excited about that and joined the project, so what you see in this post is a collective work, not only my own.. Also they gladly offered to be guinea pigs and try the wings underwater.
3. Research of bladder material
The first step was to scroll through internet, finding almost nothing, just useless statements about necessity to have an ultrasonic weld machine to be able to make an airtight bladder. Well, luckily I dismissed all of them as not true, since I have seen some airtight connections in some devices made by other means.
I ordered online bunch of glues(from superglues of different brands, to epoxy resins), materials (rubber, silicone, polyuretane, hypalon, pvc, nylon) of different thickness and hardness. Then some time was spent to figure out which combination of glue and material produces extremely strong airtight bond between 2 sheets of material without breaking the material. From glues and materials I got decently worked only flexible PVC sheets with korean glue for PVC boats. Also Loctite cyanoacrilate glue worked well for PVC and rubber. But special boat glue is preferred because it produces flexible bond. Cyanoacrylates produced extremely strong bond, but hard, and prone to cracking which probably could lead to leaks in the future.
Silicon was dismissed because I couldn't achieve strength of bond with which pressure would break the material first, not the bond. (That is what I was aiming for). Also silicone sheets have horrible for this application peculiarity: even a little crack leads to whole sheet breaking into pieces. Polyurethane seem to be nice material, but no glue from thos I had could produce any decent bond. Same with Hypalon. Initially I was placing high hopes on Hypalon, since that's the strongest (and most expensive) of all the materials I've got. But even with special Hypalon (also super expensive glue) I couldn't get a bond between 2 sheets which I wasn't able to break just with my hands by pulling the sheets opposite direction. Maybe I got wrong glue, but siince the price of other kinds of Hypalon glue is extraorbital, I stopped experimenting in that direction. So eventually PVC and PVC boat glue were chosen as combo.
4. Plastic and metal parts.
Simple - ordered plates from SUMP UK, d-rings, power inflator, webbing - from the nearest diveshop, dump valves from China.
5. First prototype

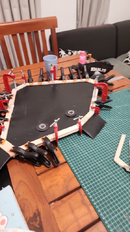
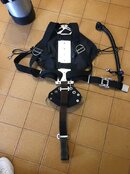
I will not discuss here, how to assemble a harness, that's quite easy, and info on that exists in many places, SUMP UK Facebook for example. For the bladder we've decided that the first prototype is going to be just bladder, witthout any external cover. Initially I tried thin 0.5mm 2 layers PVC from random pvc sheets shop. That didn't work well - glue made the material fragile and the layers disconnected from each other. Then I picked 2mm transparent PVC which by itself is quite strong, so I assumed that's gonna be a decent bladder. We've cut 2 equal pieces of trapezoid shape, cut the holes for dump valve and inflator, glued rubber dump valve gaskets to the holes with cyanoacrylate (that was mistake - those gaskets don't need to be glued, just places around the holes.). Then we slowly glued top layer to bottom. Step by step, over a few days, leaving the glued parts under pressure for 24 hours. In the bottom and top and the sides we glued more material together with an intention to use that spaces for the holes to attach the bladder to the plates and wing bungees. When the first part was done - we screwed the dump valve and the inflator hose in and testeed it ina bucket of water. Well, it had a couple of small leaks - between the different days glue sessions. We inserted some glue through those holes, and pressurised it in those places again. At the next test the leaks were gone. Then we made holes, inserted eyelets in the top, bottom and at the sides. The question was how to ensure the bladder stays inline with the webbing and how to atach tank bungees. Well, the simplest solution - we glued loops for all them using little bit thicker pvc. Then it was assembled with the harness (with the screws screing the bladder to the top and bottom plates) and time has come to test it underwater.
6. Testing underwater
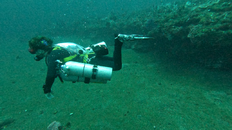
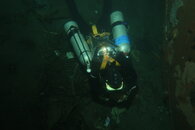
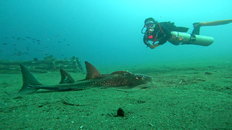
Surprisingly it turned out having no major problems and quite diveable! It was not attached to the body tight enough, creating little not even noticeable drag - and that was all! And more than that - it's transparent! The coolest wing in the world!
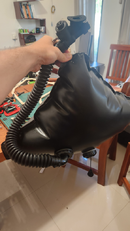
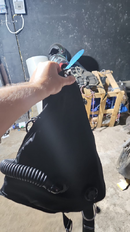
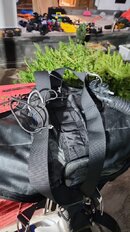
But there turned out to be problems with the material. The pvc was not thick and strong enough to drop it together with diving equipment. I was afraid it would get punctured bu something easily. Another problem was that exposed to the sun pvc softened and that's where the next problem appeared. It turned that the glue made pvc softer and softened more by the Sun it started breaking up in the places where pvc sheet connected to the bond. Well, those leaks were easily fixable with a patch on top of the seal, the wing had 20+ dives afterwards, but from this we understood that transparent PVC looks extremely cool, but definitely not sufficient for implementing a safe durable sidemount. That's how the next prototype was created.
Therefore I'm creating a post to share the story and inspire anyone who'd like to repeat that.
TLDR: To glue a decent airtight bladder at home with almost no tools is possible, and in face quite easy. PVC used for PVC boats(it has multiple layers with reinforcement in the middle) seems to be the best material.
1. Reasons
So as you know sidemount wing can be pricy compare to regular bcd, add regs on top of that and that makes an investment majority of recreational divers are not going to make.
Since I dive sidemount only and would like to share the benefits of 2 tanks with my friends on our dives, I just decided to make it myself. Another reason is an idea that to truly understand something one has to build it. Why the wing of sidemount is this shape, not other? Why the arrangement of webbing is as it is? I found that making my own wing is kinda helping to answer these questions.
2.The team
Fortunately my friends (and my wife) got excited about that and joined the project, so what you see in this post is a collective work, not only my own.. Also they gladly offered to be guinea pigs and try the wings underwater.
3. Research of bladder material
The first step was to scroll through internet, finding almost nothing, just useless statements about necessity to have an ultrasonic weld machine to be able to make an airtight bladder. Well, luckily I dismissed all of them as not true, since I have seen some airtight connections in some devices made by other means.
I ordered online bunch of glues(from superglues of different brands, to epoxy resins), materials (rubber, silicone, polyuretane, hypalon, pvc, nylon) of different thickness and hardness. Then some time was spent to figure out which combination of glue and material produces extremely strong airtight bond between 2 sheets of material without breaking the material. From glues and materials I got decently worked only flexible PVC sheets with korean glue for PVC boats. Also Loctite cyanoacrilate glue worked well for PVC and rubber. But special boat glue is preferred because it produces flexible bond. Cyanoacrylates produced extremely strong bond, but hard, and prone to cracking which probably could lead to leaks in the future.
Silicon was dismissed because I couldn't achieve strength of bond with which pressure would break the material first, not the bond. (That is what I was aiming for). Also silicone sheets have horrible for this application peculiarity: even a little crack leads to whole sheet breaking into pieces. Polyurethane seem to be nice material, but no glue from thos I had could produce any decent bond. Same with Hypalon. Initially I was placing high hopes on Hypalon, since that's the strongest (and most expensive) of all the materials I've got. But even with special Hypalon (also super expensive glue) I couldn't get a bond between 2 sheets which I wasn't able to break just with my hands by pulling the sheets opposite direction. Maybe I got wrong glue, but siince the price of other kinds of Hypalon glue is extraorbital, I stopped experimenting in that direction. So eventually PVC and PVC boat glue were chosen as combo.
4. Plastic and metal parts.
Simple - ordered plates from SUMP UK, d-rings, power inflator, webbing - from the nearest diveshop, dump valves from China.
5. First prototype


I will not discuss here, how to assemble a harness, that's quite easy, and info on that exists in many places, SUMP UK Facebook for example. For the bladder we've decided that the first prototype is going to be just bladder, witthout any external cover. Initially I tried thin 0.5mm 2 layers PVC from random pvc sheets shop. That didn't work well - glue made the material fragile and the layers disconnected from each other. Then I picked 2mm transparent PVC which by itself is quite strong, so I assumed that's gonna be a decent bladder. We've cut 2 equal pieces of trapezoid shape, cut the holes for dump valve and inflator, glued rubber dump valve gaskets to the holes with cyanoacrylate (that was mistake - those gaskets don't need to be glued, just places around the holes.). Then we slowly glued top layer to bottom. Step by step, over a few days, leaving the glued parts under pressure for 24 hours. In the bottom and top and the sides we glued more material together with an intention to use that spaces for the holes to attach the bladder to the plates and wing bungees. When the first part was done - we screwed the dump valve and the inflator hose in and testeed it ina bucket of water. Well, it had a couple of small leaks - between the different days glue sessions. We inserted some glue through those holes, and pressurised it in those places again. At the next test the leaks were gone. Then we made holes, inserted eyelets in the top, bottom and at the sides. The question was how to ensure the bladder stays inline with the webbing and how to atach tank bungees. Well, the simplest solution - we glued loops for all them using little bit thicker pvc. Then it was assembled with the harness (with the screws screing the bladder to the top and bottom plates) and time has come to test it underwater.
6. Testing underwater


Surprisingly it turned out having no major problems and quite diveable! It was not attached to the body tight enough, creating little not even noticeable drag - and that was all! And more than that - it's transparent! The coolest wing in the world!
But there turned out to be problems with the material. The pvc was not thick and strong enough to drop it together with diving equipment. I was afraid it would get punctured bu something easily. Another problem was that exposed to the sun pvc softened and that's where the next problem appeared. It turned that the glue made pvc softer and softened more by the Sun it started breaking up in the places where pvc sheet connected to the bond. Well, those leaks were easily fixable with a patch on top of the seal, the wing had 20+ dives afterwards, but from this we understood that transparent PVC looks extremely cool, but definitely not sufficient for implementing a safe durable sidemount. That's how the next prototype was created.


