DIY backplate and single tank adapter kits.

Please register or login

Welcome to ScubaBoard, the world's largest scuba diving community. Registration is not required to read the forums, but we encourage you to join. Joining has its benefits and enables you to participate in the discussions.

Benefits of registering include

  • Ability to post and comment on topics and discussions.
  • A Free photo gallery to share your dive photos with the world.
  • You can make this box go away

Joining is quick and easy. Log in or Register now!

I laid out a bunch of cut-off from bigger projects, and cut them on a power shear.
Some of the ones I've made in the past, I cut on a band saw.

-Mitch
 
These are now $22. Shipping is included. Paypal preferred.
PM me if you are interested.

-Mitch
 
I've been building something similar to what you describe. And I'm sharing a picture more because I'd appreciate feedback from the group more than I'd advocate you copy. I'd be happy to have you use it and could share more info but I haven't tested this design yet so there may be glaring flaws.

I cribbed from porter's design but stretched it out (I'm 6.5'); made it flat because I bought a HOG singles wing with anti-roll inserts inside; and went crazy with lightening holes because its a lot easier for me to drill lots of holes than saw out shapes. My calculation is this .125" Al plate with all the holes will come in just under 1 lbs. I figure structural rigidity is assured by the tank itself and I only have to worry about the strength from harness slots to cam slots.

As you can see the vertical slots are meant for weaving cam straps. I am concerned that the bottom of the plate will dig into my back or the tank will be right on my rump so I'm planning to zip tie a short length of 1.5" thin wall plastic drain pipe (shown red) I have laying around. I'm hoping that angles the tank away and keeps the edge off my back.

I'm considering adding thin plastic tubing to the top edge for the same reason but could go with more drain pipe if I need to as well. I'm rounding the edges where the straps contact as much as possible but might consider the thin tubing there too.

Please critique away!

Also, I'm planning to get 2" polyester strapping for the harness. Strapworks apparently will make some standrd strap configurations so I am going to order a 12' length with an adjustable Al side disconnect (not quite Hogarthian I guess). I was also going to order a shorter length with the same hardware so I could rig it with a side disconnect at the waist, and also low on the left shoulder strap. I see DR sells something similar but the disconnect is above the sternum strap and I thought it might be more convienient below. Comments?

Thanks in advance
 

Attachments

  • travel backplate.pdf
    18.7 KB · Views: 189
Yes that's what I'm looking for but in Aluminum.

I don't have a spair to cut down, or I would.

If any one has a 1/8: aluminum plate they'd like to un load, PM me.

thanks

Mike D


Scroll down to the SS Travel plate.
Wings-BackPlates

Or theres the spare plate/band saw solution.

Mitch, did you make those on a CNC mill?
 
The blank plates I have for sale are already flat. You can cut them into any shape you lay out using a small band saw.

I still have some left. Only $22 shipped.

-Mitch
 
Jasper,

I don't think you'll have any problems with the plate digging into your back. If you install a 1.5" diameter tube along the bottom of the plate, then your tank will sit 3/4" higher than the plate. This will negate the roll control rods installed in your wing, which are probably around 3/8".

Just a thought.

Very cool plate design.

-Mitch
 
Jasper -

The basic design looks great, but...

I think the tubing is a bad idea. If you put it between the plate and the tank, then when you tighten the cam bands, you will bend the plate. That will ensure the plate will dig into your back. If you put it between you and the plate, then the plate won't dig into your back, but the tube will.

You say you only need to worry about strength between harness slots and camband slots, but it looks as though you've removed a lot of material in the area where the plate narrows down just below the upper harness slots, and also between the waistbelt slots.

How much would the plate weigh without the lightening holes? If it weighs 1 lb with, then I'd guess it only weighs 1.5 without. Seems like you give up a lot of rigidity and do a lot of work for so little savings, especially since you'd have to replace more than half of that savings with lead.

Keep us posted on your progress and how your ideas work out!

D
 
Thanks for the feedback guys!

I have attached pictures of the mostly finished product.

I was planning to have the tubing between my lower back and the plate. Once I tried the plate out with a tank I didn't really notice it digging in anyway. Hopefully I can get a chance to pool test first but if not, I plan to zip tie the tube on (because I have both anyway) and cut it away if I find its not working.

I don't have an accurate enough scale but I figure its close to 1 pound. From a loading standpoint its only the weight of the tank while getting in - once underwater the tank isn't much load static or dynamic. But I played it a little safer as you had recommended and left out some of the holes.

I figured I could always add more holes but tough to remove them. The work of drilling was trivial but the -15F temp while I was in the unheated garage drilling motivated speed!

The point of trading Al vs Pb is valid although my intent was to reduce the weight of my luggage and I'll use the lead from the shop in Mexico. I plan to make a stainless steel version without weight reduction this spring for Lake Superior.

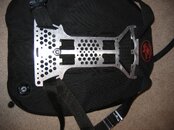
Lastly, any thoughts on this harness idea? I wanted something strong, cheap, with few failure points but with a sternum strap. I've been thinking about a solution for weeks (wife would say obsessive) and I think I have one.

I'll use one long strap from the backplate, over the shoulder to a homemade aluminum crossing plate which redirects across the sternum and loops back to the plate then down an at angle to the backplate. PDF attached but the web path is complex:
straight down from shoulder on top of plate, tucked into short slot,
folded around lower side of long slot (since it is at 45 deg the strap is now pointed across the chest),
doubled back on itself as threaded through a side disconnect buckle,
folded back around the long slot so it is pointed up,
folded over thru the short slot (22.5 deg so the strap now points 45 deg toward back/waist),
finally tucked back thru the long slot and headed toward the lower backplate slot. Mirrored on the other side.

The triangle areas are just space I left to make the plate-backplate angle steeper if I need to. Believe it or not, I tried it out with paper and the path seems to work - I feel like an origami master now.

Thanks again for your comments!
 

Attachments

  • strap plates.pdf
    3.8 KB · Views: 118
  • IMG_0960.jpg
    IMG_0960.jpg
    425.4 KB · Views: 288
Thanks for posting the design! I wouldn't have known where to start without it.
 

Back
Top Bottom