ucrtwf
Guest
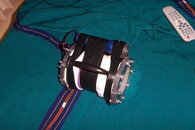
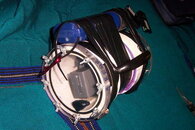
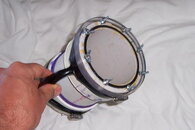
[FONT="]Thanks to all the helpful posts on this board I built my own video housing for my Sony DCR-HC42. I just got back from 17 dives in Cozumel last night (my head still thinks I'm under the water). I took 5 hours of tape, it worked like a charm. One test run without the camera to make sure, then I took it to 90 ft without a drop of leakage. I didn't think it would be right not to share my experience to help others. The total spent on the housing was around $60. The only thing that may be tricky is finding a lathe to cut the o-ring groove, if you or a buddy has access to one, you're golden.
Here's a quick breakdown of the parts I used-
12x12 plate of 1/2" thick- scratch resistant polycarbonate from McMaster Carr (this is the most expensive part, one 12x12" sheet actually makes two units, the cost is about $40)
2- 4" PVC couplings (sch 40 "white") -Home Depot
1-6" piece of 4" PVC (sch 40 "white")- Home Depot
16- 8-32 wing nuts- Home Depot
16- 8-32/wood screw studs- Ace Hardware
2- Nitrile O-rings (I think they were #248, from memory, but I could find out for sure if anyone needs the exact #)
1- Handle (like would be used on a barn or shed)- Home Depot
1- "Syringe" of two-part "plastic weld" epoxy
1- can of PVC primer- You can get it anywhere, I had some at home
1-can of PVC cement- Same as above, had it at home
1- piece of 1" wide flat stock 6" long, 1/4" thick (I used steel because I had it in the garage), aluminum, wood, stiff plastic would work fine. This is to hold the camera between the lenses as well as to brace it in the housing from moving.
2- 5-7" hose clamps- Home Depot
1- roll electrical tape (not 100% needed, but gives a wider tolerance and scratch resistance, read below).
1- tube silicone grease (for o-rings)- Napa auto parts store
[/FONT][FONT="]Instructions-[/FONT][FONT="]
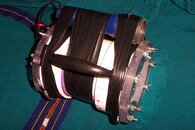
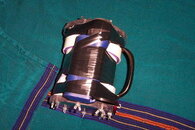
Main body
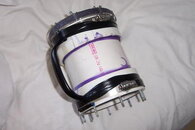
My camera with the extended life battery attached is about 5 1/2" long. This is why I cut the PVC to 6", if you don't have any, Home Depot sells 2' sections of pipe (no reason to buy 10 ft). I know some guys were using SCH 80 "gray" PVC, it is rated for higher pressure, but SCH 40 is marked 1200 PSI. When I was in plumbing, we tested SCH 40 systems at 60 psi air pressure. I wouldn't bother with the SCH 80, it's more expensive, harder to come by for normal consumers, and not needed for recreational depths of diving. No rocket science here, just cut the pipe as square as possible, a little longer isn't going to hurt you (maybe an inch or so). A band saw will generally give you a better- more square- cut than a hand saw or sawzall (IMOHO).
Add wall thickness-
Next, prime and glue one coupling on each end of your pipe. Press the pipe all the way into the coupling until it bottoms out on the middle "stop". Make sure you use the primer (purple stuff) since it softens up the plastic on both pieces for a better joint. I'd let the unit sit for at least a day to make sure it hardens up.
Cut to length-
After the glue is good and dry, cut the ends of the couplings off to the middle section (stop), again with a saw. Now comes the tricky part. I used a three-jaw chuck on a small lathe. If you had a 4-jaw, you could indicate the pipe more accurately. Since the plastic is so flexible, it's hard to clamp securely. Believe it or not, if you take some electrical or duct tape and wrap it around the pipe and jaws it does wonders for making the set-up more rigid. All you are looking to do is clean up the pipe and coupling (which makes about a 1/2" radial wall thickness) so you have a flat surface. The reason for the coupling is to give the case a double wall thickness for room for the o-ring groove. Once the "Stop" portion of the tube is machined off, and the uneven pipe is clean, stop there. The final length dimension can be customized on the other side. Try to understand totally that this is a couple of pieces of plastic... not a precision piece of metal. The tube will wobble because it isn't exactly round from the ID to the OD. This is difficult to take at first, if you've done any real machining or even wood work. Just be careful, please be careful. Disclaimer- always use common sense!! Stand to the side of a rotating part (especially during start up), keep fingers away from cutting tools, etc, etc.
O-ring groove-
Cut the o-ring groove, this is probably easier if you look up (http://www.parker.com/ead/cm1.asp?cmid=247). The Parker handbook for o-rings is the industry standard (just a side note, I happen to be a seal engineer but don't work for Parker). Use the guidelines for static face sealing, it should be easy enough. If anyone has any questions about this, feel free to let me know. I didn't machine the groove to spec, just because I wanted more squeeze. O-rings are very practical, forgiving seals for an application like this, capable of holding 1500 psi. As long as both surfaces are relatively smooth and clean, it will seal.
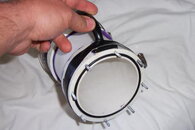
Lens bolts-
Next, is probably the most difficult part (or for me it was). I made up a "bolt pattern" on the computer, then printed it out, then scaled it with the copier so that the screw centerline was in the middle between the edge of the o-ring groove and the outer diameter of the housing (coupling outside diameter). The operation is going to be to match the circle pattern on two surfaces (housing and lens). Of course you have to do this on both ends. If you had a CNC machine, or even a mill with digital readouts this operation would be a piece of cake. I know most of us don't. I used a small hobby mill/lathe combo for my project. It's pretty self explanatory- I taped the template over the lenses, taped another over the tube, then drilled on the "x"'s. Note, use very small dots on the template for more accurate holes. I probably used WAY more than I needed. Four bolts probably would have been fine. I know a lot of the guys have been using the spring toggle clamps, I may even use these on my next revision if I ever do it again. I was being cheap, and I didn't want to make any leak paths in the tube by drilling.
I drilled the holes in the tube to the minor diameter of the screw. These screws have a 8-32 thread on one side and a wood screw thread on the other. I just measured the smallest diameter on the wood screw side and drilled. On the lens, I took the next size drill (about .020" larger than the outside diameter of the thread). I used a center drill to make sure the drill on one side, and skipped it on the other with no noticeable change in results... If you have time, experiment before you drill the lens (since it's so expensive).
Installing screws-
I used the plastic weld epoxy on the wood screw ends before I screwed them in.
Side note (if anyone cares)- I did a couple tests before completing my housing. I used threaded rod at first- I drilled and tapped the PVC, then used several types of epoxy to gauge the holding strength. My concern was that the force put on the threaded rod would pull out the plastic. To my surprise, even when used with a plain tapped hole, the force from my fingers could not pull the threads out. The results are listed from worst to best- I had to use a wrench to pull all of the studs out, but here was what I found. Bare threads pulled out easiest, then PVC cement, then Master Mend, JB weld, then the "plastic weld" two-part from Wal-Mart came out ahead. It took significant force to strip the threads out. Since then, I found the 8-32/wood screw type studs and used those in combination with the plastic weld epoxy.
Anyway- after double nutting the studs to screw them into the housing, I cut the ends just long enough to stick out past the polycarbonate and to get 4 or 5 threads into the wing-nuts. I didn't want them to be longer and catch on a wet suit, bc, or my flesh. This would also save a little time when screwing each wingut on.
Rounding corners-
After the lens was able to be bolted off, I cut the corners of the square lens off with a Sawzall (I put electrical tape on the bottom to make sure it didn't scratch the surface), and then used a belt sander to finish it off. I left the lens on each side stick out a little past the housing to make sure the edge of the PVC stays protected if bumped, etc.
Camera mounting-
Since all cameras have the threaded hole for a tri-pod, I think this should work for everyone. I just took a piece of flat stock I had in the garage, and drilled a hole just bigger than the screw to hold it onto the bottom of the camera. I made the piece of flat stock a little shorter than the space between the lenses, and then wrapped electrical tape around each end to keep it from scratching the lenses, and to give it some compression to hold the camera in place. I was going to use a piece of sponge to wedge between the top of the camera, but everything fit perfect so I didn't need it. After the 5th dive, I had to re-do the electrical tape on one end of the flat stock (note, I packed the camera in the housing during the flights down to cozumel, so it was in there for a while before it was used.
Continued due to file size
[/FONT]
Here's a quick breakdown of the parts I used-
12x12 plate of 1/2" thick- scratch resistant polycarbonate from McMaster Carr (this is the most expensive part, one 12x12" sheet actually makes two units, the cost is about $40)
2- 4" PVC couplings (sch 40 "white") -Home Depot
1-6" piece of 4" PVC (sch 40 "white")- Home Depot
16- 8-32 wing nuts- Home Depot
16- 8-32/wood screw studs- Ace Hardware
2- Nitrile O-rings (I think they were #248, from memory, but I could find out for sure if anyone needs the exact #)
1- Handle (like would be used on a barn or shed)- Home Depot
1- "Syringe" of two-part "plastic weld" epoxy
1- can of PVC primer- You can get it anywhere, I had some at home
1-can of PVC cement- Same as above, had it at home
1- piece of 1" wide flat stock 6" long, 1/4" thick (I used steel because I had it in the garage), aluminum, wood, stiff plastic would work fine. This is to hold the camera between the lenses as well as to brace it in the housing from moving.
2- 5-7" hose clamps- Home Depot
1- roll electrical tape (not 100% needed, but gives a wider tolerance and scratch resistance, read below).
1- tube silicone grease (for o-rings)- Napa auto parts store
[/FONT][FONT="]Instructions-[/FONT][FONT="]
Main body
My camera with the extended life battery attached is about 5 1/2" long. This is why I cut the PVC to 6", if you don't have any, Home Depot sells 2' sections of pipe (no reason to buy 10 ft). I know some guys were using SCH 80 "gray" PVC, it is rated for higher pressure, but SCH 40 is marked 1200 PSI. When I was in plumbing, we tested SCH 40 systems at 60 psi air pressure. I wouldn't bother with the SCH 80, it's more expensive, harder to come by for normal consumers, and not needed for recreational depths of diving. No rocket science here, just cut the pipe as square as possible, a little longer isn't going to hurt you (maybe an inch or so). A band saw will generally give you a better- more square- cut than a hand saw or sawzall (IMOHO).
Add wall thickness-
Next, prime and glue one coupling on each end of your pipe. Press the pipe all the way into the coupling until it bottoms out on the middle "stop". Make sure you use the primer (purple stuff) since it softens up the plastic on both pieces for a better joint. I'd let the unit sit for at least a day to make sure it hardens up.
Cut to length-
After the glue is good and dry, cut the ends of the couplings off to the middle section (stop), again with a saw. Now comes the tricky part. I used a three-jaw chuck on a small lathe. If you had a 4-jaw, you could indicate the pipe more accurately. Since the plastic is so flexible, it's hard to clamp securely. Believe it or not, if you take some electrical or duct tape and wrap it around the pipe and jaws it does wonders for making the set-up more rigid. All you are looking to do is clean up the pipe and coupling (which makes about a 1/2" radial wall thickness) so you have a flat surface. The reason for the coupling is to give the case a double wall thickness for room for the o-ring groove. Once the "Stop" portion of the tube is machined off, and the uneven pipe is clean, stop there. The final length dimension can be customized on the other side. Try to understand totally that this is a couple of pieces of plastic... not a precision piece of metal. The tube will wobble because it isn't exactly round from the ID to the OD. This is difficult to take at first, if you've done any real machining or even wood work. Just be careful, please be careful. Disclaimer- always use common sense!! Stand to the side of a rotating part (especially during start up), keep fingers away from cutting tools, etc, etc.
O-ring groove-
Cut the o-ring groove, this is probably easier if you look up (http://www.parker.com/ead/cm1.asp?cmid=247). The Parker handbook for o-rings is the industry standard (just a side note, I happen to be a seal engineer but don't work for Parker). Use the guidelines for static face sealing, it should be easy enough. If anyone has any questions about this, feel free to let me know. I didn't machine the groove to spec, just because I wanted more squeeze. O-rings are very practical, forgiving seals for an application like this, capable of holding 1500 psi. As long as both surfaces are relatively smooth and clean, it will seal.
Lens bolts-
Next, is probably the most difficult part (or for me it was). I made up a "bolt pattern" on the computer, then printed it out, then scaled it with the copier so that the screw centerline was in the middle between the edge of the o-ring groove and the outer diameter of the housing (coupling outside diameter). The operation is going to be to match the circle pattern on two surfaces (housing and lens). Of course you have to do this on both ends. If you had a CNC machine, or even a mill with digital readouts this operation would be a piece of cake. I know most of us don't. I used a small hobby mill/lathe combo for my project. It's pretty self explanatory- I taped the template over the lenses, taped another over the tube, then drilled on the "x"'s. Note, use very small dots on the template for more accurate holes. I probably used WAY more than I needed. Four bolts probably would have been fine. I know a lot of the guys have been using the spring toggle clamps, I may even use these on my next revision if I ever do it again. I was being cheap, and I didn't want to make any leak paths in the tube by drilling.
I drilled the holes in the tube to the minor diameter of the screw. These screws have a 8-32 thread on one side and a wood screw thread on the other. I just measured the smallest diameter on the wood screw side and drilled. On the lens, I took the next size drill (about .020" larger than the outside diameter of the thread). I used a center drill to make sure the drill on one side, and skipped it on the other with no noticeable change in results... If you have time, experiment before you drill the lens (since it's so expensive).
Installing screws-
I used the plastic weld epoxy on the wood screw ends before I screwed them in.
Side note (if anyone cares)- I did a couple tests before completing my housing. I used threaded rod at first- I drilled and tapped the PVC, then used several types of epoxy to gauge the holding strength. My concern was that the force put on the threaded rod would pull out the plastic. To my surprise, even when used with a plain tapped hole, the force from my fingers could not pull the threads out. The results are listed from worst to best- I had to use a wrench to pull all of the studs out, but here was what I found. Bare threads pulled out easiest, then PVC cement, then Master Mend, JB weld, then the "plastic weld" two-part from Wal-Mart came out ahead. It took significant force to strip the threads out. Since then, I found the 8-32/wood screw type studs and used those in combination with the plastic weld epoxy.
Anyway- after double nutting the studs to screw them into the housing, I cut the ends just long enough to stick out past the polycarbonate and to get 4 or 5 threads into the wing-nuts. I didn't want them to be longer and catch on a wet suit, bc, or my flesh. This would also save a little time when screwing each wingut on.
Rounding corners-
After the lens was able to be bolted off, I cut the corners of the square lens off with a Sawzall (I put electrical tape on the bottom to make sure it didn't scratch the surface), and then used a belt sander to finish it off. I left the lens on each side stick out a little past the housing to make sure the edge of the PVC stays protected if bumped, etc.
Camera mounting-
Since all cameras have the threaded hole for a tri-pod, I think this should work for everyone. I just took a piece of flat stock I had in the garage, and drilled a hole just bigger than the screw to hold it onto the bottom of the camera. I made the piece of flat stock a little shorter than the space between the lenses, and then wrapped electrical tape around each end to keep it from scratching the lenses, and to give it some compression to hold the camera in place. I was going to use a piece of sponge to wedge between the top of the camera, but everything fit perfect so I didn't need it. After the 5th dive, I had to re-do the electrical tape on one end of the flat stock (note, I packed the camera in the housing during the flights down to cozumel, so it was in there for a while before it was used.
Continued due to file size
[/FONT]