Recomendations for Noob, Camera Tray/ Lights

Please register or login

Welcome to ScubaBoard, the world's largest scuba diving community. Registration is not required to read the forums, but we encourage you to join. Joining has its benefits and enables you to participate in the discussions.

Benefits of registering include

  • Ability to post and comment on topics and discussions.
  • A Free photo gallery to share your dive photos with the world.
  • You can make this box go away

Joining is quick and easy. Log in or Register now!

Great job, DIYers. ermaclob...how did you cut the plastic and finish it?

hand held saw..... and finished it with....brick floor. i just went out and cut it out the most simplistic way possible, nothing special used the brick floor to get a nice round finish after cutting a few tangent lines around the handle part . the only small unnecessary thing i did do was use fine sand paper to make the round tray endings FEEL nicer.

very easy project. no special equipment needed.
 
Great DIY rigs Here's a thought, center the camera in a16:9 aspect frame and it will function as a crude viewfinder. I have posted several clips that were taken using that rig. The frame really keeps the video centered. I just handed it off to a buddy that had not taken video before and he did a great job, once he had confidence the GoPro was on, a lot of clips of him looking to see if the red light was flashing:eyebrow:

http://www.scubaboard.com/forums/underwater-videography/381327-gopro-hd-camera-placement-3.html


However, bought the package mentioned above with lights as it looked really cool.

Anyone know how you would attach the articulating arms to your DIY rig? Maybe some hard plastic or rubber 1" diameter toy balls and attach and then use it to transition to regular manufactured articulating arms and light brackets. If you could put a groove around the ball and add an"O" ring that would be perfect. Think I'll look in the plumbing section, there may be some 1" plastic ball things there.
 
Anyone know how you would attach the articulating arms to your DIY rig? Maybe some hard plastic or rubber 1" diameter toy balls and attach and then use it to transition to regular manufactured articulating arms and light brackets. If you could put a groove around the ball and add an"O" ring that would be perfect. Think I'll look in the plumbing section, there may be some 1" plastic ball things there.

i dont have any arms or have actually gotten an opportunity to see how those arms work. but i know that theres some that attach onto a ball like this one . it dont think it be to hard to find something like that and integrate it. Just find a ball and put a small screw in it, then on to the DIY tray with a wing nut.

i think for a DIY tray those types of strobe arms are kinda expensive, i was thinking of using a idea i saw here on scubaboard and uses the legs from a Gorillapod to mount lights, but to be honest idk, its not something ive been really looking up yet.
[h=1][/h]
 
Anyone know how you would attach the articulating arms to your DIY rig? Maybe some hard plastic or rubber 1" diameter toy balls and attach and then use it to transition to regular manufactured articulating arms and light brackets. If you could put a groove around the ball and add an"O" ring that would be perfect. Think I'll look in the plumbing section, there may be some 1" plastic ball things there.

Ram Mounting Systems sells different diameter balls that are male or female threaded and would work perfect for this. There's also the Light Motion Photo Ball Mount Kit. This is a good idea and I'm going to rethink my light mounting.
 
Last edited:
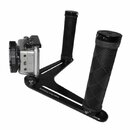
3SRPTRY.jpgErmaclob, Your tray slightly resembles our Tray! lol. Nice job on your home built design, perhaps the best looking home built tray I've seen! We went back and forth on building ours out of Polycarbonate, but in the end we decided to stay with hard coat anodized aluminum. We didn't want to deal with the scratches in the Polycarbonate during production. Anyways nice work!

Thanks,
SRP
 
Ermaclob, Your tray slightly resembles our Tray! lol. Nice job on your home built design, perhaps the best looking home built tray I've seen! We went back and forth on building ours out of Polycarbonate, but in the end we decided to stay with hard coat anodized aluminum. We didn't want to deal with the scratches in the Polycarbonate during production. Anyways nice work!

Thanks,
SRP

Thanks Alot !!, i really like you guys tray, but i really needed to stay on the cheap side. i used polycarbonate because i had no power tools that could cut aluminum, plus i had like 3 sheets sitting there. if i did have tools i could have made a better one. but for 2-3 hours of work and thinking it came out wonderful.

im still pretty envious of the slide rails on your tray. id, have to measure and drill holes that may not work for a different add ons later.
 
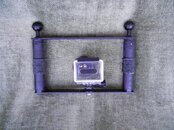
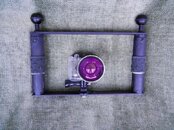
Here's my entry in the DIY category, finally finished Everything from Lowe's, Walmart, or Home Depot (except GpPro and SRP Blur Fix). Note, offset the camera so lens would center. A little hard to tell from pics but it is square in corners and a 16:9 aspect ratio

DSCN1391.jpgDSCN1389.jpg

If I took my time at a little more than minimum wage and gasoline for trips back and forth to store, probably could have purchased SRP tray. :)
 
hi dauntless can i ask whats the dimensions to get a 16:9 aspect ratio!

its a great improvement from the PVC rig to this! im thinking probably using aluminium is a better alternative?

i love this thread it gives me alot of ideas about DIY arm tray system. the systems are too pricey for me haha.

Here's my entry in the DIY category, finally finished Everything from Lowe's, Walmart, or Home Depot (except GpPro and SRP Blur Fix). Note, offset the camera so lens would center. A little hard to tell from pics but it is square in corners and a 16:9 aspect ratio

View attachment 126591View attachment 126592

If I took my time at a little more than minimum wage and gasoline for trips back and forth to store, probably could have purchased SRP tray. :)
 
hi dauntless can i ask whats the dimensions to get a 16:9 aspect ratio! .

If you measure center of GoPro lens from the base of the tripod mount it is ~2.5 inches x 2 gives 5 inches for height that centers the lens equidistant top to bottom. Then 1.7777 x 5 inches = ~8.8 inches for the width. Handles are 4 PVC SCH40 1/2", 4 flat top PVC 1/2" plugs and a little 1/2" PVC pipe to make the 8.8 inch height. Use a #8 or #10 screw in the center drilled plug so you can get a socket and lock washer and lock nut inside with the aluminum strip on top with a drilled (use the drilled plug to get exact center on strip) appropriate hole size. Used bike handlebar grip and cut to fit length of 1/2" pipe. The balls are standard but used a #10 screw so could tighten with socket inside plug. Glued everything but top strip and lubed the plugs a little and hammered home and sunk in a small screw to hold in place in case wanted to open it up later.

Also can get my JVC Picsio + Ikelite case with adapter mounted on this tray and put the GoPro on top if I wanted.

You probably will have $20 to $25 in parts without the balls unless you have a lot of PVC, aluminum, and stainless screws around, but you will have some left over PVC and aluminum. The balls are probably around $35 for two.

Ah, but the PVC Rig took some nice video so don't dis the ghetto gear

EDIT: Forgot to add that the handles are 1" in diameter so add 1/2" to each end of aluminum or 1" overall so cut the aluminum 10 inches and when you square off and finish they will be just about 9.8 inches in width giving the internal width of 8.8"
icosm14.gif
 
Last edited:
If you measure center of GoPro lens from the base of the tripod mount it is ~2.5 inches x 2 gives 5 inches for height that centers the lens equidistance top to bottom. Then 1.7777 x 5 inches = ~8.8 inches for the width. Handles are 4 PVC SCH40 1/2", 4 flat top PVC 1/2" plugs and a little 1/2" PVC pipe to make the 8.8 inch height. Use a #8 or #10 screw in the center drilled plug so you can get a socket and lock washer and lock nut inside with the aluminium strip on top with a drilled (use the drilled plug to get exact center on strip) appropriate hole size. Used bike handlebar grip and cut to fit length of 1/2" pipe. The balls are standard but used a #10 screw so could tighten with socket inside plug. Glued everything but top strip and lubed the plugs a little and hammered home and sunk in a small screw to hold in place in case wanted to open it up later.

Also can get my JVC Picsio + Ikelite case with adapter mounted on this tray and put the GoPro on top if I wanted.

You probably will have $20 to $25 in parts without the balls unless you have a lot of PVC, aluminium, and stainless screws around, but you will have some left over PVC and aluminium. The balls are probably around $35 for two.

Ah, but the PVC Rig took some nice video so don't dis the ghetto gear

thanks for the tip dauntless! will try it out if i have the time!
 

Back
Top Bottom