Need an uw camera "expert"...?

Please register or login

Welcome to ScubaBoard, the world's largest scuba diving community. Registration is not required to read the forums, but we encourage you to join. Joining has its benefits and enables you to participate in the discussions.

Benefits of registering include

  • Ability to post and comment on topics and discussions.
  • A Free photo gallery to share your dive photos with the world.
  • You can make this box go away

Joining is quick and easy. Log in or Register now!

For my outdoor stuff (on land) I rarely use the RAW files unless someone requests a really nice print, but due to the huge differences of shooting underwater I rely on the RAW files a lot. Once you learn the basics of post processing them I can do most justice in less than a minute, and that includes the time to crop where needed. I use Photoshop rather than Lightroom to do the conversions & I'm pretty sure Elements can do it too but haven't checked lately to verify that. The Canon supplied software included with their cameras also does it but with much less control than when using Adobe software.
 
but due to the huge differences of shooting underwater I rely on the RAW files a lot. Once you learn the basics of post processing them I can do most justice in less than a minute, and that includes the time to crop where needed. I use Photoshop rather than Lightroom to do the conversions

A quick question - using photoshop, when do you make your color corrections, when opening the RAW file photo shop gives you the choices to adjust exposure, color ect before it opens the file.... is this where you make your changes, do you just load the RAW file and then make changes while editing or a combination of both?
 
"

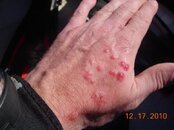
Wonderin why the hydroids like the photogs more than the rest of us? I always come home with battle scars, but this year I found some great gel stuff so it's not such an issue anymore :)


11tsx3a.jpg

I don't touch it, it touches me. That stuff attacks me every time I go down there! Can you give me the name of that gel stuff?

On the plus side I get the armrest to myself on the flight home.
 
Got this stuff free about 2 years ago, figured it was junk, but must have thrown it in my divebag. This summer, 2nd dive, BAM, me on the hands, Gabi on the lip and my son on the arm... I figured what the heck, and made us all try it (This is an EXPERIMENT boys! Shut up and put it on. No..we're NOT going to pee on it as a control. Sigh. Sometimes I hate being the only girl on the boat).

The bottle says it's for Jellyfish, but it seemed to do the job. It didn't take a 100% of the sting out, but it gave significant relief. What was really impressive was that there was virtually NO reaction the next day. I ended up with just a small, bumpy rash, that didn't itch or hurt. Really nothing. My son's arm was slightly blotchy where he was hit, no pain or itching, NO welting. Stayed that way for about a week. Gabi was fine :) He kept asking for "that sheeet" all week LOL I meant to leave it with him and totally forgot :( and then, oh well...

We used it all week with the same results and yes, I'm thorough. I tested it on a jellyfish, worked on that too. Better actually.

Mine is in a different bottle, but I think this is the same stuff. I've had others tell me it didn't do a thing for them. Maybe it's like wine and you need to age if for two years? :wink:

Amazon.com: Jelly Fish After Sting Relief for Scuba Diving, Snorkeling, Swimming and all Watersports: Sports & Outdoors
 
Something that I don't think any of us explained properly (but it has been hinted at) is that cameras that can shoot in RAW also can shoot in RAW + jpg, which is how I shoot. You don't have to use the RAW file if you're happy with the jpg, but every once in a while you'll get a shot you really want better than your jpg allows you to improve in post. This is when you pull the RAW file up & go to work.

Mike, When I select RAW files to open in Photoshop (I have CS4) that automatically starts the RAW plug in. Once that's open I make as many corrections as I can to get the result I'm looking for and when I don't think I can improve it more here I save to a jpg (the RAW stays the same as it was but Photoshop saves a file with my recipe which can be used on other files or just left to re use on that specific file). The newly outputted jpg can then be processed in regular photoshop or any other common editing program. Depending on the photo I may dodge or burn selected areas, clone things out etc using Photoshop
Just opening the RAW file (of underwater photos) & using the white balance tool ONLY can make a very noticeable improvement, but by using the color temp & tint sliders you can often hit what you're looking for in 15-30 seconds.
NOTE that I do use a monitor designed for editing photos & I've calibrated it's colors & brightness to match the output from my 2 printers (both are Epson so they should be much easier to do this to than if I had different brands of printers). I did my calibration by eye, using downloaded photos specific to the task. I did not use one of the commercially available tools because I read too many reports of people getting inconsistent results. I relied on my darkroom days & although it took some time to get it right it's dead on now.
 
A quick question - using photoshop, when do you make your color corrections, when opening the RAW file photo shop gives you the choices to adjust exposure, color ect before it opens the file.... is this where you make your changes, do you just load the RAW file and then make changes while editing or a combination of both?

There's an add-on for Photoshop that allows RAW processing prior to the usual image editing. Later versions of Photoshop may have this as standard (I still use CS2).

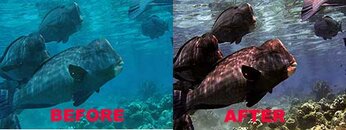
Here's my tutorial on quick photo editing (JPEGs/Processed RAW). It can achieve remarkable results:

5 Minute Photoshop Edit for Underwater Photographs - Scuba Tech Philippines


Attachments

  • Before-After-Edit.jpg
    Before-After-Edit.jpg
    17.4 KB · Views: 230
A simple point and shoot, i like the Canons Powershots or the Nikon Coolpix with thier housings. Easy little cameras that can do more than the average photographer. I also have strobes but have found unless it is a night dive I don't even carry them. Several years ago while on vacation I took the photo course from the house photographer. Best money I ever spent taking pics. He taught manners for taking pics in a group, and preached learning white balance. Get the camera, housing, a white baance card and learn how to use them and pratice good etiquette.
 
...
I did not use one of the commercially available tools because I read too many reports of people getting inconsistent results. I relied on my darkroom days & although it took some time to get it right it's dead on now.
Umm.. If people get inconsistent results with commercially available tools (like Datacolor - Global Leader in Color Management Solutions), that's down to user error or having monitors that simply cant produce correct colors..
What should be said however is that if you use a calibrated monitor and give the files to a photo lab for them to develop, you need to let them know that pictures ARE processed else they'll be run through the same post-processing software they would use for any other picture file they develop..

Visually calibrating your screen towards the printer can work as long as you only use your own setup, but the colors can potentially be way off what theire supposed to if you send them to a professional lab or others who use industry-standard calibrated equipment..
 
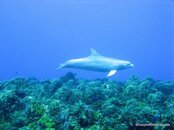
I haven't sent anything to the printers in years. I've done my own printing either wet or via computer / printer for a very long time so that's not a problem. Here's one of those shots where I was very thankful I was shooting RAW + jpg, and it's from last winters trip. This was taken on San Juan, at about 60 feet and my camera was in sleep mode when I saw a big fin on the other side of a ridge so expected to maybe see a shark. Out of almost 200 tanks in Cozumel this was the only day I saw a Dolphin (we saw 2 at a distance while doing our SI before the dive). I barely got the camera to wake up & had NO time to check the settings before having to take the shot & the moment I did it turned & headed away. The first shot was edited using Picasa which I use a lot, and I did the best I could before uploading it that night.

IMG_2569.jpg

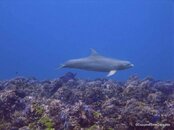
This is the shot after working with the RAW file at home which did most of what I wanted but I didn't think the Dolphin looked correct so after saving to a jpg I carefully selected just the dolphin & burned (darkened) the skin to match my interpretation of many photos I looked at on line showing them out of water, either partially or while jumping.

IMG_2569v5.jpg

To me it was worth the time it took to edit, and even though downsizing the file to web resolution removes some of it's glory I think it's a much better photo than the original jpg the camera produced. .
 
Here's my tutorial on quick photo editing (JPEGs/Processed RAW). It can achieve remarkable results:


Very nice!

What's the reason for adjusting the colors first using the channel mixer and then doing it through layers? Are they that different? I've always adjusted colors using just layers.
 
https://www.shearwater.com/products/teric/

Back
Top Bottom