MK5 - or something?

Please register or login

Welcome to ScubaBoard, the world's largest scuba diving community. Registration is not required to read the forums, but we encourage you to join. Joining has its benefits and enables you to participate in the discussions.

Benefits of registering include

  • Ability to post and comment on topics and discussions.
  • A Free photo gallery to share your dive photos with the world.
  • You can make this box go away

Joining is quick and easy. Log in or Register now!

@qwertz -
Could you post a photo of all the parts?

@Angelo Farina -
I see your point, the rods belong to Cressi balanced piston regs that have the yoke or din connector perpendicular to the reg body instead of inline.

But I think the image at BluTimeScubaHistory is mislabeled, everything I can find about the F3 shows it as an inline unbalanced first.
 
I say Beuchat, do not recall model number, but probably vs4
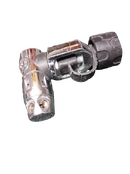
I have 2. Being DIN, you don't get the proud advertising from yoke knob to figure this stuff out.
Being able to adjust IP with this simple design is impressive to me.

20220513_171533-removebg-preview.png

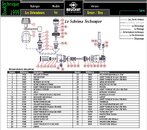
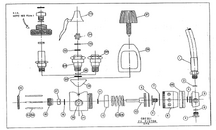
ETA: schematic
v4.jpeg
 
I say Beuchat, do not recall model number, but probably vs4
I have 2. Being DIN, you don't get the proud advertising from yoke knob to figure this stuff out.
Being able to adjust IP with this simple design is impressive to me.

View attachment 722423

ETA: schematic
View attachment 722424
Thanks for reminding me that Beuchat also produced MK5 Clones with the rod adjustment system, but the Beuchats were quite different from the outside, while Cressis look almost the same as SP MK5s, only from below you can see that the edge of the body is more rounded than the SP original, that's the only real difference from the outside I could find.
 
@qwertz -
Could you post a photo of all the parts?

@Angelo Farina -
I see your point, the rods belong to Cressi balanced piston regs that have the yoke or din connector perpendicular to the reg body instead of inline.

But I think the image at BluTimeScubaHistory is mislabeled, everything I can find about the F3 shows it as an inline unbalanced first.
The images on BlueTimeScubaHistory are taken from pages of the official Cressi catalog, so I do think they can be mislabelled:
CRESSI%20SUB%20catalogo%201987.jpg
 
The images on BlueTimeScubaHistory are taken from pages of the official Cressi catalog, so I do think they can be mislabelled:

The collection images are not from the catalogs. They don't even have the full 1987 catalog, just the cover.

But I did find a 1991 catalog image from Cressi's own site. https://www.cressi.com/easyUp/LifeStyle/history_advertising/cat_1991_f3_fx_fxpro.jpg

Here's a crop of the relevant section
Screenshot_20220514-092036-217.png


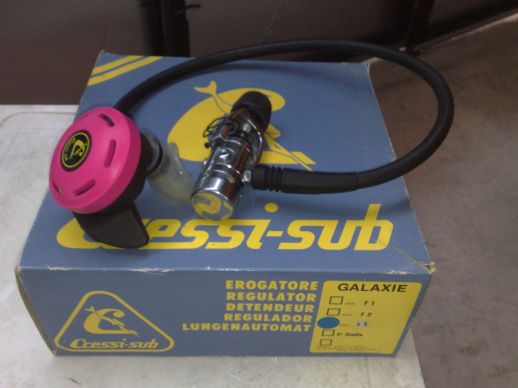
Also this is from an auction of an F3 Galaxie with box
sub_m_324916916.jpg
 
Well, quite a few responses. Thanks for the input everyone.
I am not exactly sure what @lowwall is referring to by "all" parts, since all parts are in that pic.

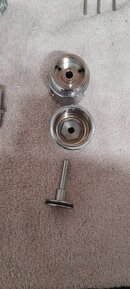
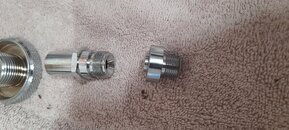
I made 2 more pics of - to me - interesting features, which is the piston itself and maybe the DIN-connector. Not seeable are a few o-rings aswell as the sim, swivel-nut and its o-ring.

I did not write down IP beforehand, since I was too afraid to simply hook it up.

The DIN connection sits perpendicular to the body, so the above referenced picture "F3" looks close af, but not quite. :)

The only question that remains to me - are there parts, that need to be replaced. I will dig into the cressi website, afaik they make quite a bit of information available to the public. Will keep all of you updated concerning its assembly.
@axxel57 seeing you are from central Europe, I case you really are interested in it, send me a PM. AFAIK I cannot use that 1st stage, due to the low temps in meh alpine lakes. Those few occasions I dive warmer water, I don't really require a dedicated stage.

_____
EDIT
Haha! Found sth! The attached schematic is, again, close but not quite right.
Differences to what I have:
Conical body instead of cylindrical.
Part 6b is missing.
 

Attachments

  • 20220514_190011.jpg
    20220514_190011.jpg
    81.7 KB · Views: 128
  • 20220514_190025.jpg
    20220514_190025.jpg
    76.5 KB · Views: 133
  • Screenshot 2022-05-14 at 19.23.51.png
    Screenshot 2022-05-14 at 19.23.51.png
    76 KB · Views: 142
I am not exactly sure what @lowwall is referring to by "all" parts, since all parts are in that pic.

The piston, filter and valve connection parts are what I was referring to.
 
The collection images are not from the catalogs. They don't even have the full 1987 catalog, just the cover.

But I did find a 1991 catalog image from Cressi's own site. https://www.cressi.com/easyUp/LifeStyle/history_advertising/cat_1991_f3_fx_fxpro.jpg

Here's a crop of the relevant section
View attachment 722527


Also this is from an auction of an F3 Galaxie with box
sub_m_324916916.jpg
I asked my wife, who was using one of these Cressi Galaxie while we were working in diving resorts, in the eighties.
Her memory is better than mine.
Here a photo of my wife taken (by me) at Ikoga, Felidhu Atholl, Maldives in April 1986.
You can see the yellow second stage and the balanced first stage with rotating turret.
ikoga.jpg

At the time this reg was not yet available in shops: our resort (Alimatha by Club Vacanze) had some sort of agreement with Cressi, who provided all the diving equipment. My wife was given some new equipment for beta-testing. This did include the new regulator and a new version of the Rondine Gara fins.
My wife recalls that this reg was called Cressi FX.
And effectively the F3 was instead the Cressi version of Scubapro MK2 (unbalanced), as you said.
So the first stage of the OP is a Cressi FX.
 
Cressi FX. Same as already posted by @qwertz above.
Not exactly the same reg as posted by the OP, but...
Nice thing is that o-ring sizes are posted.
FX.jpg
 
So I assembled everything - it took quite some time.

After the first assembly, the IP went way off the scale and after a couple of breaths and closure of supply pressure, the first stage started to leak lots of air from the ambient pressure holes.
I changed the Duro 90 O-Ring (#11 in rsinglers schematic) to a Duro 70 and after a couple of hours, the IP is solid without supply pressure.

As all of you mentioned, adjusting IP is a piece of cake with this 1st stage - highly comfortable.

Thanks everyone for helping!
 

Back
Top Bottom