Light Monkey - 10-24 LED w/ 10ah (2x 5ah) battery - user replaceable batteries?

Please register or login

Welcome to ScubaBoard, the world's largest scuba diving community. Registration is not required to read the forums, but we encourage you to join. Joining has its benefits and enables you to participate in the discussions.

Benefits of registering include

  • Ability to post and comment on topics and discussions.
  • A Free photo gallery to share your dive photos with the world.
  • You can make this box go away

Joining is quick and easy. Log in or Register now!

trimmatters

Registered
Messages
43
Reaction score
14
Location
Adelaide
As per subject line.

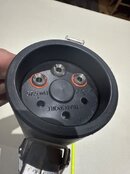
I've had my Light Monkey canister light since 2018, chopped the cable a few times and even replaced it once.

But... its starting to die.

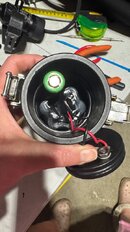
Are the batteries in the canister replaceable with the packs from the LM shop with a bit of effort? 2x $200 and some time is a little easier to swallow than $900 for a new canister (only).

I'm familiar iwth this one, I can field repair the cable, it works well with the rest of my kit. I dont want to buy an entire new light.

Thank you all
 
I just replaced the cells in a buddy's light. Won't be UN38.8 certified for air travel, but by the same token was easy to upgrade the cells from 12x 2600mah cells to 12x 3500mah cells. I reused the existing BMS chips in there. Took me about an hour and $80 for brand name Sanyo cells.

You will need a spot welder, some insulating bushings, nickel strip, and a soldering iron. You can get a home grade spot welder for about $100.
Nice one

Just so I don’t break anything in the tear down, confirming the need to … leverage? off this central cap/lid?
 

Attachments

  • image.jpg
    image.jpg
    164.1 KB · Views: 32
Nice one

Just so I don’t break anything in the tear down, confirming the need to … leverage? off this central cap/lid?
Pull the inner oring between the disk and the canister
then pull out that center plug in the disk
Reach through the center plug hole with a hook and pull the disk straight out
 
Reach through the center plug hole with a hook and pull the disk straight out
This bit is ... not playing nice.

Reach through the center plug hole with a hook and pull the disk straight out
This only gets me so far.

I can’t get a feel, nor look, at what’s preventing the disk from coming the last bit.

The tip of it is still recessed 5mm


Have tried various rattling and bumping techniques, which did produce some results before just.., stopping.

Is there any hard attachment?
 
This bit is ... not playing nice.


This only gets me so far.

I can’t get a feel, nor look, at what’s preventing the disk from coming the last bit.

The tip of it is still recessed 5mm


Have tried various rattling and bumping techniques, which did produce some results before just.., stopping.

Is there any hard attachment?
Did you remove the outer oring between the disk and the canister wall? You need to pull exactly perpendicular to the disk to remove it
 
Did you remove the outer oring between the disk and the canister wall?
I did, I did. Well, I'm looking at an o-ring and there's still the head one in place but I am absolutely questioning my life choices at this point.


You need to pull exactly perpendicular to the disk to remove i
yeah, I get this bit. I've using cir-clip pliers to pull straight out.

Even upside-down it just doesn't want to go past this last stop.

If anything, it feels a little stuck on the travel side, not the live plugs.


Round trip shipping from Aust to US is hugely unappealing, but so is killing the light - I like this one, I can field repair it, works well with my setup. And I'm not a fan of change :D
 
Can opened. Ignore the green battery it was for spacing perspective. There’s cardboard pieces in it. I didn’t have to try that hard to open it.
 

Attachments

  • IMG_2535.jpeg
    IMG_2535.jpeg
    143.2 KB · Views: 21
I did, I did. Well, I'm looking at an o-ring and there's still the head one in place but I am absolutely questioning my life choices at this point.


yeah, I get this bit. I've using cir-clip pliers to pull straight out.

Even upside-down it just doesn't want to go past this last stop.

If anything, it feels a little stuck on the travel side, not the live plugs.


Round trip shipping from Aust to US is hugely unappealing, but so is killing the light - I like this one, I can field repair it, works well with my setup. And I'm not a fan of change :D
You have to pull pretty firmly and work it out parallel to the canister axis. The oring you removed isn't the sealing ring that only holds the disk in place. The actual sealing ring is on the edge of the disk and provides some resistance
 
Thank you both - the visualisation and knowledge of that extra o-ring was key... to feeling comfortable to apply that much force.

Next question, just use the existing BMS and spot-weld in some new 18650s...

easy to upgrade the cells from 12x 2600mah cells to 12x 3500mah cell
Just swap them out, or it there other tricks required?

Thanks again
 

Back
Top Bottom