Ferei Light Head Build

Please register or login

Welcome to ScubaBoard, the world's largest scuba diving community. Registration is not required to read the forums, but we encourage you to join. Joining has its benefits and enables you to participate in the discussions.

Benefits of registering include

  • Ability to post and comment on topics and discussions.
  • A Free photo gallery to share your dive photos with the world.
  • You can make this box go away

Joining is quick and easy. Log in or Register now!

350xfire

Contributor
Scuba Instructor
Divemaster
Messages
1,014
Reaction score
38
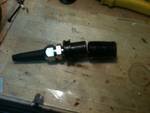
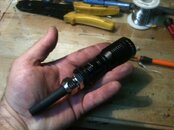
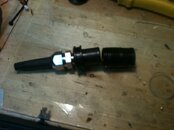
So thanks to DocEd, I took on a project to build a Ferei light head based canister light. Here is a picture of it taken apart. Turns out the reflectors screws off and then the LED/heatsink/driver assembly comes out of the top by unscrewing the whole assembly off. Overall, this is a really nice head.

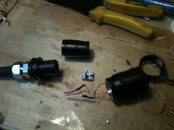
I think I burned up the driver so I will be replacing that as well as using the Cree XML in it.

I am waiting for some different metric O-rings to try out. Hopefully will be here tomorrow. Then we will all have the replacement size down.

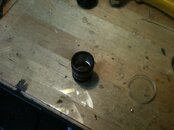
I machined a Delrin insert for the back of the barrel. The insert is pressed-fit and uses JB Weld to permanently hold in place. It has the M16x1.5 threads for the Agro gland.

Here is a pic of the light apart. Have some more pics coming.
 

Attachments

  • photo[1].jpg
    photo[1].jpg
    102 KB · Views: 503
Ah... there you go! I knew I was able to somehow remove the whole thing! :D

I like how that there's this separate "bulkhead" in the tail section of the cap that limits the amount of travel of the delrin plug.

I'd really like to see the XML/hall effect mod in this one :D
 
Here are the parts of the tail assembly. The tail was bored out to remove the internal metal present to hold the rear plug with screws. Delrin plug was made to be a friction fit and JB Welded on.
The tail has a groove for a snap and has M16x1.5 Agro threads.
 

Attachments

  • Tail assembly.jpg
    Tail assembly.jpg
    3 KB · Views: 390
A few more pics. I will hopefully get my sample o rings today to see if they work.
 

Attachments

  • All Parts.jpg
    All Parts.jpg
    85 KB · Views: 165
  • Bored Barrel.jpg
    Bored Barrel.jpg
    96.2 KB · Views: 148
  • Full assembly mock up.jpg
    Full assembly mock up.jpg
    95.5 KB · Views: 191
  • Tail and Delrin Insert.jpg
    Tail and Delrin Insert.jpg
    80 KB · Views: 158
Thanks... I wish I had not fried the driver messing with it though... That will give me a chance to replace it with one that can take 7.4 volts though. This way I can use one of my standard battery packs and not have to make 3.7 volt packs.
 
Did you get to try out all the neat features that driver had though?

- High setting
- User settable "low" light (reason I thought it was a PWM driver)
- 5 different blink modes

I like the "low" feature because it allows me to extend battery life :D
 
Did you get to try out all the neat features that driver had though?

- High setting
- User settable "low" light (reason I thought it was a PWM driver)
- 5 different blink modes

I like the "low" feature because it allows me to extend battery life :D

No, didn't get to try that. All I got it to do was high low and off... Didn't know it could do the other stuff. I just got the head with no instructions or anything.
 
Really nice. I like the groove for a boltsnap tie-in. Slick indeed.

Henrik
 

Back
Top Bottom