By popular demand (that means one or more requests)
Material needs to be heavy duty. 1000 denier Cordura nylon is good
7” closed end heavy-duty zipper
Velcro: ¾” lengths or 2” lengths
¾” to 1” webbing.
Plastic handle – piece of cutting board works well
D-ring (optional)
Go back and forth over the end of all seams. This needs to be strong.
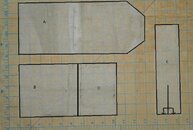
Step one: cut out the pattern pieces as shown. Please note the long skinny piece (C) is cut on a fold – you see only ½ of a continuous piece. ½” seam allowance is included. Note the vertical line on the long skinny piece at the fold. That is the cut line for the zipper opening. This makes one pocket, you will need a minimum of two.
Step two: Cut a skinny rectangular opening along the cut line on piece C. Make it just big enough to expose the teeth on the zipper. Sew the zipper in, and finish that edge with a zig-zag stitch over the exposed fabric edge
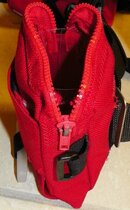
Step three: Cut 2 3” lengths of webbing and sew them to the short straight edge of piece A. These make the belt carriers. Use at least 3 tripled seams. If these rip out you lose your weight and pocket.
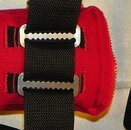
That is why it is 2 carriers. Make sure to leave enough room for your seam allowance and a little space as shown. I use a retainer on both carriers for security and stability.
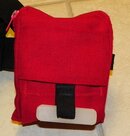
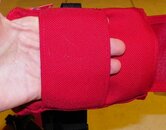
Step four: Fold the long edge of piece D over by ½” and sew down. Zig-zag the exposed edge. Repeat on the other long edge. Sew a 2” strip of velcro (or sew 3 parallel ¾” strips) on piece B about ½ way down. Cover the velcro with piece D and sew the raw edges to piece B. You will have the velcro covered by piece D with both ends open.
Step five: Mark the center of A (short straight edge), B (unsewn edge), and C (center of long edge). Pin and sew (matching center marks) of part A to C, then pin and sew the remaining 2 sides of A to C. Next do the same with B to C. Do the center section first. You will end with 3 seams (up, over, down). At this point you will have something that looks like this (without the visible velcro or handle and web). If you want the optional D-ring this step is the time to install it. Incorporate the D-ring on a small loop of web into a side seam. Make a left and right for your pair. The zipper goes on top when wearing them. The D-ring isn’t used if mounted on a weight belt, but stabilizes the pocket if mounted on the waist strap of a backplate. Finish all seams with a zig-zag stitch along the raw edges. Lastly fold over all the unsewn raw edges and sew them with a straight and zig-zag stitch.
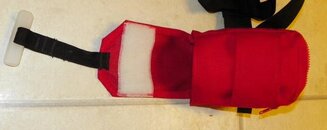
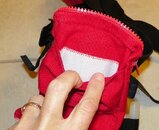
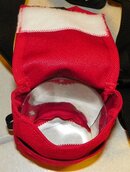
Step six: Add the 2” strip of velcro (or 3x3/4”) on the flap and sew in the release handle. Make the release handle just long enough so the plastic handle sits just below the cloth tunnel. Sew the strap on in such a way that pulling on the handle peels the flap outward and down thru the tunnel. I used fuzzy on the flap and rough in the tunnel. Insert a piece of stiff plastic sheet in the pocket to allow the weight to slip out easily. Shown is a segment of plastic instant coffee container that was cut lengthwise to fit. My other pocket has a piece of flexible cutting board rolled into a tube and inserted.
Step seven: Mount the pocket with the zipper up and flap down. Push the flap up the tunnel (fig 1) – putting your fingers between the velcro helps – and bring the release strap/handle back through so the handle sits just below the tunnel (fig 2).
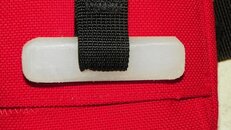
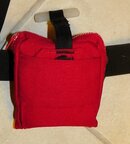 fig 1
fig 1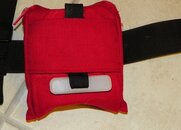 fig 2
fig 2
Enjoy.
I started with my pockets on the BP harness. This leaves me very buoyant and the rig barely floating. Now I wear a belt under my harness - that's why they had to be ditchable. Actually after dropping the belt when exiting my rig for a boat entry the belt now has suspenders. Each pocket will hold a coated hard 5# and 3# weight. The hard weights drop better, especially without the plastic insert.
Material needs to be heavy duty. 1000 denier Cordura nylon is good
7” closed end heavy-duty zipper
Velcro: ¾” lengths or 2” lengths
¾” to 1” webbing.
Plastic handle – piece of cutting board works well
D-ring (optional)
Go back and forth over the end of all seams. This needs to be strong.
Step one: cut out the pattern pieces as shown. Please note the long skinny piece (C) is cut on a fold – you see only ½ of a continuous piece. ½” seam allowance is included. Note the vertical line on the long skinny piece at the fold. That is the cut line for the zipper opening. This makes one pocket, you will need a minimum of two.

Step two: Cut a skinny rectangular opening along the cut line on piece C. Make it just big enough to expose the teeth on the zipper. Sew the zipper in, and finish that edge with a zig-zag stitch over the exposed fabric edge

Step three: Cut 2 3” lengths of webbing and sew them to the short straight edge of piece A. These make the belt carriers. Use at least 3 tripled seams. If these rip out you lose your weight and pocket.

That is why it is 2 carriers. Make sure to leave enough room for your seam allowance and a little space as shown. I use a retainer on both carriers for security and stability.


Step four: Fold the long edge of piece D over by ½” and sew down. Zig-zag the exposed edge. Repeat on the other long edge. Sew a 2” strip of velcro (or sew 3 parallel ¾” strips) on piece B about ½ way down. Cover the velcro with piece D and sew the raw edges to piece B. You will have the velcro covered by piece D with both ends open.
Step five: Mark the center of A (short straight edge), B (unsewn edge), and C (center of long edge). Pin and sew (matching center marks) of part A to C, then pin and sew the remaining 2 sides of A to C. Next do the same with B to C. Do the center section first. You will end with 3 seams (up, over, down). At this point you will have something that looks like this (without the visible velcro or handle and web). If you want the optional D-ring this step is the time to install it. Incorporate the D-ring on a small loop of web into a side seam. Make a left and right for your pair. The zipper goes on top when wearing them. The D-ring isn’t used if mounted on a weight belt, but stabilizes the pocket if mounted on the waist strap of a backplate. Finish all seams with a zig-zag stitch along the raw edges. Lastly fold over all the unsewn raw edges and sew them with a straight and zig-zag stitch.


Step six: Add the 2” strip of velcro (or 3x3/4”) on the flap and sew in the release handle. Make the release handle just long enough so the plastic handle sits just below the cloth tunnel. Sew the strap on in such a way that pulling on the handle peels the flap outward and down thru the tunnel. I used fuzzy on the flap and rough in the tunnel. Insert a piece of stiff plastic sheet in the pocket to allow the weight to slip out easily. Shown is a segment of plastic instant coffee container that was cut lengthwise to fit. My other pocket has a piece of flexible cutting board rolled into a tube and inserted.
Step seven: Mount the pocket with the zipper up and flap down. Push the flap up the tunnel (fig 1) – putting your fingers between the velcro helps – and bring the release strap/handle back through so the handle sits just below the tunnel (fig 2).

 fig 1
fig 1 fig 2
fig 2Enjoy.
I started with my pockets on the BP harness. This leaves me very buoyant and the rig barely floating. Now I wear a belt under my harness - that's why they had to be ditchable. Actually after dropping the belt when exiting my rig for a boat entry the belt now has suspenders. Each pocket will hold a coated hard 5# and 3# weight. The hard weights drop better, especially without the plastic insert.


