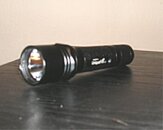
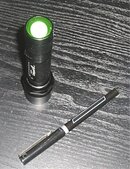
This is a light I came up with as an experimental test (dive) light. The first picture is of the front and the second is of the tail with a pen in the picture for size reference. They are not great pics but perhaps are adequate since you can't really tell much about what I've done from pics anyway.
In the second picture it looks like you are looking at a green light but it's actually just a glow in the dark switch cover I used. When I took the picture the flash made it look more like a light.
This light costs no more than $25 or so to make, it runs on (1) 18650 li-ion cell (rechargeable). I've tested it down to 100 fsw. This is not a perfect light in that after a certain depth you can't turn it off. Around here that isn't a problem however.
If I continue experimenting with it I'll address the always on issue. You can turn it off and use it as usual when not in the water of course.
I already have plenty of dive lights so this was to test a few concepts. I like the idea of having small lights that can be mounted hands-free whether using an Oxycheq Softsock or a homemade version that is similar. I like the idea of taking a stock light and by choosing the right one having to modify it as little as possible.
I've been a little more cautious this time around with the experiments only because the parts I use while not expensive take forever to obtain (Hong Kong).
This light looks stock even after the changes and in fact I intend to mainly use it as a non-diving flashlight after I test it in the water a few more times. It is an exceptional light in its own right as a general purpose flashlight.
It outputs 325 lumens (emitter specs so no guarantees there) on high, 120 lumens on medium and 3 lumens on low. I've replaced the standard tail switch with a momentary switch that clicks to the "on" position as well.
This means that water pressure turns it on and not off. I removed the lens retaining ring from the head, took out the glass lens (very thin and no room for a thicker one so 100 fsw is all I'm going to test this one to) and added a 30 mm o-ring to the ledge on which the lens rests. I then put everything back together.
As mentioned I took apart the tailcap and replaced the standard switch with a "forward clicky" switch. It wasn't an exact replacement part but once it was installed the stock switch retaining ring held it firmly in place.
Before finishing up that I popped out the tailcap cover and replaced it with a green GITD version. I added some marine grade silicone sealant to the top surface of the tail cap flange. This is the surface that would mate to the inside of the tail of the flashlight. The threaded washer retaining ring applies pressure from the inside as well. I put a little in the hole that the cover button pops through too.
This was it! The light was $23 plus battery ($4) and a couple of dollars worth of silicone sealant, o-ring, tail cap button (not necessary) and a $2 switch replacement.
The light uses a Cree XP-G R5 led rated to output 325 lumens with a current draw of 1A.
I tested another small non-dive light earlier (last year) where I had to make a few more extensive modifications...made the tailcap solid with epoxy and used a lot of sealant in front of and behind the lens with a similar result. That light went to 100 fsw as well.
So, in effect I'm collecting data points (experience) with exactly what causes lights to flood and what isn't a big problem. I picked this light because there was a ledge for the lens to rest on among other reasons. I simply had to add an o-ring and deal with the switching method and with sealing.
FYI-the are two small holes in the side of the tail cap so you can fashion a way to attach a boltsnap or lanyard.
Another reason I picked this light is that led "drop-ins" are commonly available. If I decided to replace the XP-G led with a smaller beam but one that might punch through limited viz waters a little better I could do that as well for the cost of an $8 drop-in.
Future improved led's could be easily added this way.


