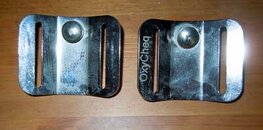
Show N Tell DIY Back Plate.
Show-n-tell DIY plates.
View attachment 132023 (Round 1, SUS304 Wins)
View attachment 132024 (very nice crisp but sharp angles from laser cutting)
View attachment 132025 (small radius causes some burns, but can be removed manually or chemically)
View attachment 132026 HEY wheres the wingnut? Oh wait, I like this better.

Credits: Design based on HUW's H-plate and Schematics by edthesped.
Backplate material: 3mm stainless steel SUS304.
Units: I made the design using metric units instead.
Cost: USD40.00 per piece (material & laser cutting)
Excluding: transport, hand & power tools which I already have sitting around in my workshop and USD100 for sandpaper

j/k.
What I have done thus far: Laser cut the the slots and hole and plate profile. While idling, manually turned 10pcs of knurled threaded knobs to replace those wingnuts for attaching the STA (for M8 & M10 x 30mm thread carriage bolts.)
What to do next: Round out all edges, Apply fine hairline finishing, bend the plate (waiting for the brake die as the one I have would not clear the bend required), more finishing to cover all scratches & bend marks, try it out, make changes to schematics if any, load and share the schematics.... AND gloat about it.
The story:
In short SS Backplate 1 : 0 Sand paper
Q: Why SS back-plates costs more than Ally back-plates when: Aluminum material (up to series 6) is cheaper than Stainless steel (up to 304 or even 310)
A: Well, the aluminum is very easy to work with compared to SS (Stainless steel), ESPECIALLY the finishing details. - This is especially true for DIY projects. For Stainless steel, the process is slower, longer & costlier.
Q: What are ways to fabricate the back-plates; DIY style and Mass Manufacturing pro style.
A: DIY'rs -
For SS plates;
>>The best way, if you have the patience AND the means >>> CNC Mill/Center. This process is tedious and slow, but the finish product requires much less finishing, noting that the CNC mill can at the same time bevel/chamfer all edges. (only find out this when I asked my machinist for advice on how to make smoother edges on my already-laser-cut SS plates)
>>The 2 other ways are by Laser cutting & waterjet cutting. I was told that waterjet cutting leaves slightly serated edges due to the 3mm plates being not heavy enough to give a steady cut. Perhaps the waterjet cutters around here is a bit outdated, maybe the newer waterjet cutters can get it done better. Laser cutting leaves burn marks on some edges (especially small radius). Both the said method will need additional work on deburring the sharp edges (especially webbing slots).
For aluminum plates:
>>The same methods for SS plates will work, addtionally; you can ghetto it by working the material with some woodwork tools. Just spend more time with the sandpaper to make the end product look just as good.
- To smooth edges, Working with Stainless steel, I have tried sanding it down alone, using a diamond file, which failed miserably as you can see how the sandpaper wore out after working on 2 slots. The more effective way was to use a pneumatic/electrical/dremel die grinder with a fine conical stone and then sand it down with some paper. As for aluminum plates, the sandpaper alone will do the job. For the circles and the round corners, just wrap the sand paper around a small pen. Or if it is available to you, go with the big boys and pop them into the tumbler!
The mass producers -
Mass produced plates are most likely laser cut OR, for an order of 2000 pcs or more, it can be die/mold stamped (stamping can be done by slot/hole stamp then shape forming stamp, forming stamp will replace the bending using press brakes). This is due to the heavy initial investment of the mold/die cost, otherwise these 300 ton punch machines and press forming like those I have sitting around my workshop will spit out a piece of backplate every minute. Then of course, it will be popped into the tumbler for smooth finished edges.
Q: How to bend the plates
A: Hydraulic manual or CNC press brakes. Or you can try a manual hand brake... havent tried that myself, wont know if it works.
Q: What cosmetic finishing can be done?
A: Aluminum & SS can be brushed with fine sand paper for hairline finishing (it takes some practice to get it even.) Or if it is conveniently available, they can be Powder Coated, Electro-Chromed or Gold plating (if that floats your boat), Electro polishing looks awesome on Stainless Steel. Similarly, anodizing aluminum plates can be very attractive option as well. Power coating & Anodizing provides the widest options for color. I have yet to find a printing method which do a good job, otherwise, I'd be tempted to paint my plate camo-style

Hope you DIY'rs thinking of making your custom plates find this useful. Below find glossary to some of the things/terms used.
HUW H-Plate:
H-Plate
Die grinder:
http://2.imimg.com/data2/XG/FP/MY-697332/die-grinder-35000rpm-250x250.jpg
CNC Mill:
http://www.automation-drive.com/EX/05-14-14/haas_01.JPG ,
http://upload.wikimedia.org/wikiped.../220px-Makino-S33-MachiningCenter-example.jpg
Laser cutting:
http://subconlaser.co.uk/wp-content/gallery/2axisgallery/cnc_laser_cutting-2.jpg
Waterjet Cutting:
http://upload.wikimedia.org/wikipedia/commons/4/4f/5-Axis-Waterjet-Cutting-Head.jpg
Hydraulic Press Brake:
http://image.made-in-china.com/2f0j00OBgQWYvFfsbi/Hydraulic-Sheet-Metal-Press-Brake-WC67KJ-.jpg
Press Brake Mold/Dies:
http://www.lulusoso.com/upload/20120310/CNC_Press_Brake_Dies.jpg
Manual Hand Brake:
http://www.robotshop.com/Images/big/en/bac-40-tabletop-manual-metal-bending-brake-tool.jpg
Metal Punch/Stamp:
http://www.cannonind.com/images/capabilities_metal_stamping_300.jpg
Hairline Finish:
http://steelmaster.info/uploads/user/images/Hairline2.jpg
Aluminum anodizing:
http://www.matweb.com/reference/images/AnodizeParts.jpg
Electro Polishing:
http://www.masterfinishco.com/images/Image_1384-200.jpg
Electro plating:
http://media-3.web.britannica.com/eb-media/39/99539-004-C85C2A96.jpg
Vibra Tumbler:
Holley Restore Tumbler Photo 3
Small Tumbler:
http://1.bp.blogspot.com/_XczW3pZVfPc/TSXp__sxmYI/AAAAAAAABeU/Rlx4EhqgdWM/s1600/100_9640.jpg (wont work for backplate though)
-- -- -- -- -- --
 any comments on this?