Constructing a cheap UW video light...

Please register or login

Welcome to ScubaBoard, the world's largest scuba diving community. Registration is not required to read the forums, but we encourage you to join. Joining has its benefits and enables you to participate in the discussions.

Benefits of registering include

  • Ability to post and comment on topics and discussions.
  • A Free photo gallery to share your dive photos with the world.
  • You can make this box go away

Joining is quick and easy. Log in or Register now!

Guba
I can help you to build a pcb board with high power leds if you want to, I live in Fort Worth so it will be easy to try...

---------- Post added November 21st, 2012 at 09:51 AM ----------

you can also do this

Polymer Optics 7 LED Cluster 50° Optic

Cool White (6500K - 1540 lm), 7 LED CoolBase Assembly

then you have to use this driver
700mA, Externally Dimmable, FlexBlock Wide Range DC Driver - With Leads

and a good lipo battery

1540 lumens on a 50 degree angle !!!!!!

expensive but maybe worth it...
 
Last edited:
All on the plexiglass/Acrylic question. Keep in mind that plexiglass is acrylic. My other hobby is Marine aquariums and I make my own tanks and sumps, for a project like this I would recomend finding a supplier that sells cell cast acrylic. what you find in the home improvement stores is extruded acrylic. The reason is twofold, Cell cast is stronger and it's make up also makes it more impervious to heat. because of the second quality it is easier to machine i.e. doesn't clog blades when cutting and tooling as fast since it's melting point is higher. Another advantage if you have a supplier near you is a piece big enough to cover a 3" pipe cap very likely may come out of the scrap bin for very little change possibly even free.
almost forgot to add I have flame polished a lot of acrylic it is fast and easy to do, however I would not recomend doing that to the surface sealing against the o-ring just the outside edge for a clean appearance. the reality is you are melting the acrylic, leave the torch in one place a little longer than another etc.... and your surface would no longer be flat. :)
 
Last edited:
...for a project like this I would recomend finding a supplier that sells cell cast acrylic. what you find in the home improvement stores is extruded acrylic.
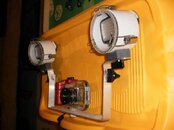
Yup, cast acrylic is what I used. Easily obtained from a variety of sources (on the internet, anyway...) Thanks for your input!
 
Hi Guba, great design. Where did you get the LED array? Also, you said no piercings of the housing - how are the clips held to the housing? How warm does your unit get?
 
Hi, philba I got the LEDs from Sima, through Amazon. They are just plain video lights and they are very inexpensive...about $20-30. The clips are, indeed, held in place with two short, wide-thread screws each. However, they are not long enough to penetrate the housing wall. It's close, but the integrity of the housing is intact. I've taken some readings with an IR thermometer, and even after running the lights for ten minutes, there was only about a degree Celcius increase in the interior temperature of the housing. I thought that was pretty remarkable, and usually, the ambient temperature of the water should help to keep things cool. Well, except for those trips to the Gulf of Mexico in the sunner...water is about 85 degrees Fahrenheit! Hope this helps.
 
I know my reply is late, but what were you using for the power source? If possible could you post a picture of the wiring? I love the look and size of this light, nice job!


Sent from my iPhone using Tapatalk 2
 
So no heat sinking needed for these leds?

I like the look and the simplicity.
 
Aquabot, sorry for the slow reply...been hectic here (I need to go diving!)

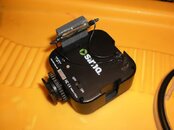
The power source for my two lights is totally internal. While the LED arrays are nearly identical, one unit has an internal battery that has to be charged through a typical charger connection. The other has a removeable rechargeable battery. On both units, I simply removed the backplate (a few screws hold it on) and spliced into the wires going to the switch. I drilled a small hole in the units side, fed the wires through the hole and attached them to a reed switch. I made a small mount for the reed switch that attaches the unit and places the reed switch very close to the housing wall. In this way, the magnet on the outside of the housing is assured of triggering the reed switch when the magnet is moved into the proper position.
To me, it's a simple elegant solution to the problem. However, only time and experience will tell if it truly works. Like I said, I NEED TO GO DIVING! C'mon, warm weather!

Here are a few pictures. Hope they help.
PICT0437.jpgPICT0440.jpg
 

Back
Top Bottom