In the meantime (because I'm struggling to find second hand strobes), I'll go without strobes
For what it's worth, SeaFrogs SF-01 (about $360 on Aliexpress) seems to be working mostly as advertised.
Welcome to ScubaBoard, the world's largest scuba diving community. Registration is not required to read the forums, but we encourage you to join. Joining has its benefits and enables you to participate in the discussions.
Benefits of registering include
In the meantime (because I'm struggling to find second hand strobes), I'll go without strobes
Interesting, didn't know about this model! But I'll probably wait until there are more reviews/feedbackFor what it's worth, SeaFrogs SF-01 (about $360 on Aliexpress) seems to be working mostly as advertised.
Interesting, didn't know about this model! But I'll probably wait until there are more reviews/feedback
A15
white: 15x Cree XM-L2[*], seller claims 20000 Lm
red: 6x Cree XP-E N3, seller claims 720 Lm
violet: 6х (?), 390 nm
Disclaimer: these torches are bad, they're cheap for several reasons! Unreliable, very short lifespan, bad manufacturing, lacking attention to details. Only advantage in buying them is they're cheap.
That's my humble opinion on what I've personally experienced. People may disagree.
Anyway, one of the ones I own stopped working (in such a similar way as others report, here too) and instead of throwing it away I tried (and succeded) in reapairing it. This may help someone. Here's how.
I'm talking about the A15 model, as mentioned in the starting post. I suppose other models are very similar if not identical.
The culprit seems to be the internal pcb which is not fixed in place, it rotates when you close the battery case and tears the wiring inside.
The details follow.
First sign of failure was the coloured leds not working. After a short time (I'm talking minutes) the white leds stopped working also.
The torch didn't flood nor did the buttons show any sign of damage.
I opened the battery case, removed the round metal spring holding the pcb in place and immediately saw the wiring connecting the main pcb to the external ones (those inside the front case, where buttons and leds are mounted) being torn apart (not all, just a few ... well, several!).
It seems like the rounded metal spring holds that pcb in place but doesn't stop it from turning when you close the battery case, like ... you screw the case (with the batteries inside) and because of friction the batteries' + pins force the pcb to rotate with it a bit. You repeat the process several times and the pcb rotates so much that it breaks the wiring hidden behind it.
View attachment 676803
2x4 small black wires connect the main rounded pcb to the front casing where leds and buttons are mounted (from point B to point C).
Those are so tiny that cannot hold the stress and become loose after a while (see floating wires on A).
Other 4 biggish wires (red and black) survived the stress. I guess they provide current to the LEDs.
I simply soldered back the tiny wires and everything works again. No LEDS has been harmed in the process
You need steady hands, but if you're used at soldering it's not that difficult, it's not like SMD or similar.
In order to prevent the same from happening again I placed a small plastic thingy inside the oval notch on the PCB (point X), where it aligns with underlaying rounded notch on the casing (point Y), hoping it will stop the PCB from rotating again under the mechanical action of the batteries. It's not a fool proof solution, I will try and block the PCB in a more definitive way in the future, but at the moment it works.
View attachment 676804
Thanks for the reply. I think following your advice I will take two D15DVP, for 110eur each I can't really go wrong. The battery format is annoying but there are ways around it
Diving in Malta in a few weeks, I'll let you guys know how they perform (if they arrive on time !!)
Out of 3 lights, all of them were actually superglued so that they wouldn't rotate. Makes disassembly a pain, but prevented that issue. The reason I disassembled was to replace the switches with piezoelectric ones from here:It seems like the rounded metal spring holds that pcb in place but doesn't stop it from turning when you close the battery case, like ... you screw the case (with the batteries inside) and because of friction the batteries' + pins force the pcb to rotate with it a bit. You repeat the process several times and the pcb rotates so much that it breaks the wiring hidden behind it.
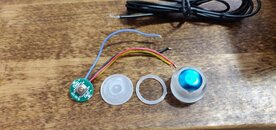
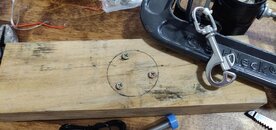
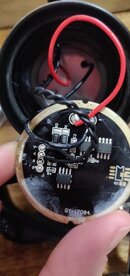
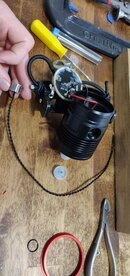
So I've got some similarly designed lights:
33.19US $ 41% OFF|BORUiT 5*XM L2 LED Scuba Diving Flashlight 6000LM 3 Mode Diving Video Photography Torch Underwater 80M 18650 Spearfishing Light|LED Flashlights| - AliExpress
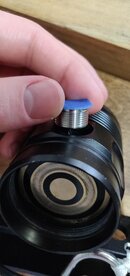
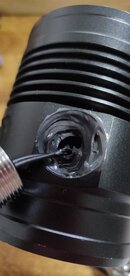
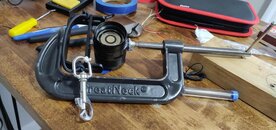
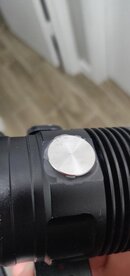
Out of 3 lights, all of them were actually superglued so that they wouldn't rotate. Makes disassembly a pain, but prevented that issue. The reason I disassembled was to replace the switches with piezoelectric ones from here:
piezo switch 16,19,22mm PS series (I contacted customer support, they shipped me 2 switches for like 20 dollars freight cost)
OR
https://www.amazon.com/ONPOW-Momentary-Waterproof-Stainless-PS161P10YSS1/dp/B07SLWV8XY/
Removing the first (crappy) switch is easy if you have the right tool. I've got some cuticle clippers, which were sufficient. For all of these lights, you can jerryrig a fixture to open up the fronts. Not needed for switching the light switches, but if you need to re-solder better wires to the actual LEDs, you'll want to have that. In that third picture you can see the telltale white marks of the superglue. The piezoelectric switches were a smidge on the small side (I don't think there are any available that will fit the diameter of those threads, so I used marine J-B Weld to fill the gap (it only should theoretically need to withstand 100ish psi). The switch itself works flawlessly, and I love it. No leaks or anything out of the switch port.
View attachment 678353 View attachment 678354 View attachment 678355 View attachment 678356 View attachment 678357 View attachment 678358 View attachment 678359 View attachment 678360
I'm considering retrofitting/selling a batch of these particular ones if there is any interest.
Exactly my frustration. I think that a lot of stuff in scuba is overpriced with the excuse that "your life depends on it" when that simply isn't true for most equipment. Hell, I'm even comfortable with higher failure rates in lights, I'll just use a portion of the saved money and get a 4th light.On the one hand, I wish the factories, who are definitely capable, simply make the lights of better quality, and I am happy to pay even 2x the price.
At the same time, I think most of the brand name lights 10-20x the cost are definitely overpriced with insane margin.
And to reiterate, I'd really be happy making a batch of 10 or 20 of these and selling them for like a hundred-something bucks apiece, complete with hard goodman handle and accessories. They work really well in caves for reasonable penetrations (somewhere around 2 hr burn time at highest setting). I'm not in it for the money, and would document everything (where the parts are from, retrofitting, etc) transparently.I'm considering retrofitting/selling a batch of these particular ones if there is any interest.
