1st time reg rebuild questions...

Please register or login

Welcome to ScubaBoard, the world's largest scuba diving community. Registration is not required to read the forums, but we encourage you to join. Joining has its benefits and enables you to participate in the discussions.

Benefits of registering include

  • Ability to post and comment on topics and discussions.
  • A Free photo gallery to share your dive photos with the world.
  • You can make this box go away

Joining is quick and easy. Log in or Register now!

Rainh2o

Registered
Messages
22
Reaction score
0
Location
Grand Rapids Michigan
# of dives
25 - 49
I recently bought a couple of what I found out to be TUSA Liberator 1st stage regs for 15 bucks at a yard sale. I figured this would be a great couple of learning regs to learn and understand repair on before tackling my good reg next year. Having the shop do it just drives me nuts since I do most every repair on everything else I have ever owned. I would like the knowledge that it is being done properly and no shortcuts...and maybe gain 2 more decent regs in the process...anyhow...

The TUSA's are balanced piston type and seemed to work OK but I did not dive with them or take any pressure readings yet. I know I need to get a gauge to measure the IP pressure still yet but I wanted to take one apart and take a look. Actually it looks real clean.

3 questions,

1) I understand TUSA wont sell kits to anyone but dealers, but is there another brand of regulator that has the same parts inside I could use? (Mainly seats)

2) There is a small O-ring inside the hole where the piston shaft passes through, I could get it out with a pick but how do you get them back in without damaging them? Do I need to get a special tool?

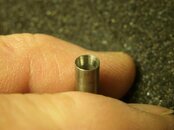
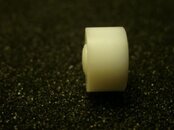
3) The seat on one I took apart looks OK but it has a small raised dimple on it in the middle where the piston lines up with and seals against. The inside of the piston has a tapered edge to it. Does the replacement seat have to have the same dimple or will a flat seat work in its place? (I'm thinking not?)


I didnt take the seat out of the other one yet, and prob wont unless I discover it has creep, I took the first one apart to confirm what it looked like and what parts may be inside.

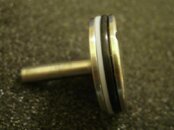
If it helps identify what other kits may be useable from another clone, there is one o-ring on the piston along with a small plastic ring, an 0-ring inside the piston shaft hole (inside the main body), an o-ring under the seat and then 2 large O-rings, one on the LP section and one between the LP section and swivel head. The last pict is the end of the piston.
PICT0040.jpgPICT0037.jpgPICT0041.jpg
 

Interesting looking HP seat. Scubapro now uses one with a concave dimple. I believe it helps reduce noise compared to the flat seat. Perhaps the convex dimple does the same thing. In any case, the old, flat SP HP seat was 1/2 inch in diameter and just a hair under 1/4 inch tall. If your is those same dimensions, then a generic flat seat may work. Scubapro uses a 2-010 o-ring on the piston shaft. I expect many BP 1st mfgrs use the same size. So measure yours. A -010 is 1/4 inch OD, 3/8 inch ID and 1/16 wide. Installation is a bit tricky. I start by turning it into a figure 8 to get it started in the hole and then use soft dowels to move it into place in the o-ring groove. Be very careful with a sharp metal pick as a scratch on the sealing surface of that groove will cause an irreparable leak. You really need a few tools like the IP gauge and a bullet tool to install the piston past the o-ring without cutting the o-ring. The "knife edge" on your piston looks to be rounded enough that you may well not need the bullet tool. You would be much better off doing a little research and reading before disassembly and assembly.
 
Thanks awap...I was going to order the book from airpress on the subject for sure this week..and I will invest in the bullet tool as well. I have not probed around on it with any metal tools for fear of screwing something up so no scratches yet...I was worried about getting the small o-ring in and out so I left it alone, just looked. I blew the seat out with my air compressor nozzle. I will measure it and post the dimensions tomorrow. Thanks Again!
 
Re: 2) "Orange sticks" which can be found in a drug store work nicely for pushing o-rings into place. They are wood so you are not at risk of scratching a sealing surface. You can put the o-ring in the end and then work around and down until you are seated in the groove.
If you do scratch something maroon scotch brite can take them out at least on accessible surfaces.

Re: 3) The high pressure seats I have used are flat, so flat is a possibility.

If you have a local shop that is a Tusa dealer try to develop a relationship with them. They may sell you factory parts. It helps if you sound like you know what you are doing before going in asking for parts however. To that end a read through one of the two regulator maintenance books is worthwhile.

You are already taking photos which is good. Take more. Take photos every step of the way.
 
Mr. Carcharodon, Orange Sticks: is this what you are referring to? Seems like a clever idea.
Orange Wood Stick Cuticle Pusher Manicure Lot of 144 - Nail Supply - 1780

There's a good chance a MK 5 service kit will have the seat, filter, o-rings etc you need to service that puppy, if not it's only $15
Shop Online

The MK 5 schematic can be found under the kit info in the link above.

One more small detail. When you replace the piston stem o-ring, use a duro 85 or 90 (will be in kit)


Welcome to the Dark Side, good luck & please keep us posted.
 
+1 for the Scubapro MK5 kit: see this thread Brother couv just dug out.

Regarding your question #2, I use a pick made of a piece of brass rod to get it out, and a chopstick to push it back in. It takes a few tries and a good assortment of unpublishable vocabulary to get it right, but at least it's easier than the MK10 where the o-ring keeps falling out because the "passage" is shorter. Use a lot of lubricant.
 
I am an aviation electronics tech (component level chip component troubleshooting) by trade so being careful with small delicate parts is what I do best...plus I get to use a nice high power scope at work to take a look at the parts for damage...which I plan on doing the end of the week. Pictures are worth a thousand words if you take something apart your not sure of. Going to order my book tomorrow since I get my overtime check. I was reading on other part of the board about making your own bullet tool and may give it a try, doesnt sound too hard. I need to order a gauge and fittings before I start though, and read through the book. I'll order a MK 5 rebuild kit as well to get me started off.

Do I need to order the special socket to fit in and under the yoke to get the large nut off or is that something that normally isnt serviced unless its leaking?

Also is an ultra sonic cleaner the best way to go or just plain vinegar and elbow grease? I may have access to a cleaner at work in the machine shop, I'll have to check and see what they use as a solvent and if I am allowed to use it after hours.

The closest dealer I saw that does TUSA around here, I have never been in so I'm not sure if they would even consider selling to someone off the street...I may wonder over there this weekend and feel them out though.

Thanks for all the help so far!


---------- Post added April 3rd, 2012 at 06:19 PM ----------

I also measured the seat...Its 7/16th x 1/4 of an inch
 
Last edited:
Do I need to order the special socket to fit in and under the yoke to get the large nut off or is that something that normally isnt serviced unless its leaking?

Also is an ultra sonic cleaner the best way to go or just plain vinegar and elbow grease? I may have access to a cleaner at work in the machine shop, I'll have to check and see what they use as a solvent and if I am allowed to use it after hours.

I also measured the seat...Its 7/16th x 1/4 of an inch

Homemade yoke nut socket is pretty easy. Start with a Craftsman 3/8 drive 1" socket and use a dremel tool to cut away everything that does not fit: Homemade yoke nut sockets - - ScubaBoard Gallery

The one on the right is a 1/2 drive socket with a 1/4 drive socket inserted for use with older style yokes with smaller yoke screws.

US cleaner is nice on the really dirty regs but I rarely use mine after the first restoration.

That looks like an oddball seat which surprises me. See if your LDS will give you an old seat out of the garbage to compare.
 
Last edited by a moderator:
And 2 torque wrenches: a small one (1/4) for the turret retainer, and a medium one (3/8) for the yoke bolt. I've got some cheapos ($20 ea.) off eBay that are surprisingly serviceable.
 

Back
Top Bottom