Question Scubapro MK14 diaphragm, HP seat, and boots?

Please register or login

Welcome to ScubaBoard, the world's largest scuba diving community. Registration is not required to read the forums, but we encourage you to join. Joining has its benefits and enables you to participate in the discussions.

Benefits of registering include

  • Ability to post and comment on topics and discussions.
  • A Free photo gallery to share your dive photos with the world.
  • You can make this box go away

Joining is quick and easy. Log in or Register now!

I looked up the service kit it is indeed very minimal and doesn’t include the HP seat (for some reason called piston) (even the aftermarket one at scubagaskets)

The 117 is a 02-006 sh85 EDPM oring, it was very briefly used in the mk17 (1st Revision, then updated to x.x.317)

I guess I'll just have to see how that seat and the o-ring look when I finally remove the swivel. I'm not intending to use it as a reliable backup for anything, but just to clean it and get it to hold steady IP would be cool.
 
I guess I'll just have to see how that seat and the o-ring look when I finally remove the swivel. I'm not intending to use it as a reliable backup for anything, but just to clean it and get it to hold steady IP would be cool.
You can go old school on the seat and resurface it like old doublehose HP seats;
I’m trying it out of interest on an mk17 (well it’s all sitting on my workbench collecting dust)
It is possible to lap the HP seat or VDH has reproductions, I would not buy old stock unless you just "have" to keep it OEM.
This is how I polish them.

You will need a flat surface and some wet/dry sandpaper. A pane of glass works. I use a 12x12 ( 305x305 mm for the metric folks)ceramic tile I purchased at the discount section of a home improvement store. Size does not matter...at least in this case as long as it's big enough....but as always bigger is better.

Start by taping down a sheet of wet/dry sandpaper. I use 800 to 1000 grit to start with depending on the damage. Wet the paper and start polishing the face of the seat IN LARGE FIGURE 8 LOOPS using light pressure and a slow pace. Change the position of the seat in your hand and the orientation of the loops fairly often. The objective is to remove slight amounts of material while keeping it as flat as possible. The large figure 8 loops and frequent position changes are to help even out the material removal. Inspect the face of the seat OFTEN looking for even material removal and that the defects are getting less evenly. Experience will teach you the interval that works for you but in the beginning check often. I use a jewelers loop to inspect the seat. Once the damage is gone, I switch to 1500-2000 grit paper to do a finish polish using the same large slow figure 8 loops.
I also polish out the HP nozzle. I stat by polishing out the interior of the nozzle with strip of purple Scotchbright pad, doesn't take much, just get it clean. Then with a 1/2 in (12.5mm) wood or plastic dowel sanded down to be a loose fit, wrap a strip of the 1500-2000 sand paper around the end of it and using light pressure insert it into the nozzle. With light pressure, make a couple of turns then inspect the sand paper. You should see a light brass ring form on the sand paper and the orifice should be shiny. Again, go easy, the objective to is clean it up while removing as little material as possible. Removing too much is a BAD thing.
Clean everything well to remove any grit and grim.

While on the subject, I test the nozzle assembly before installing it in the reg.
Assemble the nozzle as normal then place it in it's yoke. Install the yoke/nozzle on a tank with at least 1000 psi, open the valve and check for leaks. I use a small pony tank for this since I can dunk the entire thing into a bucket of water to check for small leaks. If you have a slight leak, leave the nozzle pressurized for some time, often times the seat just needs some time to take a set. I usually cycle the seat by installing the pin and pin pad then pressing it in with my thumb. Check again. When you are satisfied that the seat is sealing, use the pin/pad/thumb to release pressure .
This step takes time but it beats having to disassemble the reg multiple times to fix a leaking nozzle.
 
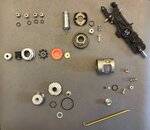
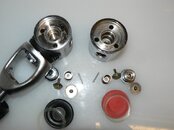
Well, it's completely apart
 

Attachments

  • mk14_1.jpg
    mk14_1.jpg
    133.3 KB · Views: 33
  • mk14_2.jpg
    mk14_2.jpg
    98.8 KB · Views: 29
Well, it's completely apart

I cleaned all the metal as much as possible without acid or ultrasonic cleaner, and replaced all the o-rings including the tiny one. It works well, holds perfect 135 ip. Likely very diveable.

At this point, I don't think it's worth it to chase a new diaphragm and seat. I'm satisfied with the results, lol.
 
So that’s why it got discontinued; it doesn’t really need parts for service to work
 
Best bet it’s the same one in the 16/18 (and old early 19)
ie the 11 diaphragm + thrust washers should work (but I’m out of my depth)


No idea if the 14 can have the HP seat/orifice upgrade that the 16/18 got, you’d be able to use the current kits then


Again I’m out of depth

@axxel57 any thoughts?

Okay, back from holidays…..

I’m late, but I needed to do some research…

The history of the SP MK14 is a bit particular.

When the Mk14 came on the market in Europe in 1997 (one year later also in the US), it was the first SP membrane 1st ever.

Seems that SP felt quite under pressure to come out with membrane 1st on the market.

So they used in their MK14 design the same valve mechanism and components as the German Seemann Sub SL20/21 1st stage.

Seemann Sub (SS) had been acquired 1997 by the former Diving Division of Johnson Worldwide Associates Vice President Robert Stoss, so maybe they orientated their design on his SS 1sts and used those valve parts to get the MK14 as fast as possible on the market.

The performance was improved by the SP design against the SL21, the MK14 could flow about double as much air as the Seemann Sub SL20/21.

Further development of the SP Membrane Series let finally to the unique valve and parts design we nowadays know …..

In 2007 Johnson Outdoor bought Seemann Sub from Robert Stoss ( who bought early 2008 together with Doug McNeese SSI International) and SS became Subgear (SG), before in 2016 finally Subgear and SP became one brand.

Fun fact……

The Mk14 HP seats are not available anymore for many years in the Service Kits, but seems (according to the Catalog here in Europe) you can still get them ordering the SS SL20 Service Kit…

Does that make sense…..?

But probably nowadays nobody here at SP knows…..

The membrane is the same as the ones of the Mk 16/18.

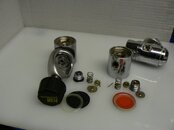
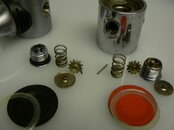
There are only two genuine Mk14 parts still available, the balancing chamber (10.705.102) and the Internal Disc (10.705.113).

I think that the reason, that there are hardly any parts and the HP Seat available for this relatively ‘young’ model ( that is quite untypically for SP) lays in the fact that the ‘original’ design was ‘non SP’.

The MK14 was not a big seller here in Europe, strange enough it was sold in the US years longer than in Europe, but the much better MK18 was never introduced to the US market.

Anyway, a nice Collectors Item.

If the OP needs a new HP Seat, he can contact me….
 

Attachments

  • P1360605.JPG
    P1360605.JPG
    60.1 KB · Views: 18
  • P1360604.JPG
    P1360604.JPG
    62.8 KB · Views: 15
  • P1360601.JPG
    P1360601.JPG
    81.7 KB · Views: 16
Okay, back from holidays…..

I’m late, but I needed to do some research…

The history of the SP MK14 is a bit particular.

When the Mk14 came on the market in Europe in 1997 (one year later also in the US), it was the first SP membrane 1st ever.

Seems that SP felt quite under pressure to come out with membrane 1st on the market.

So they used in their MK14 design the same valve mechanism and components as the German Seemann Sub SL20/21 1st stage.

Seemann Sub (SS) had been acquired 1997 by the former Diving Division of Johnson Worldwide Associates Vice President Robert Stoss, so maybe they orientated their design on his SS 1sts and used those valve parts to get the MK14 as fast as possible on the market.

The performance was improved by the SP design against the SL21, the MK14 could flow about double as much air as the Seemann Sub SL20/21.

Further development of the SP Membrane Series let finally to the unique valve and parts design we nowadays know …..

In 2007 Johnson Outdoor bought Seemann Sub from Robert Stoss ( who bought early 2008 together with Doug McNeese SSI International) and SS became Subgear (SG), before in 2016 finally Subgear and SP became one brand.

Fun fact……

The Mk14 HP seats are not available anymore for many years in the Service Kits, but seems (according to the Catalog here in Europe) you can still get them ordering the SS SL20 Service Kit…

Does that make sense…..?

But probably nowadays nobody here at SP knows…..

The membrane is the same as the ones of the Mk 16/18.

There are only two genuine Mk14 parts still available, the balancing chamber (10.705.102) and the Internal Disc (10.705.113).

I think that the reason, that there are hardly any parts and the HP Seat available for this relatively ‘young’ model ( that is quite untypically for SP) lays in the fact that the ‘original’ design was ‘non SP’.

The MK14 was not a big seller here in Europe, strange enough it was sold in the US years longer than in Europe, but the much better MK18 was never introduced to the US market.

Anyway, a nice Collectors Item.

If the OP needs a new HP Seat, he can contact me….

Very interesting!

Not that I am eager to get a new seat (as a matter of fact I don't mind diving it as is, if I have to or just for fun of it), but do you happen to have new seats? The ones in the pictures (at least the rest of the parts) seem used.

One thing I noticed about my MK14, the filter looked brand new. Something tells me that this 1st stage wasn't used much if at all in the last 10 years. I got it as a part of a much larger lot of gear.
 
Overlooked your question about new seats for the MK14.

Yes, I have....

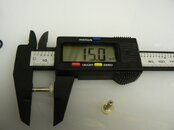
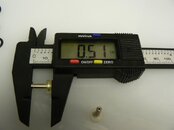
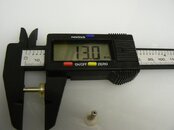
Actually found some Seemann Sub SL20 and SL24 Kits in my garage.

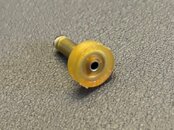
They are sold now it seems by SP with the same HP Seats, just 2mm longer.

So if the longer HP Seats are in the Service Kits for the 1sts with the originally shorter Seats, SP should be sure that this works.

Nevertheless I tested one on the MK14.

The IP was instantly about 12psi (0,8bar) higher, but that's no problem, one can adjust it with the adjustment screw.

Works perfect.....

In my fundus I found even some more of these seats.

Coltri Sub was using the same valve in their C60-C70-C80-C90 1sts in the 90ties.

So if someone has access to old Coltri Kits of the C-Series, he would have also MK14 seats.

I have only two or three MK14, which are just part of my collection, but I'm happy that I found a source to ensure that they can be in working condition.....
 

Attachments

  • P1360615.JPG
    P1360615.JPG
    58.5 KB · Views: 5
  • P1360614.JPG
    P1360614.JPG
    58.8 KB · Views: 4
  • P1360613.JPG
    P1360613.JPG
    58.5 KB · Views: 4
  • P1360612.JPG
    P1360612.JPG
    26.9 KB · Views: 4
  • P1360616.JPG
    P1360616.JPG
    60.9 KB · Views: 5
Actually found some Seemann Sub SL20 and SL24 Kits in my garage.

They are sold now it seems by SP with the same HP Seats, just 2mm longer.

So if the longer HP Seats are in the Service Kits for the 1sts with the originally shorter Seats, SP should be sure that this works.

Just to make sure I understand... Are you saying that SP (Scubapro?) is selling the kits for Seemann Sub?

Cause the original SP kit for MK14 doesn't include the seat nor the diaphragm...
 
No, they owned Seemann Sub and let it finally die and still have a couple of Service Kits for their old regulators.....
I guess they have no clue here about the fact that they could have sold MK14 HP Seats for quite some time longer, at least here in Europe......
The diaphragm is still available with SP.....
 

Back
Top Bottom