Workbench Update!

Please register or login

Welcome to ScubaBoard, the world's largest scuba diving community. Registration is not required to read the forums, but we encourage you to join. Joining has its benefits and enables you to participate in the discussions.

Benefits of registering include

  • Ability to post and comment on topics and discussions.
  • A Free photo gallery to share your dive photos with the world.
  • You can make this box go away

Joining is quick and easy. Log in or Register now!

I need to make one of those fill spiders for my O2 side. No booster, so I have to trans fill out of three 3 storage bottles... that's a lot of bleeding and moving hoses.

Fill 4 40's at a time? Sign me up!

-Chris

bit less efficient pressure wise doing it that way, but certainly a lot more convenient!
This one is O2 clean, so I use it with my Invacare setup which I should have set up next week. Huge thanks to @herman for helping me get an adapter made up for the OPV since it blew. Just need to get it fully cleaned out and then I'll be good to go on that guy
 
well today was mildly frustrating.... Got a rack that @cool_hardware52 designed and built for the UTD MC-90 CCR. Wanted to go this route because during my course, Ted was diving a rack on his SF2 and the concept of it seemed to be quite worthwhile for the dives that I'm doing now. Able to hop in the water in one consolidated rig which will be nice while I'm diving at home as well as long term for the cave diving I have planned.

Since my trailer was stolen with my lp45's in it, I have to patiently wait another 2 weeks until I get down to Cave Adventurers to pick up my new lp50's to put it in, but started with some spare AL40's I've got to get everything sorted.

The goal is to have LP50's with lola valves on there to have consolidated bailout, and mount both FX23's on their for wing/suit inflation and O2.

Frustration #1 was found with the bloody latches on the Meg. The canister wants to sit a lot higher than I want it to keep the latches above the rack. I messed with that for probably an hour but have resolved that I'll be putting a spacer of some sort in the rack itself so the canister sits flat despite the latches.
#2 showed up with the ideal positioning of the Tiger Mounts not allowing the 3l's to clock right as shown in the picture below. When I got the mount fit properly, the cam buckle wouldn't let that bottle latch. Will be cutting out a nitrile spacer tomorrow at work and standing the bottle off the mount by 5mm which should allow it to clear the cam buckle. Not a huge fan of the Tiger Mounts with the rattle, but it's what's on there and I'm not entirely sure spending the money on some other brackets will be worthwhile with the rack setup.
#3 is that the rig is obviously quite impossible to stand up without resting on the valves and the valves don't have bump stops on them. Not my valves, so don't want them getting knocked around, so will have to figure out which valves I want to put on there with bump stops. Any suggestions on those, or an easy way to put some sort of bump stop on these valves would be appreciated.

Tomorrow will hopefully be a bit more successful and then I can start sorting out hoses and if I can get the Manta Lung to work for me. Will be bringing both the Manta and OTS to cave country in 2 weeks, but have my fingers crossed the Manta will work because the OTS was not my favorite in class
 

Attachments

  • 20180114_204052856_iOS.jpg
    20180114_204052856_iOS.jpg
    100.7 KB · Views: 419
Last edited:
long time since update but a phone call with @The Chairman reminded me I need to update this. Worked with Randy at Piranha to get some better bottle mounting options and I think I have it. Took the pony tamers and had to drill a hole to mirror the mounting locations, but I''m pretty happy with the profile. With the CCR mounted in there, the bottles just barely stick up over the can *~0.5"* which helps to protect it a bit. Both 3l's have to be removed to install the can, but it goes on easily and fully rigged it will stand up on its own. I wish there was a way to mount the ball stops on the top of these valves or that the CCR valves with the stoppers weren't only in the inline configuration, but alas the boots on the 50's allow it to stand without resting on the valves, so I'm OK with it.

Ultimately I will likely end up putting lola valves and a crossover on here, but wanted to be happy with the setup before investing in the lola valves. I'm used to diving indy doubles and it doesn't bother me, so we'll see when/if that happens.
34511261_10160421813810134_5511533043338182656_o.jpg


34556365_10160421813790134_5496828269317586944_o.jpg
 
don't want to disclose
I'll try to beat it out of you the next time we talk! :D :D :D
 
wanted to follow up on this since it had come up in a thread with @JohnnyC and @PfcAJ this week.

This is laying down on the truck to show the height difference between the bottles and the canister.
The pony mounts have been shifted. You can see the top one on the inside, but I was annoyed with the rattle as they shifted. I have the stabilizers that are meant to be used with the long tanks that you can see in the pictures above, but I moved them to the other "side" of the 3l's so it attaches on either side. Much more secure now when walking or rolling in the water.

Still haven't gotten Lolas yet, but the regulators are rigged similar to standard doubles. The right post is "normal", and the left post has the ADV line with the red tape on the hose where the drysuit inflator would be.
The left 3l is a dil bottle and you can see the splitter coming up on the left to go to drysuit and wing. I wanted to keep as many hose lengths as "normal" as possible and the inverted 3l's require some annoyingly long hoses. The hoses coming off of the splitter are "normal" inflation hoses, and it is fed by a standard 22" reg hose which is nice. O2 line isn't on there but does essentially the same thing when it splits to the MAV and the solenoid.

Pretty happy with it overall right now. The 3l's onboard mean everything is self contained and it doesn't stick up more than an inch higher than the canister itself which is ideal.
To AJ's point, not scalable to LP121's, but I'll cross that bridge when/if the time comes. For right now, it's comparable bailout wise to OC LP85's. With most of my dives having been limited to OC 121's+2 stages, this will mean I have to carry 3 stages to go the same penetration distance, but I'm OK with that for now. Ultimate goal for cave diving is still to end up with a sidemount rebreather of some variety so this will be likely restricted to a combo of setup dives and OW diving once that happens in the next year or two.

35839762_10160479621055134_7770966452722466816_n.jpg
 
One of the major annoyances I had with the Meg was dealing with battery packs. While the AA's last forever, when you need one, you need one. They have the 9v adapters from the factory, but the mAh is obviously restricted to a single 9v. This is a stock part for wiring 9v's in parallel which gives a more similar form factor the to 5xAA's.
Added advantage is the 5xaa's have roughly 20wh, but the single 9v only have about 4.5. This is still roughly half the capacity of the aa setup, but I can put a single 9v or double 9v in depending on availability

36030296_10160494988860134_5324919385796640768_o.jpg
 
ok, been a bit lazy with the update, so here's what I've been working on for the last 2-3 months. It's not 100% done, but it's REALLY close *couple fittings and some wiring left. I'll preface this with @DA Aquamaster and @Bobby as being bad influences and with @The Chairman being upset that I keep haskelling him as he's quite jealous

In September I was lucky enough to come upon a screaming deal I couldn't pass up on a Haskel AG-30. My problem with it is that I don't really have a "permanent" space to keep it since my trailer was stolen. I kept looking at all of the people who had smaller ones in pelican cases as well as some of the portable units from Nuvair and figured I could do better.
I bought a 4cfm diaphragm compressor used for O2 concentrators that puts out clean air and is rated for continuous duty. It won't run the booster fast, but it will keep it going.
Next was a way to get "clean" air into the compressor. Despite what everyone says, these things are actually designed to be used with shop compressors not breathing air compressors. You have to read the manual which says that you need a water trap and an appropriately sized filter to keep it clean, but it's designed for shop compressors.
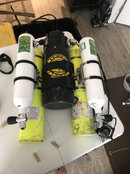
In comes what is called a "clean air package" which is designed to put out Grade D breathing air from shop compressors. Heavy duty filtration. On the end of the package is a swagelok QF8 *needed it for the 1/2" NPT inlet on the Haskel*. I wanted this because the unit will be comparable to the Brownies E150 so 1 diver to 3ata or 2 divers to 2ata. I will eventually have a short hose with a QF8-QRS adapter so I can plug into the Brownies system should I ever need it. There are 3 holes drilled below the filters for draining which will just go straight thru the case.
On the right side you can see the open compressor shut-off switch assembly which is open until I get the wiring done. Right after that is a pair of female shop QD's. I put both as female to remove the need for a shutoff valve on the male nipple. I will have a m2m adapter which will allow me to plug into either large shop compressors *I have 3x 2500cfm compressors at work that will make quick work of filling cascade bottles*, or a scuba tank if I don't have 110v power and will have appropriate adapters to get to a BC fitting as well. The second QD is to have flexibility and the port was there so why not.

Three things are keeping this from running.
I ordered the wrong adapter size from Swagelok to get the 9/16-18 O-ring fitting to 1/4" NPT to go to normal hoses. From there they will go to QF4's which is the standard quick disconnect used on Bauer compressors and what I have used as standard for all of my blending/filling adapters. QF4's are easier for me to work with since the hoses I'm using are going to be 10ft *can see them coiled at the top of the picture*, and it is better to be able to use QD's should I want to use a short hose, have to extend them, etc etc.
The elephant in the room is wiring. The compressor needs a pretty good sized capacity for soft-start and I have to figure out where and how I'm going to mount it. Once I have that sorted it will get wired in and we'll be good to go.
Last little thing is getting the lid organizer which will just help keep some of the small adapters organized instead of flailing around or being instead of a regulator box.

This sucker is heavy, around 100lbs, but it is fully self contained and portable which is important to me.


46646605_10161045422605134_5086381197144096768_o.jpg
 
You may have some issues with moisture removal if you don't have some form of intercooling between the compressor and the moisture separator.

The hot hair from the compressor needs to be cooled to allow the water vapor to condense, so that it can be removed by the water trap. If not, the water vapor in the air will first compromise the effectiveness of the filter and then end up in the drive section of the compressor where it will compress as it drops back to ambient pressure.

"Clean" air will help the drive section O-rings last longer, but the drive section and shuttle valve O-rings are cheap (and are standard size O-rings that can be purchased from McMaster-Carr, etc). But the air coming out of an oil-less compressor is already going to be clean enough.

"Dry", in my opinion, is much more important than "clean" for the drive section gas as water in the drive section will cause corrosion issues and in conjunction with freezing or near freezing temperatures, can also effect the surface of the 5 3/4" cylinder in the drive section.
 

Back
Top Bottom