What is an inline adjusting tool?

Please register or login

Welcome to ScubaBoard, the world's largest scuba diving community. Registration is not required to read the forums, but we encourage you to join. Joining has its benefits and enables you to participate in the discussions.

Benefits of registering include

  • Ability to post and comment on topics and discussions.
  • A Free photo gallery to share your dive photos with the world.
  • You can make this box go away

Joining is quick and easy. Log in or Register now!

Am I correct in understanding that this inline tool is used to adjust the position of an orifice, moving in or out, so as to control the 2nd stage from free flowing? I read another way is to use a flat head screwdriver that would fit the slot in the orifice and manually adjust it in small increment, reconnect hose, test it, and adjust again until free flow stops. Is this what the sink test is about. If it's, what is the proper way to do a sink test?

The first part is right. The inline tool allows the adjustment to be made without having to remove and replace the low pressure hose, which speeds up the the process.

I think what you mean by the "sink test" is a check of the cracking pressure. The cracking pressure is the pressure needed to start the flow of gas from the second stage and drives the work of breathing. That is done by immersing the second stage in water diaphragm down until gas flows. Measuring how deep the diaphragm is is the value you are after. Typical values are several inches of water. It is a way to quantify the performance of the regulator. But again it is a "nice to have" in the end. The real test is that you should not have to inhale deeply to start the flow of gas.
 
Thanks again for all advice and detailed explanations. They are truly well guided and appreciated. I am so glad to have found this forum where open discussions, information exchange, and education are just a few clicks away for divers and non-divers alike.

As I was thinking about the sink test for checking cracking pressure it's actually a very
reliable and simple method based on the fact that water pressure pushes on the lever arm and thus moving the poppet and opening the orifice to start air flow. If I can fill a rectangular tall tank that is transparent and tape a ruler on it for measuring depth, or height of water changed, it might work out to be a fairly accurate method that doesn't need calibration and field service friendly when a magnahelic is not available. It would be nice if someone can do an experiment this way to compare with magnahelic
readings. Just my thought.
 
As I was thinking about the sink test for checking cracking pressure it's actually a very
reliable and simple method based on the fact that water pressure pushes on the lever arm and thus moving the poppet and opening the orifice to start air flow. If I can fill a rectangular tall tank that is transparent and tape a ruler on it for measuring depth, or height of water changed, it might work out to be a fairly accurate method that doesn't need calibration and field service friendly when a magnahelic is not available. It would be nice if someone can do an experiment this way to compare with magnahelic readings. Just my thought.

I think you'll find it more than sufficient to just do a rough "eyeball" measurement of "sink test" cracking pressure.

The recommended range of cracking pressure from many manufacturers is usually pretty broad, such as 0.6 inches to 1.3 inches or more. It's very easy to estimate, even if you want to be close to the low end of the range.

Just get a good sense of the landmarks on your second stage that coincide with your desired cracking pressure and keep the second stage level as you lower it.

Then, when you go diving, bring along your basic second stage adjustment tools to the dive site because, if you're like me, you'll have set your cracking pressure just a little too close to free flow.... :D

Dave C
 
Last edited:
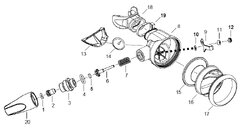
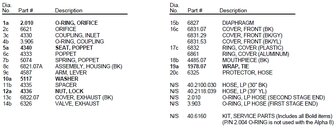
This is my Oceanic alpha 8 test regulator, see diagrams below. If Im only using a flat head screwdriver to adjust the orifice, set cracking pressure, of the alpha 8...

What is your advice, tips, techniques, in balancing the adjustments on both the orifice and level arm? For example, level arm shouldn't be too tight? the orifice shouldn't press too close to the seat? I would like to hear your experience on making these adjustments and things to watch out.

If the level arm is too tight or lock nut is threaded too far in, this will put the poppet spring under high compression and so will the poppet seat be subjected to high compression against the orifice when in storage, is that right?
 

Attachments

  • Alpha8-2.jpg
    Alpha8-2.jpg
    101.1 KB · Views: 84
  • Alpha8-1.jpg
    Alpha8-1.jpg
    173.9 KB · Views: 61
I believe most of the Alphas want 2 to 3 threads of the poppet showing above the lock nut. Then adjust to orifice to set cracking pressure. Finally, shake the reg to check if the lever is too loose (you will hear it rattle if it is too loose).
 
I have a Mares rebel that has the same tuning mechanism of the Oceanic you mention
Here is what the service manual says
CHECK THAT THE DEMAND LEVER (35) IS CORRECTLY ADJUSTED.
AIR DELIVERY SHOULD BE TRIGGERED ABOUT MIDWAY
ALONG THE PURGE BUTTON'S TRAVEL, AND THE SOUND OF
THE DEMAND LEVER TOUCHING THE METAL DISK OF THE
DIAPHRAGM ("TAPPING") SHOULD BE AUDIBLE WHEN THE
SECOND STAGE IS SHAKEN UP AND DOWN.

Now to be honest with you I never set it like that but a bit harder so that I do not hear the sound
 

Back
Top Bottom