Video Housing

Please register or login

Welcome to ScubaBoard, the world's largest scuba diving community. Registration is not required to read the forums, but we encourage you to join. Joining has its benefits and enables you to participate in the discussions.

Benefits of registering include

  • Ability to post and comment on topics and discussions.
  • A Free photo gallery to share your dive photos with the world.
  • You can make this box go away

Joining is quick and easy. Log in or Register now!

ktomlinson

Contributor
Scuba Instructor
Divemaster
Messages
1,052
Reaction score
168
Location
Statenville, GA
# of dives
200 - 499
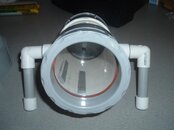
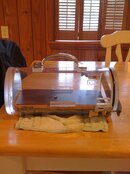
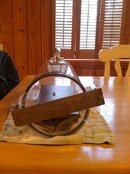
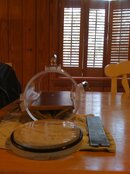
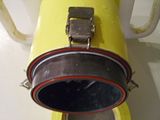
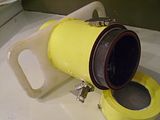
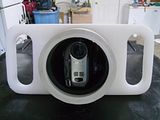
Hey all! I thought I would share my first attempt at a video camera housing. The brown wood inside is what the camera mounts to. It can be slid in and out (when the enclosure is closed the wood does not move). I bought the tube and acrylic online and had a local machine shop machine the two ends. Drop latches hold a stainless bar which holds the end in place and gives enough pressure to keep the o-ring from leaking. This was my first time working with acrylic, so I learned a lot. Total investment was around $300 (the tube was expensive). I have only water tested this to 10', but will be taking it down to 130' this weekend. So far it looks like 8lbs will make this almost neutrally buoyant, and the 8lbs fit nicely under the wood camera slide. Any comments, or suggestions for version 2.0 would be appreciated.
 

Attachments

  • 1.jpg
    1.jpg
    152.5 KB · Views: 143
  • 2.jpg
    2.jpg
    159 KB · Views: 117
  • 3.jpg
    3.jpg
    146.2 KB · Views: 123
Although you won't be able to see through it, PVC works great. Attach 4 and 1/2 in tempered glass to each end and the same latches and you would of saved a few bucks. Very nice camera housing by the way.

Here is what I did.

th_CameraHousing005.jpg


th_CameraHousing006.jpg


th_camerahousing001.jpg
 
Thank you for the suggestion with the PVC! How did you mount your camera in your housing? I really like your handles btw. I am wondering if I will like mine on the top or not... I put it there because my cameras LCD can be flipped around and I will be able to view it from the side.
 
Ahh good call on the battery, I just need to practice and get used to 'point and shoot' :)
 
Nice job,pvc is a lot cheaper,yes. Remember when you point and shoot, move sloooooooowly!!
 

Attachments

  • camera housing 008.jpg
    camera housing 008.jpg
    125.8 KB · Views: 102
Wow that's a really nice enclosure! Thank you for the tip on moving slowly. I should have some videos to post on Monday. Do you have the plans for the one you built?
On a seperate note, has anyone figured out how to waterproof the remote yet?
 
On a seperate note, has anyone figured out how to waterproof the remote yet?

I used a condom once and it kept the remote dry, but... the pressure squeezed all the buttons at once disabling any one function at depth. 25 to 30' works great.
 
Ahh I thought about doing that but didn't realize that would happen. I have heard of a company that will make any electronics waterproof. They disassemble them and then coat the pc board with something...when I heard about them they weren't taking orders yet.
 
There are several options to make basic controls. If you cam can be set so it starts recording when power is supplied you can feed it via magnetic reed switch controlled from outside.

Some SONY and Canon cams have LANC remote control port, you can buy the basic remotes online cheap like $30, then you have to parallel buttons on those controls w/reed switches. You can make mechanical levers sealed w/shaft seal. It is a bolt made of soft metal (brass, aluminum) or hard plastic. Then few options available. You can drill a hole thru enough diameter to let stainless still rod to go thru. Then from the outside hole should be drilled to a large diameter to accommodate o-ring that would fit it snug. O-ring should allow ss rod to go thru but it is snug. You bend ss rod from the inside side and from the outside by the geometry required for you cam controls. Finally you screw your rotary seal into housing body (you have to cut thread in housing wall using tap). O-ring from the outside can be held in its nest with spring washer or otherwise.

I built my first control slightly differently but it also works Picasa Web Albums - ARY

Some cams come w/IR remote. You can extend the wire that connects to IR emitter (little diode in remote front) and stick it to the cam receiver. Now you have to parallel buttons that you want to be accessible from the outside w/reed switches. This way you can control everything you want from the outside using a magnet on a bolt clip or magnet on a finger ring.
 
https://www.shearwater.com/products/teric/

Back
Top Bottom