SP pilot regulator

Please register or login

Welcome to ScubaBoard, the world's largest scuba diving community. Registration is not required to read the forums, but we encourage you to join. Joining has its benefits and enables you to participate in the discussions.

Benefits of registering include

  • Ability to post and comment on topics and discussions.
  • A Free photo gallery to share your dive photos with the world.
  • You can make this box go away

Joining is quick and easy. Log in or Register now!

I opened one up for a rebuild attempt today, got along ok until trying to get the stop off the poppet retainer. It was indeed a challenge to remove the stop, I tried a few modified tools and creative ways to remove it but threw in the towel before doing damage. It could help adding hot/cold treatment, but think I need to find tool of some sort as well.

There is mention of success with a modified caliper, it would be interesting to see pictures of that or other options to get the job done.
 
I used awap's calipers for that if I remember. I think I documented my experience working on my original pilot on that thread. It's very finicky. Even though it's very high performance, I end up using my converted pilots much more often because they're less finicky and much easier to work on without any noticeable drop in performance.

I love the pilot design from a hobbyist standpoint; it's a challenge to work on and fun to get into. But for actual diving over the long haul I think the converted ones are simply more practical. I would never convert one; they're too rare and I think important historically. But there are plenty of converted ones around for sale.
 
On eBay they’re called pin spanner wrench. Similar to the expensive motion pro type. There are ones with exchangeable pin sizes but you could file down to what you need if too big on a fixed tool
 
@John C. Ratliff If you have a copy of the Pilot manual could you post it here please?
Unfortunately, I do not have a copy. I thought it would remain on the VSS website, and usable. Apparently, Tony Christianson reach a photo limit on Flikr, and Flikr deleted it last spring. I have not been successful in re-contacting Tony via PM. He is sometimes available on-line, and sometimes not, as he lives inside Yosemite National Park. I'm pretty sure he still has the scans of the manual, and that eventually we can get it from him.

I found two adjustments critical in the functioning of my Pilot.

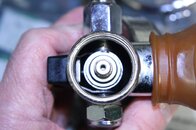
--One is the adjustment via a small Allen wrench where the demand lever interfaces with the valve. This was the source of the leak in mine, that this set screw, #56 in the patent diagram below, was adjusted too tightly.

--From the manual, I found out that the Venturi adjustment is critical in preventing the "chattering" of the pilot valve. You need to move the Venturi opening way to the side, so that when the purge button is depressed, the flow stops by itself. If it continues, it is set for too much flow, and will at times chatter too. Also, if the Venturi opening is directed directly down the mouthpiece, it can actually overpressure the lungs--not good. So carefully adjust the Venturi opening so that the flow just stops by itself.

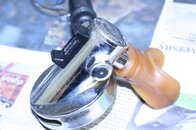
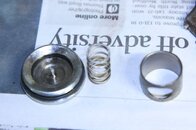
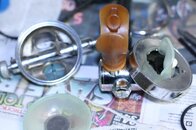
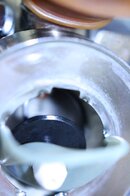
'Hope this helps. Below are photos of my Scubapro Pilot. One of our members at VSS has two Pilots, and has disassembled one and placed it into his A.I.R. I housing; according to him, Morris75, it fit perfectly. Here's where you can see his post:
http://vintagescuba.proboards.com/thread/4966/scubapros-pilot-regulator-2?page=2

The Christianson patent has some really good diagrams in it, one of which I'll post here too.


US4076041-drawings-page-3.png


US4076041A - Pilot valve operated demand regulator for a breathing apparatus - Google Patents

SeaRat
 

Attachments

  • IMG_2812.jpg
    IMG_2812.jpg
    66.6 KB · Views: 123
  • IMG_2810.jpg
    IMG_2810.jpg
    67.1 KB · Views: 117
  • IMG_2811.jpg
    IMG_2811.jpg
    53.6 KB · Views: 108
  • IMG_2808.jpg
    IMG_2808.jpg
    67.3 KB · Views: 114
  • IMG_2807.jpg
    IMG_2807.jpg
    48.2 KB · Views: 175
Thanks Luis!, very helpful! The search for the manual is over and now I know the special tool (modified pliers) for the poppet.
 
Thanks Luis!, very helpful! The search for the manual is over and now I know the special tool (modified pliers) for the poppet.
Thanks to Luis, we now have the manual. Be advised, however, that many of the fine points are not described.
For example, separating the parts of the poppet retainer assembly with the "special tool" can be a huge challenge.
Here's an assembly that took four days to open up, from a Pilot I restored for a guy last year:
20181127_225936.jpg

You can see the rust in the threads, and the wrench flats are very thin. It didn't comes apart initially. It didn't come apart after a half hour in warm ultrasonic solution; it didn't come apart after another hour in the ultrasonic! I finally did something I've never had to do before or since: I let it sit for four days in WD-40. It finally came apart.
Another issue is finding a 50 duro oring for the seal.
And then there's the 800# gorilla in the room: restoring the knife edge of the orifice if there's a nick. Even thinner than the D400 orifice, it's a challenge to sharpen.
20181127_234451.jpg
 
Then there was this surprise:
20181129_200206.jpg

After a nice restoration, the reg would breathe perfectly at its lightest cracking effort. But if you increased the valve resistance just a little, it started to leak and breathe wet! That didn't make sense!
After some careful re-examination (remember that the case makes inspection a bit of a challenge), it became apparent that the edge of the combination diaphragm/exhaust valve was curled. On the right is an Air 1 diaphragm for comparison. It had been stored for so long with too much tension on the spring, that the diaphragm had deformed. When the cracking effort was increased by screwing in the plastic nut on the diaphragm, it pulled the diaphragm in, and allowed the curled edges to lift up off the sealing surface of the metal case.
I had no source for original Pilot diaphragms, so installed this Air 1 diaphragm instead, carefully centering it under the plastic nut because of the larger center hole.
Now the edges lay flat against the metal seal inside the case:
_IMG_000000_000000.jpg

But you can see how the bowl of the case can reshape a diaphragm over time.

Like I said, lots of subtle stuff with this old beauty.
 
Rsingler, appreciate that you share experience working on the Pilot. Being able to learn from everyone that has already been down this path is wonderful, and can make the difference between success or failure on a project like this (at least for me).

McMaster-Carr has the 50 duro red silicone orings for part #'s 35, 44, & 55 . I have a few extras and happy to share until they run out.
 
https://www.shearwater.com/products/swift/

Back
Top Bottom