Blackheart12A
Registered
Hello,
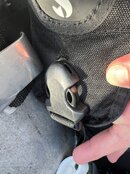
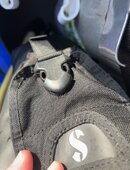
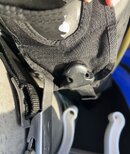
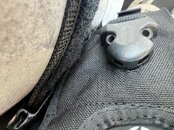
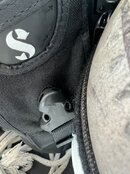
I am brand new to SB so I hope I’m posting in the correct place. While on a trip to Cozumel this past week I noticed that the fabric around the female portion of my trim portion clips seems to be fraying which I assume will lead to failure sooner rather than later. The boat I was on a few days ago (6 pack) also had a married couple who both had the Hydros Pro (HP) with similar damage. I purchased my HP in August 2023 and have approximately 80 dives on it, the couple I referred to only have 20 each on theirs. I am extremely diligent about my gear maintenance after each trip (e.g. two dives then return to base before afternoon/evening dives) and find it very concerning that 6/6 trim pockets on the same boat are in similar condition with such low miles. I called Scubapro and they told me I should be using soft weights and that if I chose to have them repair the HP shipping would be my responsibility. I thought this was an outrageous response to an obviously common problem on a new purchase. I am new to the diving community and have approximately 90 dives total. Has anyone else had these issues and any advice on how to proceed? I’m considering just getting it repaired and selling and buying a BP/W setup. I appreciate any advice, thank you.
I am brand new to SB so I hope I’m posting in the correct place. While on a trip to Cozumel this past week I noticed that the fabric around the female portion of my trim portion clips seems to be fraying which I assume will lead to failure sooner rather than later. The boat I was on a few days ago (6 pack) also had a married couple who both had the Hydros Pro (HP) with similar damage. I purchased my HP in August 2023 and have approximately 80 dives on it, the couple I referred to only have 20 each on theirs. I am extremely diligent about my gear maintenance after each trip (e.g. two dives then return to base before afternoon/evening dives) and find it very concerning that 6/6 trim pockets on the same boat are in similar condition with such low miles. I called Scubapro and they told me I should be using soft weights and that if I chose to have them repair the HP shipping would be my responsibility. I thought this was an outrageous response to an obviously common problem on a new purchase. I am new to the diving community and have approximately 90 dives total. Has anyone else had these issues and any advice on how to proceed? I’m considering just getting it repaired and selling and buying a BP/W setup. I appreciate any advice, thank you.


