You are using an out of date browser. It may not display this or other websites correctly.
You should upgrade or use an alternative browser.
You should upgrade or use an alternative browser.
S95 Replacement
- Thread starter cjibber
- Start date
Please register or login
Welcome to ScubaBoard, the world's largest scuba diving community. Registration is not required to read the forums, but we encourage you to join. Joining has its benefits and enables you to participate in the discussions.
Benefits of registering include
- Ability to post and comment on topics and discussions.
- A Free photo gallery to share your dive photos with the world.
- You can make this box go away
Tippytoes12
Contributor
Hi thereHi,
I have managed to buy a TG5 in KL. Still upset at losing my S95 but at lease I have a camera again!
Do you have any tips about settings for both macro and non-macro shots? Most of the information about underwater settings that I have found on the internet seems to assume you are using strobes and/or additional lenses. I will start experimenting on Friday but any advice about where to start would be helpful!
Cheers.
Great that you managed to get a replacement.
I put everything on auto , auto WB , auto UW mode and auto flash. For both macro and wa getting as close as possible to the subject is really imperative with the TG5 . Then I use Dive Plus to WB and do a bit of cropping and light and colour with the iPad. I have tried manual WB with the TG 5 and it’s way harder than with the canon.
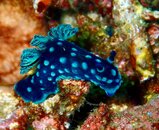
A nudi from Alor as an example of the colorful but simple shots that are the result of the above.
Best fishes and enjoy your trip.
Attachments
I am by no means a photographer. But I have been using an S95 for around 10 years, my late partner was the better photographer.
I have learned a few things.
1. Use manual white balance. (if you are not using a strobe).
You can pre-program the shortcut button ( a massive benefit of the S95), to do manual white balance. In addition, you need a neutral (e.g. white) slate to point the camera at. This recalibrate the sensor. (If you wish to test this point the camera at a red background or a green or a blue!).
You need to manual white balance as you change depth.
2. Use manual ISO setting.
For correct exposure, you have ISO, Speed and Apperture.
If you have them in Auto, they are all competing with each other.
3. Ideally use manual mode.
For a long time I used Auto.
Manual does give you much better pictures because you get more control.
Apperture adjust depth of field (what stays in focus)
Speed, reduces movement blur, that includes camera shake and moving fish!
4. If you are using Auto
Check the metering mode. It is often better to have it on point metering, rather than average metering.
This is condition dependent.
The camera locks the settings, focus, exposure when you partially depress the shutter button.
So you can point it at a bright light in spot exposure mode, partially depress the button and that exposure setting is held whilst you reposition the camera, similarly, you can point it at the dark, partially press the button and lock the exposure for this environment.
However. Focus is also locked, which means your picture 'could' be out of focus.
You can also program the shortcut button to lock focus or exposure, or manual white balance.
NOTE the pre-program button can only be programmed for one function at a time.
The BIG one is manual white balance. The second is Manual ISO.
Even for an idiot like me, it improved my pictures significantly.
Gareth
Similar threads
- Replies
- 17
- Views
- 1,039
- Question
- Replies
- 1
- Views
- 136
- Replies
- 2
- Views
- 336
- Replies
- 1
- Views
- 151


