


KGNickl
Contributor
What?
This shows you how to turn your wrist mount Mares M2 into a retractor mount computer! You can revert back to the wrist mount at a later time if you want. Do remember that you have to drill and cut part of the middle area where the pins go through, but this is not a big deal since the outer pin holder area is left alone which is where most of the support comes from for the watch band. This took me about 30 mins from start to finish! Since your not experimenting like me it should only take 10-20 minutes!
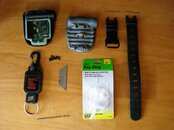
Before you Start (needed stuff!):
-Mares M2
-Screw Driver (Phillips)
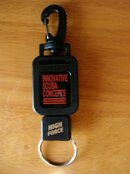
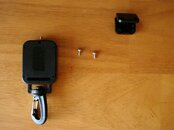
-Retractor (I used an Innovative Scuba Concepts Mini High Force w/ split ring that I picked up from my LDS).
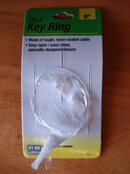
-6" Cable Key Ring (I bought it from Ace Hardware for about $2. They also sell online but I could only find them in packs of 5 for about $20.)
-Drill, dremel, file, razor, etc.. Something to open up the pin holes to get the Cable Key ring through.
What I did and you should too!
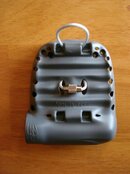
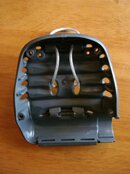
Step 1: Remove 6 screws from Mares M2 and remove the back cover.
Step 2: Remove pins from back cover that are holding watch band by carefully pushing them out.
Step 3: Remove back cover
Step 4: Open up the 2 middle pinholes on the bottom of the cover using a tool of your choice (I used a small drill bit and a razor blade).
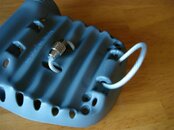
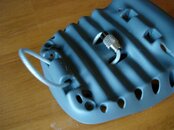
Step 5: Run the cable through the back cover then twist it together to lock/secure it.
Step 6: Put the Cable key ring through and then put the screws back in.
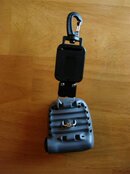
Step 7: Remove the retractor screws and take out the split ring.
Step 8: Put the computer back together.
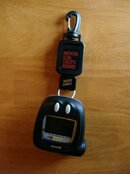
Step 9: Your done, go clip it to something now and retract away!
NOTE: I have uploaded a bunch of pictures so you can get an idea of what I did and how it looks. I'm also not sure how the locking part in the back of the cable key ring will hold up to salt water, so I'm considering coating it with a thin layer of silicon to keep it from rusting!
This shows you how to turn your wrist mount Mares M2 into a retractor mount computer! You can revert back to the wrist mount at a later time if you want. Do remember that you have to drill and cut part of the middle area where the pins go through, but this is not a big deal since the outer pin holder area is left alone which is where most of the support comes from for the watch band. This took me about 30 mins from start to finish! Since your not experimenting like me it should only take 10-20 minutes!
Before you Start (needed stuff!):
-Mares M2
-Screw Driver (Phillips)
-Retractor (I used an Innovative Scuba Concepts Mini High Force w/ split ring that I picked up from my LDS).
-6" Cable Key Ring (I bought it from Ace Hardware for about $2. They also sell online but I could only find them in packs of 5 for about $20.)
-Drill, dremel, file, razor, etc.. Something to open up the pin holes to get the Cable Key ring through.
What I did and you should too!
Step 1: Remove 6 screws from Mares M2 and remove the back cover.
Step 2: Remove pins from back cover that are holding watch band by carefully pushing them out.
Step 3: Remove back cover
Step 4: Open up the 2 middle pinholes on the bottom of the cover using a tool of your choice (I used a small drill bit and a razor blade).
Step 5: Run the cable through the back cover then twist it together to lock/secure it.
Step 6: Put the Cable key ring through and then put the screws back in.
Step 7: Remove the retractor screws and take out the split ring.
Step 8: Put the computer back together.
Step 9: Your done, go clip it to something now and retract away!
NOTE: I have uploaded a bunch of pictures so you can get an idea of what I did and how it looks. I'm also not sure how the locking part in the back of the cable key ring will hold up to salt water, so I'm considering coating it with a thin layer of silicon to keep it from rusting!
Attachments
-
 Stuff on My Desk.JPG100.8 KB · Views: 114
 -
 Finished (Front).JPG72.1 KB · Views: 110
 -
 Finished (Back).JPG73.6 KB · Views: 77
 -
 Cover (Back).JPG81.4 KB · Views: 67
 -
 Cover (Inside).JPG85 KB · Views: 78
 -
 Cover (Inside Pin Hole 1).JPG80.2 KB · Views: 70
 -
 Cover (Inside Pin Hole 2).JPG83.6 KB · Views: 76
 -
 Retractor.JPG70 KB · Views: 77
 -
 Retractor Taken Apart.JPG85 KB · Views: 71
 -
 Retractor attached to back cover.JPG89.1 KB · Views: 86
 -
 Cable Key Ring Package.JPG76.5 KB · Views: 124
