


realdiver7
Contributor
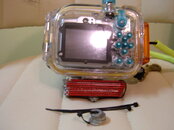
OK, so I didn't want to spend the $25 on a set of camera weights to make my Canon A720IS 8mp camera and housing neutrally buoyant in the water, so my Sunday afternoon project on this cold, wet and dreary day was to pull out the old tools and make my own weight set. It's not that $25 will break the bank, but it's just the principle of buying something when I can make it that bothers me. I take much better pictures when my camera is more steady, and it is much more steady and easier to use when it is weighted, so I believe a weight system is important.
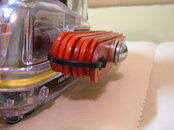
I used a Dremel tool, an electric drill, a drill bit, four metal arm plates from two sets of magnetic welding holders, one round stainless bolt, two spacer washers, one lock washer, and a small zip tie. The metal plates already had a hole in the end of each one, so I used that hole to zip tie all of the plates together.
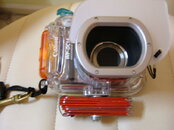
As you can see in the pictures, I cut the four metal plates in half, grinded the rough edges down to make them smooth, and ended up with eight flat metal plates. I then drilled a hole in the middle of each plate for the bolt, inserted the bolt with one spacer washer against the camera housing, and one spacer washer and one lock washer against the head of the bolt. I snugged down the bolt and the job was complete.
The lock washer is very important to help keep the bolt from working loose over time, and I have always checked the bolt on my older camera before diving. By the way, my old weight system was a heavy lead weight attached to the bottom of my 35mm camera housing with a bolt and three spacer washers. It worked OK, but the camera was always very buoyant, so this new project works better, is much nicer and more versatile.
I included extra spacer washers in my package and extra zip ties in case I need to remove some of the plates to make the unit lighter. I don't know the exact weight of the plates, but all I have to do is unscrew the bolt, remove some plates, and add some spacers if I need to adjust the weight. I won't know how much weight I will actually use until I try it in salt water in a week or two.
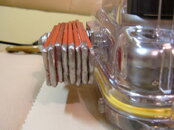
It could have been much neater if I had the right cutting tool with a larger cutting blade for the metal plates, a real grinder and some red enamel paint. Regardless, it still works very well, and the camera is well-balanced with the weights in place. There are no sharp edges to snag anything, and I am satisfied with what I have done, using the only basic tools that I own, even though the end product looks like a wide pack of chewing gum from one end!
It's not pretty, but it works, and I saved $25 and learned something all in about 1 1/2 hours! I hope this tip will help others.
I used a Dremel tool, an electric drill, a drill bit, four metal arm plates from two sets of magnetic welding holders, one round stainless bolt, two spacer washers, one lock washer, and a small zip tie. The metal plates already had a hole in the end of each one, so I used that hole to zip tie all of the plates together.
As you can see in the pictures, I cut the four metal plates in half, grinded the rough edges down to make them smooth, and ended up with eight flat metal plates. I then drilled a hole in the middle of each plate for the bolt, inserted the bolt with one spacer washer against the camera housing, and one spacer washer and one lock washer against the head of the bolt. I snugged down the bolt and the job was complete.
The lock washer is very important to help keep the bolt from working loose over time, and I have always checked the bolt on my older camera before diving. By the way, my old weight system was a heavy lead weight attached to the bottom of my 35mm camera housing with a bolt and three spacer washers. It worked OK, but the camera was always very buoyant, so this new project works better, is much nicer and more versatile.
I included extra spacer washers in my package and extra zip ties in case I need to remove some of the plates to make the unit lighter. I don't know the exact weight of the plates, but all I have to do is unscrew the bolt, remove some plates, and add some spacers if I need to adjust the weight. I won't know how much weight I will actually use until I try it in salt water in a week or two.
It could have been much neater if I had the right cutting tool with a larger cutting blade for the metal plates, a real grinder and some red enamel paint. Regardless, it still works very well, and the camera is well-balanced with the weights in place. There are no sharp edges to snag anything, and I am satisfied with what I have done, using the only basic tools that I own, even though the end product looks like a wide pack of chewing gum from one end!
It's not pretty, but it works, and I saved $25 and learned something all in about 1 1/2 hours! I hope this tip will help others.


")
