
Ok, I just had to asked my wife and she didnt see anything either. So I guess Im just see things.....Still looks good...........Mark

You are using an out of date browser. It may not display this or other websites correctly.
You should upgrade or use an alternative browser.
You should upgrade or use an alternative browser.
Lighting Tips and those nasty background GREENS
- Thread starter pakman
- Start date
Please register or login

Welcome to ScubaBoard, the world's largest scuba diving community. Registration is not required to read the forums, but we encourage you to join. Joining has its benefits and enables you to participate in the discussions.
Benefits of registering include
- Ability to post and comment on topics and discussions.
- A Free photo gallery to share your dive photos with the world.
- You can make this box go away
OP
pakman
Contributor
DFM, nice... I agree, I'd rather solve the problem pre-post but...
Out of curiousity, what did you do in After Effect? I've fired up After Effect only a few times but need to get my hands on a good tutorial. Pretty powerful program.
Out of curiousity, what did you do in After Effect? I've fired up After Effect only a few times but need to get my hands on a good tutorial. Pretty powerful program.
DaFireMedic
Contributor
Out of curiousity, what did you do in After Effect? I've fired up After Effect only a few times but need to get my hands on a good tutorial. Pretty powerful program.
After Effects is a far more powerful tool for color correction than any of the NLE's out there right now, but its not cheap and most people simply don't need it for basic color correction. I play around with it for effects and compositing animations, strictly amateur stuff (in other words, I still have a lot to learn).
At its most basic level, selective color correction is just a matter of placing a solid layer of the color that you want over the top of the pic that you want to adjust the color to. Then decrease the opacity of the colored solid layer to give it transparency. This adds color to the whole picture. To color just a section of it, such as the green part of your pic, you draw a mask (on the colored solid layer) around the section using the pen tool, which leaves that section colorized and the rest of the solid layer invisible. I did a few extra things to your pic.
The goal was to just isolate the green section, increase the brightness to bring out the seafloor, decrease the green in that section, then add a blue tint. On your pic, I duplicated the raw pic so that I could isolate that green section while leaving the reef/frogfish section intact. After drawing the mask around the green section, I then increased the brightness on the masked section using the hue/saturation effect (this also greatly desaturated the green hue in that section). To add the blue tint, I created a new blue solid layer over the top of everything as described above, decreased the opacity to give it transparency, and drew a mask on the blue layer so that it would only show over the green section. Finally, I feathered the mask so that it would blend well along the edge with the reef/frogfish.
To use the technique on a video clip, I would create the blue solid first, the pre-compose it with one of the raw photo layers, essentially combining them into one layer. Then when I draw the mask around the green part, it masks both layers that were pre-composed (instead of having to draw two masks as I did with your still). Once the hue/saturation adjustments are in place, you merely set keyframes and adjust the shape of the mask every few frames to keep it over the “nasty green part” throughout the length of the video clip.
I wish that I could explain it more clearly, but unless you have a basic familiarity with After Effects, its going to sound confusing. But its really not that difficult once you become familiar with layers and working with keyframes.
Video copilot has some good tutorials on this kind of stuff, some are free, others you have to pay for:
VideoCopilot.net Video Tutorials & Post Production
Otherwise, Creative Cow has tons of them for free:
Adobe After Effects Tutorials
OP
pakman
Contributor
DFM, thanks for the walkthru and links!
BTW - good luck on the DIY housing... Nice job... Can't wait to see footage from the HV20!
BTW - good luck on the DIY housing... Nice job... Can't wait to see footage from the HV20!
My two cents:
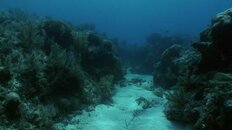
I'm an editor by trade, so I really understand color space. We specialize in underwater HD now. I don't use any color filters especially on the camera lens. My opinion; you're adding color information to the shot. Sometimes a defuse on the light, this (if at all) is the place to filter only to reduce the candlepower. However it won't do anything for your background water. Filters might, but you can't control the hue of the filter underwater either, so how do you know if you have the right tint? Can't light the entire scene.
White balance is an underwater art. We use custom presets and can usually tell by the conditions at the time of the dive. Sometimes we're wrong, requires re-deploying and takes about an hour, but the results are there. Fact: red is the shortest light wave. Violet the longest going around the color wheel. Red is dead right away, within feet. So, adjust your camera's settings to compensate for what is lost on the way down. The fine tuning of color must be done in post. No way around that with so many variables. One dive, two area, color difference must be frame matched. Check out our clips, some are free. hd2o.tv, HD Cameraflyers I also address some production issues, click on the "Flog" link. Floating blog! Also a good beating!
http://www.scubaboard.com/forums/attachment.php?attachmentid=40848&stc=1&d=1192605096
Regards,
Attachments
Hi all,
As a Hollywood cinematographer before founding HydroOptix, I can attest to how common it is to adjust the color of the lights to balance with backgrounds. On a normal day on a film set we'll use up dozens to thousands of square feet of gel.
When you white-balance for your foreground subject, bingo, your backgrounds will balance far better. And fixing the color in post just adds noise + takes lots of processing time, even on a fast box. If the Sony is color-shifting dim blue backgrounds toward green, you can still balance ambiance by eye - but you have to learn from above-water testing how much "wrong" (too much dark magenta) yields a pleasing dark blue. Then just add more foreground green, which is the opposite of magenta. Thank goodness for white balancing.
Three companies sell millions of dollars of lighting "gels" for movie & theatrical lighting in thousands of tints.
Gels are often used when you would never expect: the color temperature of daylight changes radically throughout the day, gels are added and taken away to balance with ambient exterior lighting, and discarded after a few hours of heat / UV from 18K lights.
On very low budget productions, or those wanting scenes with a gritty look, it is common to add green tint to HMI (daylight-balanced) or tungsten lights when shooting interiors with fluorescent lights. These same "plus-green" gels would be a good starting point for balancing with ambient green underwater backgrounds. Bigger budget shows have the rigging-crew go in and replace all the fluorescent bulbs with custom-made tubes that have a much higher CRI, like what you find in Kinoflos.
The above type of gel is from a color range that's cataloged for motion picture use; shifting color temperature a precise amounts to balance known light sources into a different commonly found ambiance.
There are two other types of gel color-ranges to try:
"Party gels" have evolved, often by custom requested colors that became popular. The color range is somewhat arbitrary, but a spectral transmission sheet is available for each color in the swatch books. A party color might be the best pick, depending upon what you see once you're under.
Then there's the "calibrated" range of colors - specific to each of the three primary and three complimentary color ranges -- but it's doubtful that the underwater shift will be exactly along one of these 6 vectors, though one of these greens / blues could be close enough. These are often doubled / tripled with other gels for a custom result - beyond what's practical for recreational diving. But a single green or blue is worth a try.
You should go down with a range of choices, not just one, but anything will be better than a naked light. Purchase swatch-books of the gel colors at the links below. (BTW, nowadays, all these are polyester sheets, as "real" pre-1980's gelatins dissolve in water).
NOTE - it takes a full plusgreen to shift daylight balanced light to coolwhite fluorescent. You can always double a 1/4 to = 1/2. I'd suggest starting with a sheet of full plusgreen AND a sheet of 1/4 plusgreen.
You'll have to rig your own low-tech method to securing the gel to the front of the light (e.g. jumbo rubber-band or slice up a small inner-tube). Keep your gels in a small mesh bag, so you're ready regardless of background ambiance / depth.
Here are a few links:
Store where you can purchase any of the three brands of gels, and I believe swatch books as well. Order gels by the sheet -- but you have to know what to order -- they are used to "professional" customers and are very busy.
Gel companies:
Rosco gels:
For their CalColor (calibrated-color), start with 15 green but also get a deeper tint as well.
To balance w/fluorescent light start with 1/4 plusgreen and full plusgreen from their Cinegel line.
GAM Lighting (also sells online)
And then there's Lee Filters - the largest gel company, owned by Panavision.
Burbank, California; Tel: (800) 576-5055 or (818) 238-1220
They do not have web-ordering.
bob1dp
Contributor
Jon is completely right. Your movie light is probably daylight balanced. That means it is the same color as daylight. At or near the surface your light will work well and pretty much match the natural light filtering through the water. As you go deeper the water can shift the day light to green. This is especially true in Southern California. The background is lit with light filtered through 30’ to 60’ of water filtering out the magenta and leaving the light greener. Your movie light only travels 4’ to 12’ so it picks up less green. Therefore you want to add green to the movie light to match the background. I would start with a +1/2 green. When you white balance the green is taken out of the movie light and therefore out of the background also.
OP
pakman
Contributor
thanks guys for the tips.
Cameraflyer77
New
- Messages
- 3
- Reaction score
- 0
Use a filter unless your camera has advanced setting. Natl Geo isn't using filters but they have million$ and year$ and $taff to mess with it. Most cams can't make that mush adjustment, plus you got a light like the sun. turn that down. Does use of red, pink depend on how deep?
Similar threads
- Replies
- 4
- Views
- 1,020
- Replies
- 40
- Views
- 4,293
- Replies
- 0
- Views
- 408
- Replies
- 0
- Views
- 417
