Is this Ok?

Please register or login

Welcome to ScubaBoard, the world's largest scuba diving community. Registration is not required to read the forums, but we encourage you to join. Joining has its benefits and enables you to participate in the discussions.

Benefits of registering include

  • Ability to post and comment on topics and discussions.
  • A Free photo gallery to share your dive photos with the world.
  • You can make this box go away

Joining is quick and easy. Log in or Register now!

buddhasummer

Down under...
ScubaBoard Supporter
Divemaster
Messages
17,506
Reaction score
9,734
Location
Somewhere between here and there
# of dives
2500 - 4999
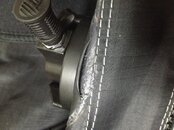
Just had inflator gasket changed on my Santi suit to work with Thermovalve, my suit had Sitech valves which are narrower and gasket is internal, Thermovalve is same as Apeks so external gasket was fitted and hole made larger.

i got the suit back today and it looks like this. Is this normal and ok to use or does it need to be returned? Cheers
 

Attachments

  • image.jpg
    image.jpg
    50.6 KB · Views: 301
Probably okay given the valve butts up against it to seal but in terms of workmanship not so much. I would send whomever did the work the picture and ask them how they want to handle it. My suggestion would be for them to send you additional glue or reimburse you for buying glue to make it right. It would save everyone money and time.

That said I would probably remove the valve and check the gasket to make sure it is glued on fully elsewhere.

Cheers, I was kinda thinking along the same lines. I sent an email with attached photo and am just waiting for a reply. I'm a little OCD so wanted a quick answer and figured I'd get one here on SB.

I'll remove the valve as you suggest and check rest of gasket. Even if it still seals properly I don't really like the fact that it's peeling. I can buy the glue here PB-300 but it's almost $50 for a very small mini tin. Would I just glue the peeling section or remove the gasket and re glue the whole thing? Is there anything I should be careful of?
 
I would pull the gasket up only to apply glue. If the whole thing pulls off I'd send the suit back and tell them to start over.

If minor, apply glue on gasket and suit, let dry, apply additional layers as directed (usually two), and then press together.

Some instructions: Drysuit Repair Instructions | O.S. Systems
 
...//...i got the suit back today and it looks like this. Is this normal and ok to use or does it need to be returned? Cheers

Absolutely NOT normal!!! There is no adhesion other than around the edge. Looks to me like someone slopped NeoCoat on your suit and thought it would seal to the valve. NeoCoat is great for covering small pinholes and tears, but it just doesn't cut it as an adhesive.

First mark the area with fabric chalk. Paint on a thin coat of Neoprene Cement and let dry. Hour or so. Repeat. Repeat. ... The painted area will finally appear shiny when the fabric is filled with dried neoprene cement. That part is done. Scuff the valve gasket with sandpaper, it gets painted too. One or two coats will be fine, let them dry. YOU GET ONE AND ONLY ONE CHANCE AT THIS: Press the two pieces together.

Do it yourself, you will get a much better end result...

NeopreneCement.jpg
 
Absolutely NOT normal!!! There is no adhesion other than around the edge. Looks to me like someone slopped NeoCoat on your suit and thought it would seal to the valve. NeoCoat is great for covering small pinholes and tears, but it just doesn't cut it as an adhesive.

First mark the area with fabric chalk. Paint on a thin coat of Neoprene Cement and let dry. Hour or so. Repeat. Repeat. ... The painted area will finally appear shiny when the fabric is filled with dried neoprene cement. That part is done. Scuff the valve gasket with sandpaper, it gets painted too. One or two coats will be fine, let them dry. YOU GET ONE AND ONLY ONE CHANCE AT THIS: Press the two pieces together.

Do it yourself, you will get a much better end result...

View attachment 181009

My suit is trilam, is this product still ok to use, assuming I can find it over here. Cheers

---------- Post added April 2nd, 2014 at 10:02 PM ----------

I would pull the gasket up only to apply glue. If the whole thing pulls off I'd send the suit back and tell them to start over.

If minor, apply glue on gasket and suit, let dry, apply additional layers as directed (usually two), and then press together.

Some instructions: Drysuit Repair Instructions | O.S. Systems

Looks like it's going back, second time lucky, I hope.
 
Who did the job? Was it Santi factory or an LDS?

---------- Post added April 3rd, 2014 at 11:20 AM ----------

Any chance to do with the silicon lub that is required for the TiZip?
 
Who did the job? Was it Santi factory or an LDS?

I'd rather not say online as everyone makes mistakes. I'm just looking for advice on what to do, I wasn't sure if it's a problem that's needs remedying or is ok to dive.

---------- Post added April 2nd, 2014 at 10:26 PM ----------

Who did the job? Was it Santi factory or an LDS?

---------- Post added April 3rd, 2014 at 11:20 AM ----------

Any chance to do with the silicon lub that is required for the TiZip?

I guess it's possible but wouldn't have thought so as no lube goes anywhere near the outside of the gasket. Looking more closely at the gasket it looks like it might have not been prepared properly.
 
https://www.shearwater.com/products/peregrine/

Back
Top Bottom