Question Help identifying older Mako 3 stage

Please register or login

Welcome to ScubaBoard, the world's largest scuba diving community. Registration is not required to read the forums, but we encourage you to join. Joining has its benefits and enables you to participate in the discussions.

Benefits of registering include

  • Ability to post and comment on topics and discussions.
  • A Free photo gallery to share your dive photos with the world.
  • You can make this box go away

Joining is quick and easy. Log in or Register now!

Neuport

Registered
Messages
13
Reaction score
8
Location
South Dakota
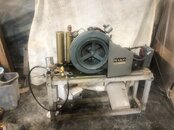
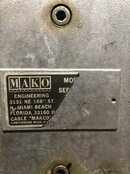
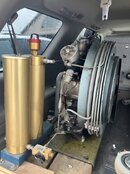
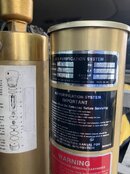
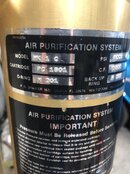
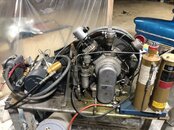
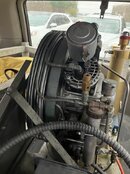
I recently bought this compressor along with a pile of other gear. The seller bought it from a fire department several years ago when they upgraded. The name plate is missing the portion with the model number. Any help identifying it is greatly appreciated.
 

Attachments

  • 3DD6D182-87AF-4356-9ECA-503C646A795D.jpeg
    3DD6D182-87AF-4356-9ECA-503C646A795D.jpeg
    83.4 KB · Views: 60
  • 5B832BD7-837E-4E31-96AD-CE1C3E99A14A.jpeg
    5B832BD7-837E-4E31-96AD-CE1C3E99A14A.jpeg
    158 KB · Views: 58
  • 1514BFB2-65A0-40A2-921D-E6582BA9C942.jpeg
    1514BFB2-65A0-40A2-921D-E6582BA9C942.jpeg
    100.2 KB · Views: 63
  • CA7C5C84-10FE-4A99-98CE-181B6B9680EA.jpeg
    CA7C5C84-10FE-4A99-98CE-181B6B9680EA.jpeg
    92.8 KB · Views: 69
  • F635E7E5-6918-4997-AAAB-42E150BD8C43.jpeg
    F635E7E5-6918-4997-AAAB-42E150BD8C43.jpeg
    98.9 KB · Views: 69
  • FE10923A-FF2D-436D-BEAF-D19916EC2397.jpeg
    FE10923A-FF2D-436D-BEAF-D19916EC2397.jpeg
    121.8 KB · Views: 69
  • 907B2087-C5D2-46A5-B118-317A7EA3B2DF.jpeg
    907B2087-C5D2-46A5-B118-317A7EA3B2DF.jpeg
    101.9 KB · Views: 59
There will be numbers ion the block and heads to give you clues...
 
The block is a very old Bauer K14
Look on the german bauer site you will find parts list
 
Actually, I have all the notifications on but am not receiving notices of new posts. Surely user error.

Turns out it is a 4 stage k14-85 block. I couldn’t see the fourth cylinder until I unloaded it from my vehicle. I had downloaded the Mako Universal manual but your suggestions and diagrams were helpful in positively identifying the block. Thanks again.
 
The K14-85 has been discontinued for a long time.
No doubt. It looked like an antique when I got it so I expected it was out of production for many years. But it was supposedly being used before I bought it. I’m working my way through it cleaning it up and following the maintenance manual to check it over. It’s an interesting project. I wasn’t in the market when I bought it so I’m in no hurry. It was included with a lot of other gear.
 
No doubt. It looked like an antique when I got it so I expected it was out of production for many years. But it was supposedly being used before I bought it. I’m working my way through it cleaning it up and following the maintenance manual to check it over. It’s an interesting project. I wasn’t in the market when I bought it so I’m in no hurry. It was included with a lot of other gear.
If the final stage discharge valve is the 7780 as I suspect, they have been discontinued, but I know someone in Texas that has several new ones he obtained when Mako sold off their Bauer parts inventory after they switched to Compair/Reavell.
 
If the final stage discharge valve is the 7780 as I suspect, they have been discontinued, but I know someone in Texas that has several new ones he obtained when Mako sold off their Bauer parts inventory after they switched to Compair/Reavell.
Thanks Craig, good to know. I haven’t gotten that far yet and don’t even understand how often those need to be replaced.

I have not powered it on. The compressor seems to build some pressure with just turning it by hand and water accumulates in the separators any time I rotate it for a while. Don’t know if the water was already in the system or if it can condense from just a few hand revolutions.

I did a first pass getting the caked on grease off so I could handle the compressor more easily. I have inspected and cleaned the first stage valves. The valves and cylinder looked much better than I expected. I did a thorough clean of the 2 intermediate separators; nasty! I took off the inter-cooler(?) coils and flywheel to better get at the rest of it. While they are off I went ahead and flushed the lines. The longest, smallest diameter circuit was so clogged I couldn’t get any 100 psi air through it. I turned my shop air up to 140psi and gently heated the coils until air started to trickle through. Then I pushed small boluses of water based degreaser through with air until I could finally circulate it continuously with a low pressure water pump. I’ve got all the lines pretty well flushed now and a lot of junk came out of all of them.

Next up is to finish the degrease on the rest of the head, inspect the rest of the valves and cylinders, reassemble, and tackle the electric and mounting base. Those should just need a bit of tidying up. If I get that far I’ll power it up. If that looks good I’ll next tackle the two stage final filters. Good thing I’m in no hurry. 😀
 

Back
Top Bottom