Ok...we start with the un-edited photo. This was 'saved as' from the forum, so the file size is very low (29.5kb) and a lot of the original detail and color information was lost. You can get better results from an original hi-res photo downloaded straight from your camera...
(if the posted pics don't load, you can see the gallery set here on Flickr..
andydavis121
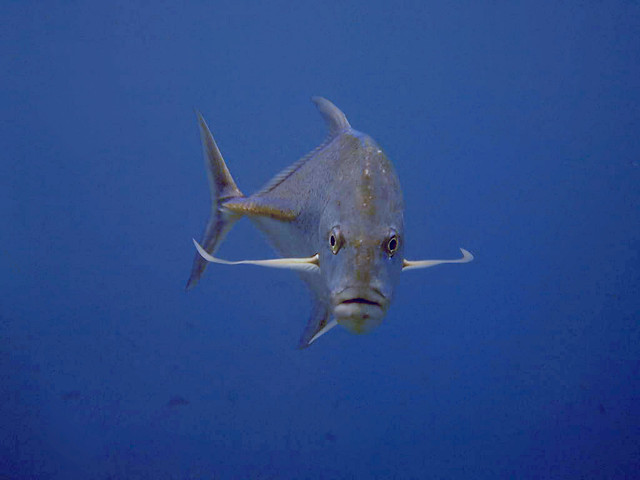
ORIGINAL
The original photo has lots of noise and some backscatter evident in the blue background. The fish lacks resolution and is quite 'blue', due to color absorbtion at depth.
EDIT #1 Backscatter Removal
I created a copy layer, then clicked on Filter-Noise-Dust&Scratches. I adjusted the filter radius until all the background speckles were removed (this also blurs the fish). Close the filter.
I then check the box on 'Dust & Scrathes' in the history menu, to set a 'history state'. Once I have done that, I click on the previous action 'create new layer'. The changes disappear. I then select the history brush from the palette menu and set the mode to 'darken'. I use this brush to 'paint' the Dust & Scratches filter over the background, removing the speckles, but not touching the fish.
EDIT #2 Channel Mixer
Create a new Channel Mixer layer. For the 'red layer', experiment with raising
either the green or blue values. If you raise one value, you must decrease the other (i.e. raise green, decrease blue). This process 'steals' picel information from the selected color and changes it into red. It is a process of experimentation for each photo. You can see below that it has brought more red into the photo - but the results aren't that drammatic because there was very little color info in the photo to start with (web saved photo)...it had a narrow spike histogram in RGB.
EDIT #3 Levels
Create a new 'Levels Layer'. Manual adjust the Red, Green and Blue levels to balance the color. You do this by dragging the 'stops' in until they touch the outer edge of the histogram at each side. Sometimes 'autolevels' works fine - but on this pic, because of the sharp histogram and the channel mixing, I had to get creative and experiment to get a better output.
EDIT #4 Hue and Saturation
Open another layer for Hue and Saturation. Go through each color option individually and adjust the saturation setting and the lightness to give a pleasing effect. Then go to the Layer Menu..and adjust the setting from 'normal' to 'multiply'. This will make the image very dark (it increases the pixels). To compensate for this, reduce the 'Opacity' setting. Slide it down from 100% until the photo is sufficiently light. It gives a crisper and deeper image.
EDIT #5 Brightness / Contrast
Open a new layer for Brightness/Contrast. Adjust both of the sliders to experiment and see if you can improve the image.
EDIT #6 Unsharp Mask
Because this image was a little blurry, I open a new copy layer of the original. Using the same process as I did for 'Backscatter Removal', I open Filter - Sharpen - Unsharp Mask. As I make adjustments to this, I only look at the fine detail on the fish.. ignore the rest. Set 'Threshold' at 1. Adjust/raise the 'Radius' until you can see improvement in the crisp detail on the fish. Once I have done that, I creat a 'history state' by clicking the box next to 'Unsharp Mask' in the history menu. I then click on the previous action 'create new layer'. The changes disappear. I then select the history brush from the palette menu and use this brush to 'paint' the Unsharp Mask filter over strategic locations of the fish. This adds some depth and definition.
EDIT #7 Trim, Size and Save
As this is a portrait, I want to remove some background. I use the Rectangular Marquee Tool to designate the area I want, then go to Image - Crop to cut the image down. The new image is quite small... so I then increase the size. I go to Image - Image Resize and adjust it larger. I opt for Resample Image: Bicubic Sharper. I then save the picture at max resolution...

There you go... but it was a 5 minute process, done as a demo and using a low res web-color 29.5kb original image!!!


")