


Create Good Pre-Dive Habits To Help Make Great Photographs
Posted by Marty Snyderman on Wednesday, 15 April 2015 in Photo Guru

Posted by Marty Snyderman on Wednesday, 15 April 2015 in Photo Guru
Hi Vivid-Pixers,
In all of my previous blogs I have written about techniques involving things you want to consider or do during a dive. This blog is a bit different in that I will be discussing some things that you will want to do before your dives as you prepare and assemble your camera system.
Sometimes when I bring up this topic in my photography classes students respond as if this aspect of underwater photography is as important with regard to their photographic success as the things they want to do in the water when they are setting up and capturing a photograph. But the hard fact is, if your camera system is not functioning properly during your dive, it really doesn't matter how far you have come in terms of mastering in-water techniques such as composition and acquiring a proper exposure. When your camera system malfunctions it's frustrating, painful, maddening, and costly.
Here's another cold hard fact: Every seasoned underwater photographer I know has a story to share about how they have lost an opportunity of a lifetime because of something they did, or something they failed to do, when setting up their camera system. They failed to make sure their batteries were charged, forgot to put a media card in their camera, failed to remove their lens cap in a housed camera, failed to make sure their camera housing controls lined up and worked properly today because they did yesterday, or failed to make sure their strobes fired when they tripped their camera's shutter etc.

My bet is many people that read the paragraph above will be reminded of some of their own mistakes. Goodness knows I have made my share.
That said, my mistakes have taught me the value of developing good habits and being disciplined when setting up my camera system. So, here are 13 tips and comments you will want to pay attention to when setting up your camera system.
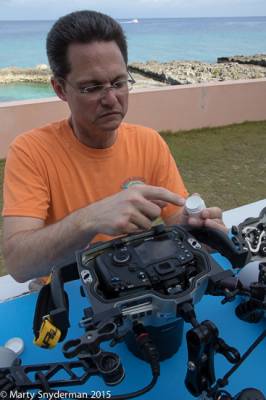
1) Give the set up process your undivided attention, and avoid multi-tasking. Talking on the phone or watching a ballgame on tv can prove to be a very expensive mistake if it causes you to improperly deal with an o-ring seal.

2) Only work with your equipment in areas that are well lit, clean, and out of wind and spray. Too many flooded camera systems are the result of tired photographers assembling their system too late at night in a dimly lit hotel room the night before an early morning dive. Working in the wrong conditions is a costly mistake just begging to happen.
3) Be sure that all rechargeable batteries are fully charged before assembling your camera system. Along the same lines, if you use disposable batteries in your camera or strobe, be sure they are fresh. If you have any doubts, replace them. Compared to the cost of a dive, batteries are cheap.

4) Follow the o-ring related instructions provided by your manufacturer. Some o-rings should not be lubricated at all. Many others should. But not all o-rings are made of the same compounds. Use the wrong lubricant on an o-ring, and it can cause the o-ring to swell. That can lead to flooding.
5) O-rings in conjunction with the surfaces they seat against make the watertight seals we want. Those seals are not made by the o-ring lubricants. The translation here is that too much lubricant can cause leaks. Too much lubricant attracts gunk, and gunk of any kind on an o-ring can lead to system floods. The purpose of a lubricant is to keep o-rings supple and prevent them from becoming brittle and cracked.
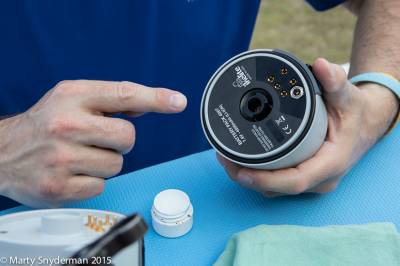
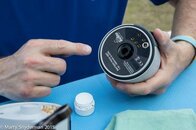
6) With your o-rings cleaned and/or lubricated as your manufacturer suggests, you have done half of the job with regard to maintaining the integrity of an o-ring seal. The second half of the job is to make sure the surface the o-ring seats against is clean and free of debris.
Take a close look! A cat hair or piece of sand on the seating surface can cause a leak in just the same way debris on an o-ring can.

7) Make sure to format your media card in your camera. Formatting helps to ensure that your media card and camera communicate properly so the media actually records the data for your image files. Formatting is completely different than deleting files on a computer before inserting your media into your camera. Both formatting and deleting files make space on your media card, but only formatting the media in camera helps to ensure that the data from your image files gets recorded properly on your media card.
Formatting is an option offered digital cameras. If you are not sure how to format your media in camera, consult your camera manual.
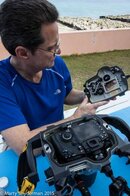
8) Once your camera system is assembled, be sure to test to make sure the various controls function properly. If you are using any kind of housing, make sure you can manipulate the camera's controls as you desire. It is usually impossible to fix misalignments during a dive. Make sure that you can focus the lens and trip the shutter. And be sure that strobes fire correctly.

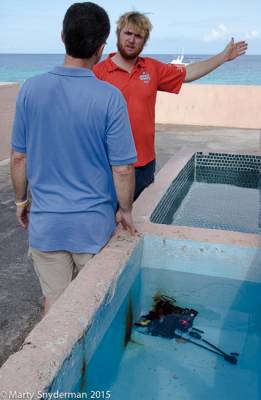
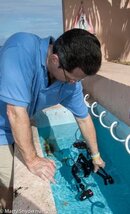
9) Once you are satisfied that your camera system is assembled properly you want to give the system a pre-dive dunk test if at all possible. This means you want to dunk the system in a "camera bucket" or other freshwater container to LOOK for leaks. The idea here is to check to be sure your system is, in fact, assembled correctly. This means that you want to check the o-ring sealed areas for leaks. If present, those leaks will be indicated by escaping air bubbles.
If you see a stream of bubbles, immediately remove your camera system from the freshwater and look inside for signs of water. Re-assemble, or repair, before taking the camera system on a dive.
Pre-dive dunk tests have saved uncountable numbers of camera systems from serious ocean floods. But the test can only help you if you look closely for leaks when conducting your test.

So, dont lose your focus and look away from your assembled camera system when you are conducting your pre-dive dunk test as the photographer wearing the blue shirt is doing here.
10) If your camera system appears to be leak free, trip the shutter and be sure your strobes fire. This is just another quick, inexpensive way to double-check that your system is working properly, and that you have not missed a possible slow leak.
A few seconds after I enter the water I trip the shutter and check to be sure my strobes once again fire as desired. And then I trip the shutter again when I am about 30 feet deep as I descend. If my strobes worked on land, but don't work during these early in-water tests I can be pretty sure that I have some kind of saltwater related problem. That means a leak, if not a full-on flood. Time to go into damage control and exit the water.
11) If you are not ready to enter the water following your pre-dive dunk test, you will probably want to turn off your camera and strobe(s) to avoid draining batteries. And then you want to properly stow you camera system until you are ready to make your dive.
You want to stow your camera on a designated camera table that is completely free of food, drinks, sun tan lotion, oily crew tools, and anything else that is not camera system friendly. If you are on a boat, make sure that table has a lip on it that will prevent a camera system from falling to the deck if the boat makes a sudden turn or catches the wrong wave.
If there is no camera table you will want to stow your camera system out of the sun in the lowest possible place. Why low? Camera systems never fall up! But gravity has caused a lot of camera systems to fall onto hard surfaces.
Why out of the sun? It is not necessary for some housed cameras if the housing is made of aluminum, but for many plastic (or plastic-like) housings stowing them in direct sunlight before a dive will lead to lenses and ports fogging over with trapped moisture inside of housings and/or cameras.
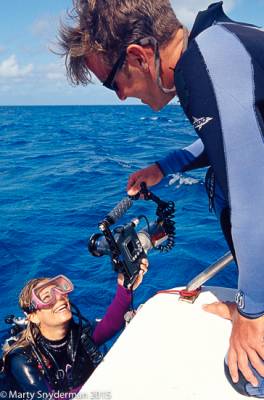
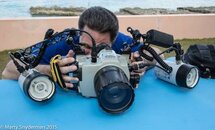
12) Whenever possible enter the water and make sure you are ready to descend, and then have someone hand you your camera system. That is usually a good idea as it prevents impacting the system when you enter the water. That said, be sure you have instructed and shown whoever is going to hand you your camera system where you want them to grab it, how you want the camera presented to you when they make the hand-off, and not to let go until you say "I have it". Plenty of cameras have made an unwanted solo dive because of some miscommunication during a hand-off. An even bigger problem is the result of camera systems coming apart because strobe arms and lanyards were not tightened or properly attached. Wise photographers will pay heed to this comment.

13) There is no possible way to cover every possible scenario in terms of how to prep your equipment. So, in many respects this piece is about three things, (a) developing some good habits, (b) being disciplined about doing what you know you should, and (c) realizing that the advice offered in this piece is about developing a philosophy that encourages you to "tune in" to your camera system when you are setting it up and stowing it before a dive.
We hope you enjoy and benefit from the information presented here, and we hope to see you back again in a couple of weeks. If you did benefit from this blog, please tell a friend about it.
Thank you,
Marty Snyderman For the Vivid-Pix Gang

For more information visit our blog at Vivid-Pix.com
Attachments
-
 2e1ax_elegantwhite_entry_8_X3A2536.jpg31.6 KB · Views: 344
 -
 b2ap3_thumbnail_9_20140716_wide_angle_01-53.jpg13.9 KB · Views: 403
 -
 b2ap3_thumbnail_12_X3A2549.jpg17.1 KB · Views: 324
 -
 b2ap3_thumbnail_1_X3A2484.jpg17.8 KB · Views: 368
 -
 b2ap3_thumbnail_5_X3A2531.jpg14.7 KB · Views: 364
 -
 b2ap3_thumbnail_3__X3A2500.jpg14.6 KB · Views: 340
 -
 b2ap3_thumbnail_2_X3A2491.jpg20.2 KB · Views: 364
 -
 b2ap3_thumbnail_7_X3A2578.jpg17.3 KB · Views: 396
 -
 b2ap3_thumbnail_6_X3A2558.jpg17.1 KB · Views: 369
 -
 b2ap3_thumbnail_4_X3A2565.jpg15.1 KB · Views: 331
 -
 b2ap3_thumbnail_10_CAYMAN-79.jpg20.7 KB · Views: 349
 -
 b2ap3_thumbnail_11_CAYMAN-84.jpg16.5 KB · Views: 373
