CDHK in action - examples

Please register or login

Welcome to ScubaBoard, the world's largest scuba diving community. Registration is not required to read the forums, but we encourage you to join. Joining has its benefits and enables you to participate in the discussions.

Benefits of registering include

  • Ability to post and comment on topics and discussions.
  • A Free photo gallery to share your dive photos with the world.
  • You can make this box go away

Joining is quick and easy. Log in or Register now!

String

Contributor
Scuba Instructor
Messages
8,510
Reaction score
378
Location
Anywhere
# of dives
I just don't log dives
Took the Canon A620 to the local quarry to test the new RAW function provided by the hack.

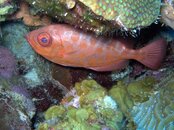
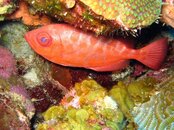
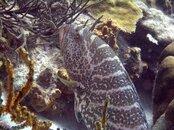
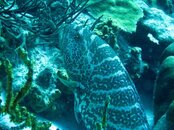
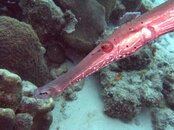
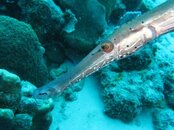
All photos other than the fish, zimmer and reel taken at a depth of 28m (95ft) and visibility no more than 3m - LOTS of silt and algae and very dark. All done on ambient light (no strobe or internal flash)

All taken with 1/40th shutter and white balance set to cloudy. There was no calibration done in the water.

All the after shots are nothing more than the adobe camera RAW functions for white balance, fill light and so on and are compared to the original JPGs off the camera. No other fancy post processing and each one took about 30 seconds to do.

IMG_8779%20(Custom).JPG
CRW_8779%20(Custom).jpg


IMG_8782%20(Custom).JPG
CRW_8782%20(Custom).jpg


IMG_8789%20(Custom).JPG
CRW_8789%20(Custom).jpg


IMG_8796%20(Custom).JPG
CRW_8796%20(Custom).jpg


IMG_8805%20(Custom).JPG
CRW_8805%20(Custom).jpg


IMG_8806%20(Custom).JPG
CRW_8806%20(Custom).jpg


IMG_8807%20(Custom).JPG
CRW_8807%20(Custom).jpg


In short thanks to the power of being able to edit the RAW files offering way way more flexibility than the old JPGs i can lock a shutter speed to avoid blur and correct any underexposure fairly well in software. In addition i dont need to recalibrate white balance every 2-3m or so with a slate thus making it far less time consuming.

The hack has given my camera a new lease of life!
 
Very impressive results. I am using the hack on a G7. Would you care to give us a bullet point description of your workflow to achieve such nice results.
 
If you have photoshop my workflow is simple to the point it requires no talent at all by me.

Firstly download the RAW (.crw) files and convert them to .DNG so that adobe can read them.

Then open them up in camera RAW.

The first thing i do is the white balance, find a neutral gray or white area on the photo, use the eyedropper selector (in the top left on ACR4) and click on it. For a neutral gray i tend to find the white quarter on tanks, maybe a bit on someones suit or even a dive computer works.
Quite often that is all thats needed to produce the above results.

Sometimes after that i increase the exposure slightly on the slider and rarer, increase the blacks. More often than not though simple correcting the white balance and nothing else achieves the above results.
 
Here are several pictures taken with my A570is. The camera does not have a strobe attached, only the internal flash. The CHDK hack results in both RAW (Canon CRW format) and JPG files being saved. Duplicates of some a few images are shown here to indicate differences between the CRW and JPG results. The files with names (can be seen by putting your cursor over each image for a moment) ending in "JPGorig.jpg" contain the images originally saved as JPGs directly by the camera. The others ("CRWorig.jpg") were saved by the camera as CRW files using the CHDK hack software.

All were edited slightly using Picasa. Picasa offers a major advantage as a viewer because it opens CRW files directly and implements the native white balance information. The Picasa editing capabilities are primitive, but often sufficient. The biggest negative about Picasa is that it saves files only as JPGs.

The Picasa editing of the present images consisted of hitting the "I'm feeling lucky" button, then using the "sharpen" feature. That's pretty much it. The CRW files then were converted to JPGs by Picasa.

For the most part, the major color differences between the two file types are obvious and accurately reflect the original differences between the CRW and JPG files as stored in the camera. The bigeye snapper has richer colors (flash used; fish in a dark overhang area) when the image is captured as a JPG, but the colors are more realistic for the CRW image. Tiger Grouper image taken without flash; trumpetfish taken with flash (you can see the overexposure of areas on the side of the head). My estimate, after several hundred pictures, is that the CRW images look better than the JPGs about 90-95% of the time, but not always. Above water there may be little difference.
 

Attachments

  • Glasseye Snapper CRWorig.jpg
    Glasseye Snapper CRWorig.jpg
    52.8 KB · Views: 47
  • Glasseye Snapper JPGorig.jpg
    Glasseye Snapper JPGorig.jpg
    62.2 KB · Views: 44
  • Tiger Grouper CRWorig.jpg
    Tiger Grouper CRWorig.jpg
    57.2 KB · Views: 49
  • Tiger Grouper JPGorig.jpg
    Tiger Grouper JPGorig.jpg
    62 KB · Views: 44
  • Trumpetfish CRWorig.jpg
    Trumpetfish CRWorig.jpg
    42.4 KB · Views: 47
  • Trumpetfish JPGorig.jpg
    Trumpetfish JPGorig.jpg
    48 KB · Views: 41

Back
Top Bottom