Another new compressor owner....

Please register or login

Welcome to ScubaBoard, the world's largest scuba diving community. Registration is not required to read the forums, but we encourage you to join. Joining has its benefits and enables you to participate in the discussions.

Benefits of registering include

  • Ability to post and comment on topics and discussions.
  • A Free photo gallery to share your dive photos with the world.
  • You can make this box go away

Joining is quick and easy. Log in or Register now!

Nice setup Mike, I'm adding another gauge to my system this evening so I can see the pressure after the 33-inch filter but before the final PMV and will post some pics up when its fitted. These things just keep growing don't they.Why do you have a digital gauge on your oxygen output after the regulator?

I wanted to ensure that I had as much control as possible on my O2 so I put the regulator --> Solenoid cut off valve --> Check valve, Micro Metering Valve, and the 100 PSI Gauge. This is my way of being able to recreate the desired mix accurately and quickly. :)
I also can't see any connections going to and coming from your booster apart from the drive gas. Do you use quick couplings or something?
Hehe.. My booster is taken apart which is hard to see as I am O2 cleaning it. I am having a slight issue putting some of it back together however I just need to sit down and rebuild it. I disconnected the block from the booster until it is back together. I do also use quick couplings for the majority of my major connections.
 

Attachments

  • 10.jpg
    10.jpg
    25.3 KB · Views: 312
Manni - looks like you are a happy man. I couldn't see a Pressure Maintaining Valve after your final filter, just a check valve. Do you have a PMV? It is kinda essential for filtration life. Manni if you look at pic 3 and 4 of Mikes system, you will see a AE211 PMV on the left hand side of his wall mounted stack. This keeps the MC (molecular sieve) under constant pressure and extends the filter effectiveness by about 450% and increases the dwell time (time that the gas is in contact with the MC) - which is very essential for correct filtration.

Here is a shot at the other side where the second filter meets fill hose - this part you could not see in the first pics. PMV set at 2000 psi. I dont completely know what I am looking at - but I trust Jim Sheldon. I think the PMV is there - but I could be wrong.
compfilt.jpg
 
Thanks Manni,

Ok, so on the right hand side leading into the first tower you have a Aqua Environment 955 check valve - there to keep pressure in your stack.
Then on the left hand side out of the second tower you have what looks like a bleed valve and that goes into what also looks like another 955 check valve - is this what you are referring to as a PMV? If so, can you point me to a link to it as I can't find anything that looks like that on the Aqua Environment website as it looks like Jim has used AE valves but all of their PMV's look like either the 211 or the 635, which are both larger than the valve you have there. Not trying to give you a hard time, just trying to understand exactly what model you have there, it may not be a Aqua Environment brand. As a friend of mine recently learnt the hard way, a check valve on the output does not do the job of a PMV - in fact you ideally need both on the output side.

Cheers,

DT


I've asked JIm to comment. I dont think you are giving me a hard time at all. I would rather add anything nesessary - than - well, have anything bad happen. How did your friend learn the wrong way? What happened and what are the potential problems?

If it is missing something, I will be sure to add it, but I will wait for Jim to comment.
 
Hi Manni,

My friend just had a check valve on the output and decided to check his stack element after about 1/10th of its expected life only to find that the MC was spent and the blue indicator strip had turned a nice pink colour. So nothing life threatening, just no moisture removal.

Glad you haven't taken offence, and no offence intended to Jim either.
 
Mike,

If you have any issues putting your booster back together, let me know. I've fully pulled my Haskel AGT15/30 down to every last part and Oxygen cleaned it too and may have a few tips. Let me guess - it's the check valves right? They can be a pain to put back together, but Perry from High Pressure Technologies told me about the little trick of putting a small amount of oxygen lube on the ring, so it stays put on the cradle while you put it in. This works well.

If it is the seal shearing the final o-ring in the HP barrel, while getting it past the cir-clip groove, Perry told me to squeeze them into the shape of an egg and feed them in sideways and then you can straighten them back up once they are past the cir-clip groove. This also works well.

If it's something else, let me know.

Cheers,

DT
 
M<anni,
I have a check valve immediately after the moisture trap - That is correct -- this allows bleed of the moisture trap with no back flow from the filters. Immediately after the 2nd filter is a bleed valve which allows you to remove the pressure from the filters to change cartridges. Next is the PMV which actually holds pressure in the moisture trap and both filter chambers. Your fill whip attaches to the PMV. In your crate is a complete operating procedure that covers all these same issues. I have been doing this for many years and read most all comments on scuba board.
Jim Shelden
Jim Shelden
 
A few pics of my panel and other stuff.

Banks.jpg Sticks and Omni.jpg Panel.jpg Outlet.jpg Hopcalite.jpg System.jpg


Mike,

As promised, here are a few pics of my current setup.
Pic 1: 350 bar bank on the left, then two 200 bar banks, which can supplement the drive gas cylinder too. Then Oxygen and Helium.
Pic 2: The helium and oxygen can be sent either to the dual sticks via regulators for blending or to the panel for pp filling, or direct to the booster via dual tee offs into a DPG111. The clear reinforced hose from either the dual sticks or the Omni booster (thanks Michael Fisch), will fit into the compressor intake and both are air tight.
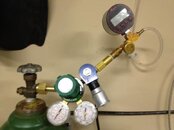
Pic 3: The panel, the little personal filter is completely filled with Hopcalite for CO removal. I have a 3.5m and 7.5m whip, so I can fill in the boot of the car without needing to lift tanks out if I want. AE 415-6000 on 350 bar bank and bypass to fill the bank. Bleed on a Hoke needle valve with silencer. DPG111 main gauge with both of them powered by the offboard battery pack to the right of the main gauge. Hoke needle valves for oxygen and Sherwood for the rest. The booster supply is a Swagelok plug valve for the Helium and a Sherwood for the oxygen.
Pic 4: Shows one of the two solenoid controlled auto dumps, the P0(p21), the moisture indicator for that, a check valve and a 30 micron pre filter, then the base of the 33-inch tower.
Pic 5: Shows the tee off to the 33-inch tower pressure gauge, then the moisture indicator for the 33-inch tower, then the Hopcalite filter, then a bleed for changing filters, then the PMV set to 150 bar with an OPV set to 325 bar, then another Hoke check valve and into the main manifold.
Pic 6: Just a different view which shows the Haskel a little better AGT15/30 with AE 415-5000 and ball valve on the drive gas input. The Haskel has DIN female on input and output, and is normally always connected to the panel and then I just connect another 8 foot whip with needle valve and DPG111 to whatever tank or bank I want to.

Been thinking about adding a second oxygen bank and two more 200 bar air banks, but not sure I will yet. Also been thinking about adding a wall mounted permanent CO monitor like this: CO Clear/ CO Clear He but with me taking the intake from the compressor from the outside air and having parkland behind us and so much filtration, I'm not sure it is worth it in reality. I have the Kitigawa test tube system and even without the 33-inch filter and the Hopcalite filter my CO levels were within spec. I may just add it for panel bling one day....

This panel building stuff sure is addictive. The biggest problem I am having now is space........

Oh, and in case you are wondering what the ally tank to the left of the panel is, it is a drain container with the valve running to a second gas reservoir with a breather in it and the drain container has a ball valve towards the bottom to empty it.
 

Back
Top Bottom