Regulator Geeks: Scubapro Mk19EVO - teardown & discussion

Please register or login

Welcome to ScubaBoard, the world's largest scuba diving community. Registration is not required to read the forums, but we encourage you to join. Joining has its benefits and enables you to participate in the discussions.

Benefits of registering include

  • Ability to post and comment on topics and discussions.
  • A Free photo gallery to share your dive photos with the world.
  • You can make this box go away

Joining is quick and easy. Log in or Register now!

my beef is ' why is every Scubapro 2nd stage from the factory de-tuned so much'?
My money is on „first impressions“; they don’t want new users who copped out to get the „deep down you want the best“ to come complaining about a freeflow on 1st use
Another guess is lead time/storage, so they anticipate by tuning stiff to compensate for the spring taking its set 🤷🏽‍♀️

Could also be completely unintentional, and the assembly techs are just.. incompetent

Something a la „rental config“ flow vane in g250HP/V..

my 260s were alright out of the box, but after the 1st 10 dives I had my reg tech class and I gor a crack at messing with them… wooowee, lot’s of headroom to improve the tuning
they got silky smooth, but them I detuned them a bit via the knob (lots of time with SM tanks submerged while at surface during classes > lots of gas hemorrhage)
 
Could also be completely unintentional, and the assembly techs are just.. incompetent
I don't think it this ^^^.
My 2 G260 were not alright out of the box, once tuned, 'sweet as'.
complaining about a freeflow on 1st use
More like this ^^^.
Joe Blow bubble blower does not know, or care I suspect.

OK, I am over it.
Back on topic.
 
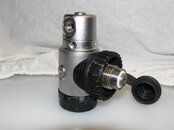
A late follow up, I recently got my hands on a couple of mk19s (the original, I also have the evo)
And my first instinct was ofcourse to open it up and finally have a looksy inside since the original presentation didn’t have it

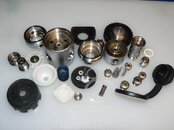
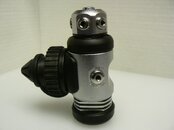
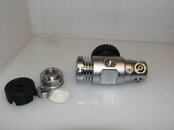
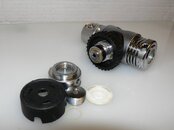
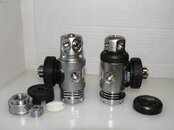
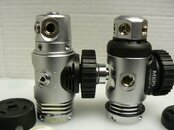
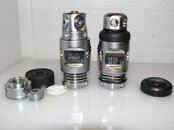
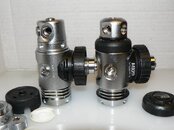
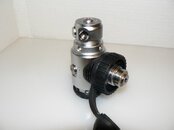
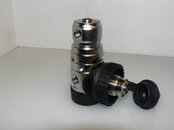
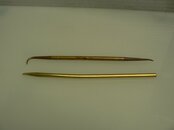
Here are a few pictures (next to the body of an mk17 non evo)

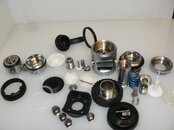
The plastic cup that does the flow redirect was an odd discovery, I thought that was carved into the body
Just for the usual suspects……

The reason why here on SB hardly anybody knows the Aspirator of the MK19, is, because in the US the MK18 and the MK19 were never officially sold.

The MK18 has the same Aspirator as the MK19, and the MK19 is just a dry version of the MK18, a mix of a MK18 with a MK17.

Seems SP Europe (Italy) went a different way than the SP US market and tried to offer another time a membrane 1st to their customers with a turret (after the MK14 was no success), while SP USA was reluctant to that idea.

Probably in Europe they were not so happy with the sales numbers of the MK18 and thought that a ‘dry’ MK18 might bring the success.

So in Italy they just took the MK18 design, improved the flow channels for a better air delivery capacity and used dry chamber parts of the MK17 to make the new model dry, and ready was the MK19, which also did not meet the high expectations in terms of sales, so SP Europe gave up just two years later in 2009.

Seems time was still not ready for the European SP Diver Community for a real MK25 challenger…..

When the MK19 EVO came out, SP had improved again quite some design aspects, among them HF Ports, which the MK18/19 didn’t have, and finally the SP turret 1st fraction seemed to be ready to go for it.

So if you have an old MK18 and you want it as a ‘dry MK19’, just change the Diaphragm Holder Combo for the MK17 (19) ones and you are fine and let other divers think about what you have there….

Would be probably an interesting Frankenreg…..

The air flow capacity will be not as good as the one of the original MK19, but it’s enough air anyway……

As member of the SP Turret fraction ( since 40 years diving MK5/10/20/25) I have always liked the MK18/19 and maybe now also some guys on the other side of the Atlantic get a bit curious…..
 

Attachments

  • P1090051.JPG
    P1090051.JPG
    68.2 KB · Views: 17
  • P1090047.JPG
    P1090047.JPG
    76.6 KB · Views: 13
  • P1260427.JPG
    P1260427.JPG
    59.2 KB · Views: 12
  • P1260409.JPG
    P1260409.JPG
    75 KB · Views: 12
  • P1330198.JPG
    P1330198.JPG
    54.9 KB · Views: 10
I finally ran into a Mk25 where the deepest bushing was stuck too tight for a "magic dowel".
Bought a cheap set of "imported" punches from Amazon.
Amazon SE 8-Piece Drive Pin Punch Set -
$17

Polished the punch end smooth and square before starting, with 1000 grit Micromesh. Then two light taps  almost parallel to the bore with the end of the punch catching in the tiny gap between bushing and reg, and bingo! Bushing out when all I was doing before was rounding the wooden ends of my dowels.
Upon inspection, one or more techs before me had given up and left the lowest bushing in the bore. Its ID was ALL scuffed up, while the outer bushing was pristine.
Are you talking about this sleeve? What size of punch did you use ultimately? I struggled with mine too and my Mk25evo wasn’t cruddy or in a bad condition at all. The result of my picking attempts … :rolleyes:

IMG_8192.jpeg
 
More pics...
Very interesting that the 18 has a turret closer to the 20 and the 19 close to the scalloped one from newer 20/25
 
Are you talking about this sleeve? What size of punch did you use ultimately? I struggled with mine too and my Mk25evo wasn’t cruddy or in a bad condition at all.
Yes, exactly. And that's about the way my sleeve looked from others' failed previous attempts to remove it.
The punch that I happened to choose was about 3.5mm. I don't think the size is critical, as long as it's not so large that you can't angle it slightly in the bore.
I took the time when they arrived to de-burr the shaft and tip with 1,000 sandpaper. I polished the end, not that polishing was important, but so that the end of the metal dowel was perfectly square, with a sharp corner.

If you can find the tiny groove where the top of that sleeve meets the lip of the bore, catching the punch tip in that groove will allow you to tap down on each side and rock it slightly until it releases.
Screenshot_20250330_085332.jpg
 
Very interesting that the 18 has a turret closer to the 20 and the 19 close to the scalloped one from newer 20/25
That's just coincidence that I used a pic with an older MK18 model.
Mk18 and MK20 had both the old style turret until 2001, then both models received the newer 'MK25' style turret.
So the turret style depends on the production year.....
 

Attachments

  • P1270180.JPG
    P1270180.JPG
    43.7 KB · Views: 2
  • P1250222.JPG
    P1250222.JPG
    49.5 KB · Views: 10
Yes, exactly. And that's about the way my sleeve looked from others' failed previous attempts to remove it.
The punch that I happened to choose was about 3.5mm. I don't think the size is critical, as long as it's not so large that you can't angle it slightly in the bore.
I took the time when they arrived to de-burr the shaft and tip with 1,000 sandpaper. I polished the end, not that polishing was important, but so that the end of the metal dowel was perfectly square, with a sharp corner.

If you can find the tiny groove where the top of that sleeve meets the lip of the bore, catching the punch tip in that groove will allow you to tap down on each side and rock it slightly until it releases.
View attachment 890947
I prefer to use the brass tool of the Brass O-Ring Tool Combo.

Up to now I was always able to remove also very stubborn MK20/25 sleeves with it.

The punches I use for example for the removal of stucked R-Series housings in their cases........
 

Attachments

  • P1330209.JPG
    P1330209.JPG
    36 KB · Views: 8
  • P1330212.JPG
    P1330212.JPG
    30.7 KB · Views: 8
  • P1330213.JPG
    P1330213.JPG
    29.6 KB · Views: 8
Back
Top Bottom