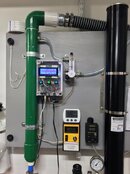
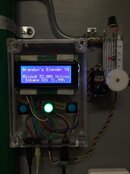
I ended up doing a similar sort of project with an Arduino Uno and a Teledyne R17S sensor. Getting it working as an analyzer was easy enough (I used an ADS1115 ADC to boost the output from the oxygen sensor), and I have the output displayed on a 20x4 LCD.
That wasn't really my goal though - I wanted the Arduino to control the oxygen input to the compressor so I don't have to stand there fiddlefarting with the valve while making nitrox. I normally run 20 psi O2 from a welding regulator to a Dwyer flowmeter, and it was a trivial mater to remove the knob from the flowmeter and replace it with a gear. I then put a servo next to the flowmeter with another gear on it, and boom - servo controlled flowmeter.


I named the contraption "Brandon's Blender", and it has three modes:
- When it starts up, it calibrates itself to air (tank o2 valve isn't on), then enters Analyzer Mode. That simply displays the compressor input 02 percentage; and I use an average of 20 sensor readings (which happens in less than a second) to smooth the output.
- If you press the green button, it enters Blending Mode. The default O2 value is 21%, and it's adjustable in 1% increments to 39%. Pick your O2 value, and it'll monitor the compressor input and adjust the flow of oxygen accordingly. If the O2 values are below 20% or more than 39.5%, it'll kick itself out of this mode and return the servo to the valve closed position. I've tested that function; it's reliable and happens quickly. Practically speaking, at 20psi the flowmeter can't deliver more than about 39% o2 to the compressor anyway, so it's more a safeguard against the compressor shutting down for some reason.
- If you press the blue button, it enters Calibration Mode. This mode returns the O2 servo to the valve closed position, grabs an average of 20 sensor readings, then resets the calibration value. This runs in a loop until cancelled.
It works darn well. I just finished it and ran it for a couple hours last night - it will hold the O2 input stable within .2% accuracy, and I could probably increase the sensitivity and get that up to .1%.
There's a little bit of chasing that happens initially, but it stabilizes within about 30 seconds. There's also a bit of sensor drift that I suspect comes from having 45F input slowly cooling a 80F sensor (my garage is really warm), but I account for that by recalibrating every time I drain the moisture separators. The final output remains within .2% of target when I analyze, so I'm not all that concerned. It's at least as accurate as I can manage by hand.
Future upgrades include a pressure transmitter and a second o2 sensor for output o2, and I'm pretty sure I can also simplify my code to increase efficiency. It's pretty rough at the moment. I may also add wi-fi so I can have a display on my iPhone, but at that point I'm pretty certain I'm just screwing around for the hell of it.
But that's part of the fun of DIY...


