Nathan Doty
Contributor
Howdy all, next up in my new hobby of building scuba gear from misc junk hanging out in my garage is the Tidycat! Since time traveling terminators have been stealing all my ideas and traveling back in time in order to put them on market before I think of them, I'm calling this the Tidycat! Tm, R, C, whatever. Let's see skynet beat that!
As always I have a self imposed limit of $10 on any of my stupid projects (stupid means your life doesn't depend on it. I personally think I'm pretty smart. And handsome. Pretty darn humble too.)
Anyway, here's where we start.

We've got:
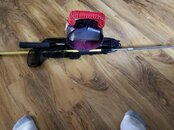
1. Old kitty litter container (courtesy of my wife).
2. 6" PVC coupler (Lowes $6).
3. Scrap 1/2" PVC courtesy of my garage
4. Laundry bag ($2 at walmart courtesy of a project I bought it for and I don't remember why but I probably had a good reason!)
5. Scrap material (courtesy of the rag bag in my garage)
6. Not shown, misc screws, glue, velcro and some paracord.
This will take more than the 5 minutes of my last build. I probably have a couple hours in this not including dry time on glue and paint.
So gather materials and we're off!
But wait! you say. What are we building? Well, you clicked on the link so it's pretty darn obvious. Try to keep up. I mean really...
We'll jump to the end though since you're so impatient. Here's the end result.

But wait! you say again. You're calling this a $5 project, and yet I see you spent $8 in material! Ok, you're a bit smarter than I thought, you can do simple math. But I can make 2 of these with what I have, so it's only about $4 each. I win! YMMV of course, but there's no reason you can't scrounge the same bits and be no more out of pocket than I am.
ON TO THE BUILD!
Step 1: Split the coupler. I used my table saw but pvc is easy to work with without power tools. I just happen to have the tools and I"m pretty lazy. You should end up with 2 3 inch wide rings which will give you 2 tidycats. Or leave it alone, no reason to do this step if you only want 1 although it will be a bit bulkier. The ring will be the main body, 6" wide give or take a bit, should fit most bugs without too much trouble.

2. Make your handle. Cut off a piece of the scrap 1/2" pvc and boil it for a few minutes. That will make the pvc easy to form. I made it wide enough to fit my hand easy and long enough to have extra long legs. We'll trim them to length in a minute.

3. Make some holes in the body. I used a spade bit, which did not do a good job and needed some clean up work with a dremel. Live and learn, I'll do better on the next one. But use the handle you made to set the spacing. It's easier to make the holes fit the handle than to try and make the handle fit your holes.

4. Stick the handle in, find where it feels about right in your hand and mark the legs to cut to length.

5. Insert and glue. I used regular PVC glue followed by some JB weld to fill the gaps. Like I said, my holes sucked.

6. Make your flap. A jigsaw and the kitty litter container come into play here. Again, no measurements as I'm just winging this. But wide enough to fill the hole and longer than you think you need. It's ok if you short this and need to make a 2nd. I know I did. On the upside it helped me name my creation. Sand the rough edges left by the jigsaw.

Where we at... 7?
7. Glue and clamps.

8. I like a little redundancy. That is, I like backups on critical things. To be honest, I'll do something twice in case the 1st fails...")
So screws from the flap and paracord for the handle in case the glue fails (it probably will).

That's a 10 image limit, stay tuned!
As always I have a self imposed limit of $10 on any of my stupid projects (stupid means your life doesn't depend on it. I personally think I'm pretty smart. And handsome. Pretty darn humble too.)
Anyway, here's where we start.
We've got:
1. Old kitty litter container (courtesy of my wife).
2. 6" PVC coupler (Lowes $6).
3. Scrap 1/2" PVC courtesy of my garage
4. Laundry bag ($2 at walmart courtesy of a project I bought it for and I don't remember why but I probably had a good reason!)
5. Scrap material (courtesy of the rag bag in my garage)
6. Not shown, misc screws, glue, velcro and some paracord.
This will take more than the 5 minutes of my last build. I probably have a couple hours in this not including dry time on glue and paint.
So gather materials and we're off!
But wait! you say. What are we building? Well, you clicked on the link so it's pretty darn obvious. Try to keep up. I mean really...
We'll jump to the end though since you're so impatient. Here's the end result.
But wait! you say again. You're calling this a $5 project, and yet I see you spent $8 in material! Ok, you're a bit smarter than I thought, you can do simple math. But I can make 2 of these with what I have, so it's only about $4 each. I win! YMMV of course, but there's no reason you can't scrounge the same bits and be no more out of pocket than I am.
ON TO THE BUILD!
Step 1: Split the coupler. I used my table saw but pvc is easy to work with without power tools. I just happen to have the tools and I"m pretty lazy. You should end up with 2 3 inch wide rings which will give you 2 tidycats. Or leave it alone, no reason to do this step if you only want 1 although it will be a bit bulkier. The ring will be the main body, 6" wide give or take a bit, should fit most bugs without too much trouble.
2. Make your handle. Cut off a piece of the scrap 1/2" pvc and boil it for a few minutes. That will make the pvc easy to form. I made it wide enough to fit my hand easy and long enough to have extra long legs. We'll trim them to length in a minute.
3. Make some holes in the body. I used a spade bit, which did not do a good job and needed some clean up work with a dremel. Live and learn, I'll do better on the next one. But use the handle you made to set the spacing. It's easier to make the holes fit the handle than to try and make the handle fit your holes.
4. Stick the handle in, find where it feels about right in your hand and mark the legs to cut to length.
5. Insert and glue. I used regular PVC glue followed by some JB weld to fill the gaps. Like I said, my holes sucked.
6. Make your flap. A jigsaw and the kitty litter container come into play here. Again, no measurements as I'm just winging this. But wide enough to fill the hole and longer than you think you need. It's ok if you short this and need to make a 2nd. I know I did. On the upside it helped me name my creation. Sand the rough edges left by the jigsaw.
Where we at... 7?
7. Glue and clamps.
8. I like a little redundancy. That is, I like backups on critical things. To be honest, I'll do something twice in case the 1st fails...
So screws from the flap and paracord for the handle in case the glue fails (it probably will).
That's a 10 image limit, stay tuned!