Disclaimer - this is what I did/am doing, I don't offer this as anything more than information about what I am working with.
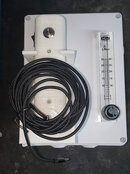
So, I decided I'd like to make nitrox, so I went and got a copy of the OHC, read a bunch of threads/posts on the internet, and watched some Youtube videos. Finally, I decided I would be comfortable and safe to make my own stick. I'll break this into two parts - the stick and the O2 Supply/Analyzer. Where possible/appropriate, I'll link to what I bought for this project as well.
(Caution - Large picture)

The stick:
Parts used -
John Deer Air Filter GY21435
1.5" pvc to filter adapter (3D print)
3" x 1.5" reducer
1" Bioballs
2' of 3" PVC pipe
5/16" hose barb x 1/4"NPT male brass coupler (1 here, the other used on the O2 side)
3" screen (3D Print)
3" x 2" reducer
2" x 1" PVC sleeve bushing
1" pvc pipe
1" x 1" x 1/2" PVC tee
1/2" PVC insert for PSR-11-39-JD o2 sensor (3d printed) (could replace this and the tee above with one that is drilled out for an O2 sensor to mount in however)
3" Clamp Brackets
Adapter and hose to go from 1" PVC to compressor inlet (varies depending on compressor, I plan on using 1" reinforced food grade hose, hose clamps, and appropriate adapters)
1/4" NPT tap, drill bits, PVC cleaner/glue, etc. were used as well. Also everything gets cleaned just because. 3d parts are sanded, washed, and cleaned to ensure they won't be having any stringing coming off etc.
When the smell dissipates, I'll also be using some scrap wood and the clamp brackets to mount it on the wall.
Parts were assembled (and glued as appropriate) pretty much in the order above, except I did not glue the 3"x1.5" reducer to the 3" PVC pipe. This is because I'm letting everything sit out for the glue odors to dissipate prior to putting the bio-balls in, and since it's a nice fit and just will sit on top of everything I don't think glue is necessary for it. The 1/4" NPT fitting was attached just far enough down to allow the 3" x 1.5" reducer to sit onto the 3" PVC pipe. If using larger bioballs or baffles, the 3" screen wouldn't be necessary as well. I could also find a different filter or attach it with a different method if I didn't want to 3d print anything there either.
So, I decided I'd like to make nitrox, so I went and got a copy of the OHC, read a bunch of threads/posts on the internet, and watched some Youtube videos. Finally, I decided I would be comfortable and safe to make my own stick. I'll break this into two parts - the stick and the O2 Supply/Analyzer. Where possible/appropriate, I'll link to what I bought for this project as well.
(Caution - Large picture)

The stick:
Parts used -
John Deer Air Filter GY21435
1.5" pvc to filter adapter (3D print)
3" x 1.5" reducer
1" Bioballs
2' of 3" PVC pipe
5/16" hose barb x 1/4"NPT male brass coupler (1 here, the other used on the O2 side)
3" screen (3D Print)
3" x 2" reducer
2" x 1" PVC sleeve bushing
1" pvc pipe
1" x 1" x 1/2" PVC tee
1/2" PVC insert for PSR-11-39-JD o2 sensor (3d printed) (could replace this and the tee above with one that is drilled out for an O2 sensor to mount in however)
3" Clamp Brackets
Adapter and hose to go from 1" PVC to compressor inlet (varies depending on compressor, I plan on using 1" reinforced food grade hose, hose clamps, and appropriate adapters)
1/4" NPT tap, drill bits, PVC cleaner/glue, etc. were used as well. Also everything gets cleaned just because. 3d parts are sanded, washed, and cleaned to ensure they won't be having any stringing coming off etc.
When the smell dissipates, I'll also be using some scrap wood and the clamp brackets to mount it on the wall.
Parts were assembled (and glued as appropriate) pretty much in the order above, except I did not glue the 3"x1.5" reducer to the 3" PVC pipe. This is because I'm letting everything sit out for the glue odors to dissipate prior to putting the bio-balls in, and since it's a nice fit and just will sit on top of everything I don't think glue is necessary for it. The 1/4" NPT fitting was attached just far enough down to allow the 3" x 1.5" reducer to sit onto the 3" PVC pipe. If using larger bioballs or baffles, the 3" screen wouldn't be necessary as well. I could also find a different filter or attach it with a different method if I didn't want to 3d print anything there either.


