Improved stage bottle rigging, with photos

Please register or login

Welcome to ScubaBoard, the world's largest scuba diving community. Registration is not required to read the forums, but we encourage you to join. Joining has its benefits and enables you to participate in the discussions.

Benefits of registering include

  • Ability to post and comment on topics and discussions.
  • A Free photo gallery to share your dive photos with the world.
  • You can make this box go away

Joining is quick and easy. Log in or Register now!

2airishuman

Contributor
Messages
2,682
Reaction score
2,007
Location
Greater Minnesota
# of dives
200 - 499
I've re-rigged some of my stage bottles incorporating suggestions received here and my own ideas.

I use #72 waxed, braided nylon cord. It's heavier than the cave line usually used for stage rigging, and holds knots a little better because of the waxed finish. Available from many sources, I got mine here, the 195 feet per pound size:

https://www.amazon.com/gp/product/B00BN37VWI

This allows the handle to be made strong enough that it can be used above the water.

P6180103.JPG


For each stage bottle, the materials needed are:
- #72 cord, about 6 feet
- two bolt snaps, one medium, one small. For larger stages, both bolt snaps can optionally be medium.
- a length of 5/16" fuel line hose, for the handle, about an 18" long piece.
- stainless steel band clamp sized to go around the cylinder. I try to find the ones that are all stainless steel, as the ones with a carbon steel worm gear will rust.
- Nylon sleeve, to go over the clamp to prevent dissimilar metal corrosion or paint damage to the cylinder. Optional for galvanized cylinders. Or, a piece of inner tube to go under the clamp.
- Heat shrink tubing to go over the screw portion of the clamp, to reduce the entanglement hazard.
- Bungee cord, about 18", for the neck ring. I use the heavier of the two styles DGX sells.

In addition to basic tools, you'll need something to help thread the cord through the fuel line. I use smaller cord, but a coathanger would also work.

The first step is to make a loop of the #72 cord and pull it through the fuel line:

P6180084.JPG


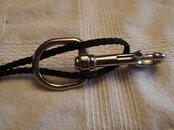
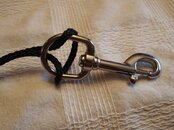
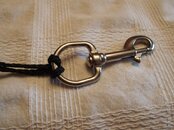
Then attach a medium bolt snap using a lark's foot knot:
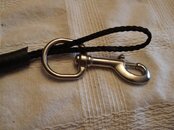
P6180085.JPG

P6180086.JPG

P6180087.JPG

P6180088.JPG
 
The cord is wrapped twice under the band clamp. This is the view from the cylinder side of the clamp.

P6180092.JPG


The elastic hose retainer and the stainless steel band are slipped onto the cylinder. The cord should be at 180 degrees from the clamp's screw. Placement of the cord determines the orientation the cylinder will have when clipped on. I like the valve outlet up, as shown, although this may differ depending on your regs and preference.

P6180093.JPG


I use a reef knot at the top of the handle to hold the upper bolt snap in place. A bowline could be used here instead, but it's harder to get adjusted exactly right, and the strength isn't necessary here.

P6180094.JPG


The small bolt snap goes on next, and is held in place by half a reef knot for convenience while working. If extra distance from the cylinder neck is needed here, as when using a small snap with an 6.9" or 7.25" cylinder, it works best to add a series of 2-4 reef knots for spacing instead.


P6180095.JPG


A bowline around the valve neck is the main weight-bearing knot. There are various ways this can be tied, but whatever method is used, the loop around the valve should be fairly snug.

P6180097.JPG
 
Like this:

P6180098.JPG


The placement of the bolt snap can be fine-tuned at this point by adding reef knots for spacing. Once it's in the desired spot, the two ends of the cord are tied together to hold it in place.

P6180101.JPG


Once adjustments are complete and everything's tight, the ends can be clipped and burned.
 
The elastic band is tied with a barrel knot, because it's the only thing that will hold reliably. There are different ways to do it, and they're harder to explain then to perform. I use one that lays flat.


P6180104.JPG


P6180105.JPG


P6180106.JPG
P6180107.JPG


P6180108.JPG


This can go over the valve after the handle and bolt snaps are rigged, but I like to put it underneath the handle rigging so that it can't come off by accident. Easy to do if you remove the clamp for a moment, or if you do it before the handle is on. This is a good time to put on the hose retainer if you forgot to do it earlier.

P6180109.JPG
 
The same approach works for cylinders of all sizes, although there will be some variation in regulator and SPG placement:

P6180110.JPG
it'

The yellow Miflex hose on the AL19 (far left) is 40" and the black rubber hose on the yellow LP72 is 24" Both lengths work.

The bungee is mainly there to hold the 2nd stage. In some situations it may be easiest to push a loop of the hose through the bungee loop, so that it retains the hose as it goes from the 1st stage down the side of the cylinder, but in other cases it's better to rely on the hose retainer for that, which means that one of the regulators (either the 1st or 2nd stage) will have to be worked through the bungee loop. In most cases the 1st stage is easier to fit through the loop.
 
I am not sure of what one needs the line running from the bolt snap at the valve neck to the one at the bottom of the stage bottle. Why not tie the bolt snap to the valve and tie the bottom bolt snap to the bottom strap and not use the line?
 
I am not sure of what one needs the line running from the bolt snap at the valve neck to the one at the bottom of the stage bottle. Why not tie the bolt snap to the valve and tie the bottom bolt snap to the bottom strap and not use the line?

For some uses, it's important to be able to clip the stage bottle on in the water.

To clip a stage in place in the water, it's helpful to have a handhold near the center of buoyancy so the cylinder can be held in place with one hand while the other hand manipulates the bolt snap. The line between the two snaps proves that handhold. It's also a convenience when out of the water.
 
I avoid using the handle out of the water as it can stretch the line over time. Nice detailed writeup. Beats buying rigging.
 
if the top attachment is just a neck leash the bottle sits way too low. The line connecting the two attachments allows for the bolt snap to be moved to where it is in a reasonable position as it hangs from the d-ring. It also allows for easier manipulation in the water. Not a big fan of using them above water because nylon will stretch over time, so it can become a bit loose
 
There are lots of ways to do this; this is one. Some searching will find lots of alternatives. For example, DIR-diver.com - Stagebottle rigging.
No problem if the handle stretches over time....just loosen the hose clamp at the bottom and tighten it again. I like the handle tight -- not loose and floppy as in the pictures -- so it stays out of the way.
Any kind of loop/material around the neck will serve as a place to clip a 2nd stage; or, even, clip the reg to the top bolt-snap bail. I have a metal ring around the neck of some of my stages so I can thread a cable through and easily lock them to mitigate pilfering. The ring also serves as a reg-clip point in the water.
 
https://www.shearwater.com/products/perdix-ai/

Back
Top Bottom