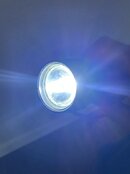
Underwater Kinetics lights have been around forever. And I'm sure a lot of you have an old SL4 laying around. I'm going to show you the method I used to convert mine to LED. It worked remarkably well with the end result being a nice pure white, very bright wide beam with a fairly small hot spot that is ideal for illuminating a wider area underwater. Perfect for night dives, or for adding color the wild life when at depth. And as an added bonus, the LED bulb running on 4 "C" batteries, will operate for many many hours.
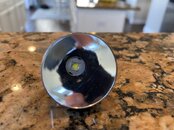
First, the finished product:
The Light (http://i.imgur.com/lnnVFND.jpg)
The Lens (http://i.imgur.com/TiLwsO0.jpg)
In The Dark (http://i.imgur.com/aTOIXnW.jpg)
To complete the project you will need:
* Your old light and it's bulb (it's OK if it's burnt out),
* A "stepper" drill bit (cheap if you don't have one),
* A hand drill
* Some kind of vice that you can secure the old bulb in while you drill it out.
* (1) O-ring from your dive saver kit (You do have a dive saver kit... right?)
First, order the LED bulb. It costs a whopping $6.41, has a built in voltage regulator (so you keep full brightness longer and don't have to worry about voltage), and ships for free. (It does take at least a week to arrive from China) This is what you need to order:
DX Web Page Screen Shot (http://i.imgur.com/iH7Oqjs.jpg)
When the bulb arrives, remove the outer spring (it pulls right off), and unscrew the brass LED assembly from the reflector that it comes with. All you will use is the threaded brass portion that contains the actual LED module. (the part on the far right in the photo below)
Bulb Assembly (http://i.imgur.com/BBAA1iN.jpg)
The old bulb housing is made from very nice aluminum, and will be easy to work with.
Old UK Bulb (http://i.imgur.com/iZhxw9n.jpg)
Pull the plastic bottom off of it, and discard. We just want the metal reflector housing.
Secure the reflector housing in your vice, or other method of holding it tightly. (I used an old leather glove to provide some padding and grip between the vice and the light reflector.)
Using the stepper bit, begin carefully drilling out the rear of the light. The idea is that we are going to greatly widen the opening.
This is the part where you have to be very careful.
Your stepper bit should increase in diameter incrementally... ending with 11/16" and 3/4". We are going to widen the entire opening to 3/4", EXCEPT for a very small lip at the bottom, that will remain 11/16". Warning: If you drill all the way through with the 3/4" bit, the new LED will pass all the way through, and unless you have a spare, your light will be dead... It's absolutely critical for the focus, that you drill out (and thus get the LED light) as far forward as possible in the reflector (without going all the way through). The LED module will rest against the 11/16" "lip" which keeps it in place, and, completes the electrical circuit. Look carefully at these pictures, and you can see what I'm talking about.
Stepper Bit (http://i.imgur.com/0KHodTh.jpg)
Drilling (http://i.imgur.com/TqXtnuD.jpg)
The Lip from inside (http://i.imgur.com/Csyd33l.jpg)
The Lip from reflector side (http://i.imgur.com/51zMYPG.jpg)
Now, steal an O-ring from your dive saver kit:
O-ring measurement (http://i.imgur.com/tTZquj9.jpg)
And place the o-ring around your LED module as shown
Oring on LED (http://i.imgur.com/DvCm7En.jpg)
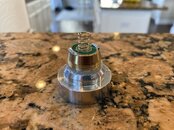
Clean out the metal shavings, and insert your new LED bulb into the drilled out aluminum reflector housing.
LED in reflector (http://i.imgur.com/ZzRNCpS.jpg)
And that housing now fits right into the clear lens cap.
LED and new reflector in lens (http://i.imgur.com/YavrqFV.jpg)
Reassemble, and you should be done. **NOTE** You must put the batteries in the light backwards. Positive should be facing up, touching the center spring of the LED light. (the opposite of the battery diagram). LEDs only like voltage in one direction.
Enjoy. It took me about 30 minutes to do the project, inventing it as I went. If you review the instructions carefully, you should be able to do it even faster.
Update:
I did some meter testing with the light module.
I ran it for about 45minutes on a regulated power supply and it pulled 420mA@6VDC. The average C battery should have about 8000mAH of juice. This light is wired in series to make 6VDC, so the amperage will remain the same. 8000/420=19.04hrs of run time. Now in my experience, those numbers are worth squat at anything but the most weak current draw. So knock some time off for safety margin and some time for less than "ideal" batteries... I'd guess you'd get a solid, dependable 10hours, maybe up to 15hrs of run time on a set of C batteries.
During that time the aluminum housing became warm to the touch, almost uncomfortably so... but certainly not hot enough to melt anything.
Now this will mean that the LED module itself is substantially hotter, particularly as it's being suspended by the o-ring. So some heat is transferring through the o-ring, and some where it's contacting the "lip" of the aluminum. After I pulled the power, I touched the back of the actual module and found it to be hot to the touch, so much so that I couldn't hold my finger there long, but it was not the "instaburn, stuff is melting" kind of hot.
By my observations here, I think it's perfectly fine. But the usual disclaimers apply... Your mileage may vary... testimonial portrayed by actors... I'm not responsible if you turn on the light and explode into a cloud of meat and compressed air... blah blah blah.
Have fun.
First, the finished product:
The Light (http://i.imgur.com/lnnVFND.jpg)
The Lens (http://i.imgur.com/TiLwsO0.jpg)
In The Dark (http://i.imgur.com/aTOIXnW.jpg)
To complete the project you will need:
* Your old light and it's bulb (it's OK if it's burnt out),
* A "stepper" drill bit (cheap if you don't have one),
* A hand drill
* Some kind of vice that you can secure the old bulb in while you drill it out.
* (1) O-ring from your dive saver kit (You do have a dive saver kit... right?)
First, order the LED bulb. It costs a whopping $6.41, has a built in voltage regulator (so you keep full brightness longer and don't have to worry about voltage), and ships for free. (It does take at least a week to arrive from China) This is what you need to order:
DX Web Page Screen Shot (http://i.imgur.com/iH7Oqjs.jpg)
When the bulb arrives, remove the outer spring (it pulls right off), and unscrew the brass LED assembly from the reflector that it comes with. All you will use is the threaded brass portion that contains the actual LED module. (the part on the far right in the photo below)
Bulb Assembly (http://i.imgur.com/BBAA1iN.jpg)
The old bulb housing is made from very nice aluminum, and will be easy to work with.
Old UK Bulb (http://i.imgur.com/iZhxw9n.jpg)
Pull the plastic bottom off of it, and discard. We just want the metal reflector housing.
Secure the reflector housing in your vice, or other method of holding it tightly. (I used an old leather glove to provide some padding and grip between the vice and the light reflector.)
Using the stepper bit, begin carefully drilling out the rear of the light. The idea is that we are going to greatly widen the opening.
This is the part where you have to be very careful.
Your stepper bit should increase in diameter incrementally... ending with 11/16" and 3/4". We are going to widen the entire opening to 3/4", EXCEPT for a very small lip at the bottom, that will remain 11/16". Warning: If you drill all the way through with the 3/4" bit, the new LED will pass all the way through, and unless you have a spare, your light will be dead... It's absolutely critical for the focus, that you drill out (and thus get the LED light) as far forward as possible in the reflector (without going all the way through). The LED module will rest against the 11/16" "lip" which keeps it in place, and, completes the electrical circuit. Look carefully at these pictures, and you can see what I'm talking about.
Stepper Bit (http://i.imgur.com/0KHodTh.jpg)
Drilling (http://i.imgur.com/TqXtnuD.jpg)
The Lip from inside (http://i.imgur.com/Csyd33l.jpg)
The Lip from reflector side (http://i.imgur.com/51zMYPG.jpg)
Now, steal an O-ring from your dive saver kit:
O-ring measurement (http://i.imgur.com/tTZquj9.jpg)
And place the o-ring around your LED module as shown
Oring on LED (http://i.imgur.com/DvCm7En.jpg)
Clean out the metal shavings, and insert your new LED bulb into the drilled out aluminum reflector housing.
LED in reflector (http://i.imgur.com/ZzRNCpS.jpg)
And that housing now fits right into the clear lens cap.
LED and new reflector in lens (http://i.imgur.com/YavrqFV.jpg)
Reassemble, and you should be done. **NOTE** You must put the batteries in the light backwards. Positive should be facing up, touching the center spring of the LED light. (the opposite of the battery diagram). LEDs only like voltage in one direction.
Enjoy. It took me about 30 minutes to do the project, inventing it as I went. If you review the instructions carefully, you should be able to do it even faster.
Update:
I did some meter testing with the light module.
I ran it for about 45minutes on a regulated power supply and it pulled 420mA@6VDC. The average C battery should have about 8000mAH of juice. This light is wired in series to make 6VDC, so the amperage will remain the same. 8000/420=19.04hrs of run time. Now in my experience, those numbers are worth squat at anything but the most weak current draw. So knock some time off for safety margin and some time for less than "ideal" batteries... I'd guess you'd get a solid, dependable 10hours, maybe up to 15hrs of run time on a set of C batteries.
During that time the aluminum housing became warm to the touch, almost uncomfortably so... but certainly not hot enough to melt anything.
Now this will mean that the LED module itself is substantially hotter, particularly as it's being suspended by the o-ring. So some heat is transferring through the o-ring, and some where it's contacting the "lip" of the aluminum. After I pulled the power, I touched the back of the actual module and found it to be hot to the touch, so much so that I couldn't hold my finger there long, but it was not the "instaburn, stuff is melting" kind of hot.
By my observations here, I think it's perfectly fine. But the usual disclaimers apply... Your mileage may vary... testimonial portrayed by actors... I'm not responsible if you turn on the light and explode into a cloud of meat and compressed air... blah blah blah.
Have fun.