Compressor cylinder inspection question

Please register or login

Welcome to ScubaBoard, the world's largest scuba diving community. Registration is not required to read the forums, but we encourage you to join. Joining has its benefits and enables you to participate in the discussions.

Benefits of registering include

  • Ability to post and comment on topics and discussions.
  • A Free photo gallery to share your dive photos with the world.
  • You can make this box go away

Joining is quick and easy. Log in or Register now!

wdeutsch

Registered
Messages
38
Reaction score
11
Location
Salt Lake City
# of dives
25 - 49
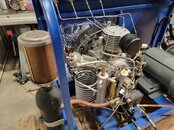
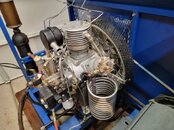
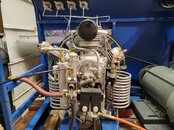
Background info: I just picked up a used Hypres horizontal compressor that was surplussed from a local fire department. While they *say* they maintained it well, I have some questions about that. It's got 1400 hours on it, and once the outside layer of filth/grime/oil was cleaned off, it looks pretty good. No rust. Motor and compressor flywheel turn easily. There's a rumor of an issue with the 3rd stage pressure relief valve, but I won't know about that until I fire it up.

Before I fire it up and send my first air sample for testing, I'd like to make sure there's not a bunch of buildup on the cylinder walls from poor upkeep or the switchover from mineral to synthetic oil that they did.

The Primary Question: If I remove the heads to inspect the cylinder walls, do I have to replace the head gaskets? From my experience in auto repair, it's 100% that you have to do this, but I'm hearing hints that this may not be the case in the world of breathing air compressors. If I will need to replace them, I'll get an order going so they are on hand. If it's more normal to be able to re-use, I'll give it a shot without the spares on hand. Thoughts/experience?

While we're at it, any other PM I should plan on that I haven't picked up on from reading here?

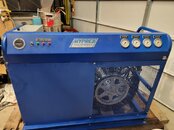
Done/To-Do includes:
  1. Thorough scrub-down of the whole unit, including detailed clean of finned final stage cooling coil
  2. Cleaning filter housing interiors, replacing filters, cleaning sintered separator
  3. Replacing intake filter
  4. Oil change. Compressor has synthetic oil in it currently, I'll replace/refresh with the same kind.
  5. Air testing
  6. Installation of in-line CO monitoring
 
Before any of that consider the following :

1. Make a note of the Model and the Serial number NA-9 NA12 NA18
2. Quote only the model when asking questions on a public forum
3. Quote both model and serial number only when pricing and or ordering parts
4. Get a copy of both the operator manual and the service repair manual
5. Get a price list of the spare service parts
6. Check the data plate on the motor
7. Check your power supply for compatibility
8. Remove the Fan Belt (Drive Belt) Record size and type, Check for wear/cracking
9. Run the compressor electrics/ motors fans etc only without turning the block or making pressure
10. Photo everything so not to forget. Don't Forget

By doing this your checking all the running gear without risking the pump assembly
Then you can concentrate on removing the dead flies out of the air intake filter
and making a judgement call if you want to lift the lids

Only the 1st stage has the head gasket on the NA's and as it seals the valve plate I would leave it be.
The only call is if the pump was inhibited or so dry it scores the rings on start up
Thanks, Iain!

Items 1-8 are completed or waiting for info from the manufacturer. I appreciate the heads up on #9. Great idea that I would not have thought about. #10 is my way if life. At my age, my phone camera is my auxilliary memory backup. :)

I don't have reason to suspect there is any inhibition/friction within the pump itself, as the flywheel turns silky smooth and quietly when spun by hand. I also don't think it's been run dry, as the oil level looks appropriate and the oil that's in there looks mostly clean.

I mostly worry that the previous owners may not have kept up on some of the details, as I know they switched from mineral to synthetic oil and made no mention of any cleanup afterwards. That, and they swore the filters would be useable and they were.... far from that. Add on that this was supposed to be a fire department breathing air compressor and their final filter was NOT rated for that purpose. So, I have concerns and want to peek under the hood.

Based on what you say, I'll take a look at cylinders 2 and 3 and see what they show and make a decision about #1 after that.

Thanks again!
 
Thanks, Iain!

Items 1-8 are completed or waiting for info from the manufacturer.
Is that on your list or mine LOL :oops:

I appreciate the heads up on #9. Great idea that I would not have thought about. #10 is my way if life. At my age, my phone camera is my auxilliary memory backup. :)
No Problem we can discuss detail later but it's a good start.
I should be able to post a manual and parts list with drawings if you get stuck.

I don't have reason to suspect there is any inhibition/friction within the pump itself, as the flywheel turns silky smooth and quietly when spun by hand. I also don't think it's been run dry, as the oil level looks appropriate and the oil that's in there looks mostly clean.
So far so good with the air intake filter, the oil and the spin test. But one of the considerations with unknown blocks you need to make before going main engine start is with the oil pump.
My rule is always fit an oil pump pressure gauge its more important than any of the interstage gauges or the final discharge pressure gauges in the first 30 seconds of start .

Without fitting your own known working gauge the risk you take is making a start the oil pump fails and the low oil cut out has been disconnected. It's very unlikely with a fire station sale more the sort of thing you get from an EBay rip off practice. The other "Star Stunt" they play is when checking the oil its brand new and never used.

Oh and check the paint on the socket bolts on each of the stage heads just to make sure they haven't been removed by the Allen Key in the past if and you really want to check the piston liners those are the heads I would check first.

You should have a direction arrow on the Block and if the motor is 3 phase another reason for removing the belts and doing an electrical and rotation check out if the phase wires are swapped on re installing

I mostly worry that the previous owners may not have kept up on some of the details, as I know they switched from mineral to synthetic oil and made no mention of any cleanup afterwards. That, and they swore the filters would be useable and they were.... far from that. Add on that this was supposed to be a fire department breathing air compressor and their final filter was NOT rated for that purpose. So, I have concerns and want to peek under the hood.

Based on what you say, I'll take a look at cylinders 2 and 3 and see what they show and make a decision about #1 after that.

Thanks again!
As far as I aware I think the NA series were all synthetic but again I will check the manuals
If you like you could post pictures they sometimes help I can see a heat exchanger fitted back to front from 30 yards.
 
It's definitely all on my to-do list. Hypress says they can get me manuals, and just after I talked to them, the fire station found the originals and are sending those to me. If neither of those come through, I'll reach out. I appreciate your generosity there.

Heard and understood on the oil pump. The compressor does have an oil pressure gauge. I'll see if I can rig a way to test that before turning the pump via motor.

The motor is a single phase Marathon Z122, and the wiring diagram I have looks pretty clear. I'll double check rotation direction before reinstalling the belt.

As for oil, the gent sending me the manual sent me a pic of the page on lubrication and it says the unit is shipped with "petroleum based oil", and that it should be used for 75 hours before switching to Anderol 500 synthetic oil. I was told they followed this recommendation, but there is no info on any cleaning of cylinder afterwards.

Good idea on looking at the paint on the bolts! It does look like the allen bolt sockets show evidence of having been turned. The fittings on the cooling coils do as well. So, perhaps they did open and clean after the switchover? I'll pull the 3rd stage head since it's the easiest to access and see what I see in there.

Pics below, if that helps with any specific advice.
 

Attachments

  • 20250513_143617.jpg
    20250513_143617.jpg
    125.7 KB · Views: 7
  • 20250513_143607.jpg
    20250513_143607.jpg
    110.2 KB · Views: 7
  • 20250513_143559.jpg
    20250513_143559.jpg
    112.9 KB · Views: 7
  • 20250513_143646.jpg
    20250513_143646.jpg
    91 KB · Views: 8
Picked up a similar Hypres NA9 unit a couple of years ago, Flywheel spun freely like you describe. Turned out the crank shaft had busted in half.
 
Picked up a similar Hypres NA9 unit a couple of years ago, Flywheel spun freely like you describe. Turned out the crank shaft had busted in half.
:oops::oops::oops::oops:

Well, I bought it pretty much knowing I was in for an adventure ride. I hope it's not THAT much of an adventure. So, do you still have that compressor, or is it scrap now? If you have it, dare I ask what a new crank shaft set you back?

I HOPE that's not the case here, as when I turn the flywheel, I can hear little 'croaks' that sound like air moving. Fingers crossed.
 
:oops::oops::oops::oops:

when I turn the flywheel, I can hear little 'croaks' that sound like air moving. Fingers crossed.
That's a good sign when you rotate by hand you can hear the intake and discharge valves open and close Just be careful not to trap your fingers and don't wear a neck tie

For the other stages 2 and 3 Stage 2 works the same way but you need to remove the inlet cooling coil and the discharge cooling coil for each stage (just not the 1st discharge only) then put your finger over the inlet side 1/2" fitting and you should feel it suck your skin to a small vacumm then similar on the discharge side push your finger hard over the discharge side fitting and when you rotate by hand the pressure you create will push your finger off the fitting. You now know you have a con rod attached to the crankcase I guess as a bonus but the real test was to ascertain the inlet and discharge valves are working. The 3rd stage is a tad harder to do as its the final stage and has a floating head piston thats not directly attached to the piston rod the trick here is to use an low pressure airline with a rubber tipped gun maybe a scuba cylinder with a 1st stage would do but Ive never done that for fear of damaging the thin metal reeds. Air flow into the discharge side should be blocked by the reed valve discharge side if it leaks expect to change the 3rd stage discharge valve on the inlet valve you need to suck and create a small vacuum and if you blow it should flow. By design you haven't removed the heads and now know you have pistons attached to the con rods and therefore the crank isn't broke !!! but the advantage is you just tested the valves both inlet and discharge without needing to replace anything (gaskets) or create leaks and trapping 0-rings if the lift the heads

The only exception is you remove the heads you can look at the pistons move up and down and check lubrication of the liners and for any washboarding particulate or aluminium particles etc
 
Picked up a similar Hypres NA9 unit a couple of years ago, Flywheel spun freely like you describe. Turned out the crank shaft had busted in half.
I hesitated pressing the like button on this but you know what I mean. Any information is good information however bad it may be. I trust you got it all resolved and repaired it its not an expensive part just all the other junk and bearings you probably replaced while your at it.

Usually for a broken crankshaft its OK doing it yourself at no charge labour basis. But from an engineering position at X dollars an hour its any residual damage you may have missed added to the cost of all the additional parts that gets you to a point of beyond economical repair.

When buying in date current models second hand and your not in the trade getting trade rate for parts and you have all the tools needed such as induction heaters for the bearing and hydraulic pullers and laser alignment and balance kit my take is before you agree to buy a second hand compressor is to get a cost for a brand new replacement bare block just in case. Also for the motor.

When I'm back at the works I will get the trade rate price for a replacement NA-9 block
add it into the post rather than guess here now.

In your head when buying second hand you add this possible extra cost. The idea is if you buy second hand and the worse happens then the cost of a replacement block is already factored and you get a box of lightly used extra spare parts together with some broken stuff.
 
:oops::oops::oops::oops:

Well, I bought it pretty much knowing I was in for an adventure ride. I hope it's not THAT much of an adventure. So, do you still have that compressor, or is it scrap now? If you have it, dare I ask what a new crank shaft set you back?

I HOPE that's not the case here, as when I turn the flywheel, I can hear little 'croaks' that sound like air moving. Fingers crossed.
If you can hear croaks it's doing more then mine did. I never ended up fixing it. I picked it up really cheap with several bank bottles. So I was always figuring if it was scrap I not be out too much.
 

Back
Top Bottom