Rebuilding regulator and BCD I just bought

Please register or login

Welcome to ScubaBoard, the world's largest scuba diving community. Registration is not required to read the forums, but we encourage you to join. Joining has its benefits and enables you to participate in the discussions.

Benefits of registering include

  • Ability to post and comment on topics and discussions.
  • A Free photo gallery to share your dive photos with the world.
  • You can make this box go away

Joining is quick and easy. Log in or Register now!

Thanks Couv,
So, for the high pressure chamber, garden hose seal, should I use the red o-ring in my pic?
I figured those extra little o-ring are for the LP ports bolts.
The kit doesn't have the o-ring for the HP ports though.
The piston stem seal high durometer -010 seal, is the red color little o-ring I placed with the brass tool on top left correct? My old one is black, just saying.

I will read the file tonight.
Thanks Couv
 
Is there any chance you have the torque specs?

The torque specs are on the chart.
So, for the high pressure chamber, garden hose seal, should I use the red o-ring in my pic?
No, either reuse the red flat seal or find the -013 in your kit.

See VDH web site, Bryan color coded some of the seals for easy ID.

Store | Vintage Double Hose

Quantity Description Part number notes

2 O-ring seat cap & yoke retainer

1 O-ring seat cap RED COLOR

1 O-ring 90 durometer small piston RED COLOR

2 O-ring swivel & below filter

5- O-ring 3/8" port

2 O ring, LP Piston and turret swivel

1 O ring ambient chamber cap/seal

1 High Pressure Seat

1 star filter retainer
 
Thanks rsingler. I was too chicken to use the brass picks on it :D
On the Viva valve ... I made it a little smoother when doing my second G250. Here how I did it, if any newbie want to know in the future... I remember reading somewhere someone mentioned a "straw", but the ID of the straw is a lot smaller compare to the viva valve's blade. Bigger straw is way too big. So, I cut a short piece of the normal size straw and nipped it a bit on both ends. On 1 end, I squeezed it to be able to slip the o-ring on. The other end, I expanded it wider, enough to cover the sharp 90 degrees square corners of the Viva valve blade. It came in a lot easier.

Very carefully, slide a hex key into the volcano orifice from the slot side (stay away from the sealing edge). With the orifice thus stabilized, it's easier to use your thumbnails to slip the oring into place.

Practice with a 5/32" hex key on a HP port plug with its stiffer 90 duro oring. The problem is the same: having the part skitter away from you just as you flip the oring over the top. Without the hex key, one often loses grip. Once you can do port plugs, the orifice is easy. But again, be careful of the cone edge.

As for the flow vane, there's nothing easy about that one. Try slipping a sharp brass pick inside the oring once you have it shouldered up against the plastic next to the oring land. Don't use the tip; instead slide the pick deeply through so you're using the shaft. Lever the oring until you can flip one side into the groove. Then remove the pick while holding that one side in place, and then use your fingernail to ooze the rest into the groove. Be careful that the pick tip doesn't damage the oring on insertion or removal.

Even a curmudgeon is willing to help! :coffee:
 
Hi guys,
As someone mentioned somewhere above, I am coming back to give feed back on the regulator kits and the video clip instruction from VDH after rebuilt/service. Well, I made it months ago but didn't have time to tune them until tonight.

The MK10 went well. LP ports give me a little more than 150psi. I can't tell exactly because I am using the tank pressure gauge which goes up to thousands psi. Comparing to the brand new set of Atomic regulators, I feel that (by feeling when perching the second stages right to my face) the Atomic blows a lot stronger... but I think my ScubaPro is fine. I read somewhere someone posted that as long as it above 150psi, then it is ok.

The second stage G250 went well too (except for 1 problem). The second stage is easier to service compare to the first stage MK10. I did 2 x G250. Lucky I decided to have 2 same second stage because 1 of them freeflow, I can swap parts for problem solving.

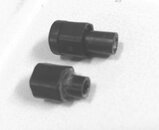
Here is my problem, 1 of the G250 regulators is freeflowing. After some parts swapping, I found that the balance chamber is bad. I am not sure if it just went bad because of aging (hard to believe), or someone put in a wrong balance chamber. On the pic attached, the balance chamber on top is the good one. It is longer and has 2 parts. The outside part can slide up and down. The bottom balance chamber is the bad one (it made the G250 leak), soon I swapped in the seat on the top pic, the G250 worked well.

Does anyone know if it is because the balance chamber is too short or the inside diameter of the balance chamber is too big/loose, or I need thicker of those tiny o-rings (those 2 at the end of the poppet)?

Thanks in advance
 

Attachments

  • IMG_1917.JPG
    IMG_1917.JPG
    63.6 KB · Views: 110
Hey mate why don't you have a look at the video for the correct name of that part
 
Hey mate why don't you have a look at the video for the correct name of that part

@rnln Thank you for the update. We'll try to get you sorted, but my Happy friend has a good point here. Please download a manual and parts diagram from www.vintagedoublehose.com so we all speak the same language. When in doubt, use the part number or nomenclature on the diagram.

LP ports give me a little more than 150psi. I can't tell exactly because I am using the tank pressure gauge which goes up to thousands psi.

Guesstimations are ok in the field when you have no other choice; but the first order of business is to have stable IP and in the correct range. Emphasis on stable. Please get an IP gauge and ensure the IP is good before tuning the second stage. MK10 IP is 135 +/- 10 psi at low and high tank pressure.

A leak is water intrusion into a stage or air escaping from a stage past a seal or crack in the housing. A freeflow is unwanted air getting past the hard and soft seat.

Your picture shows a couple of balance chambers. Typically when air leaks from one of these it shows up as pea sized bubbles. Is that what you are seeing?

The BC might just need to be cleaned. Use a Q-tip with most of the cotton removed and be careful not to expand the i.d. of the chamber. Before installing any poppet/spring/balance chamber assembly a "bounce check" should be performed. With fresh o-rings installed on the poppet insert the poppet end into the balance chamber with no spring installed. Seal the hole in the seat with your thumb or place the seat flat on a plate so no air escapes. You should be able to create pneumatic pressure inside the balance chamber when pushing down on it. (it should bounce back up.)

If it checks out, lubricate the seals and put a dollop of grease between the seals.

If it fails the bounce check, and you have new seals, and a clean balance chamber you might try slightly larger seals. Before the introduction of the new s-wing poppet and balance chamber, the poppet seals were 2.5 X 1.0 mm. The current ones are 2.2 X 1.0 mm. If still no joy, a new balance chamber is probably called for.

If you need a balance chamber check with VDH or @buddhasummer if they don't have one for you, PM me-I think I have a few serviceable ones.

Keep us posted,

Couv
 
Happy-diver, Couv, sorry for the missed used of terminologies. It's the balance chamber I was talking about. I will make the change. Thanks Couv. And will do bounce check tonight.

On the o-rings, 2.2mm and 2.5mm is the ID, and 1mm is the thickness of the o-rings. Am I correct?

Thanks again.
 
Hi Everyone,
I have to speak for the credit of Couv. Couv offered to give me a good balance chamber knowing that I have problem with one of mine, and hard to get it around here. I received it tonight, not only 1 balance chamber but couple of them with a poppet, and some o-rings too.

Thanks Couv.
 

Back
Top Bottom