Scubapro MK10 issue. Bad seat or something else?

Please register or login

Welcome to ScubaBoard, the world's largest scuba diving community. Registration is not required to read the forums, but we encourage you to join. Joining has its benefits and enables you to participate in the discussions.

Benefits of registering include

  • Ability to post and comment on topics and discussions.
  • A Free photo gallery to share your dive photos with the world.
  • You can make this box go away

Joining is quick and easy. Log in or Register now!

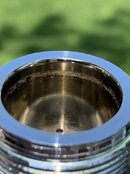
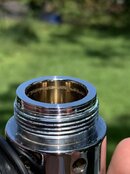
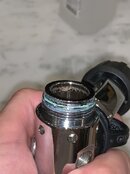
Is this turret nut on a MK10 removed by simply chocking the reg at the LP port and removing it with an allen in the attached pic? I watched Bryan’s MK5 disassembly video, but this thing looks different.

Yes, the turret bolt is removed with an allen wrench, and should be torqued when re-installing. There are differing torque values I've seen on different generations of MK10 schematics. One of these says 70 in/lbs for stainless steel bolts and 35 in/lbs for brass. I've personally never seen a brass MK10 turret bolt (most of the MK5s had brass ones, but SP went to SS after a few of them broke by being over torqued). If you don't have an allen socket to fit your torque wrench and you can determine that your turret bolt is SS, I would just estimate your best guess at about 5 ft/lbs. It's much more critical for the brass MK5 bolts; those you really need a torque wrench to make sure you don't overdo it.

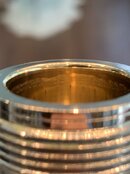
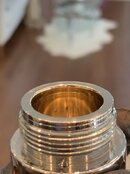
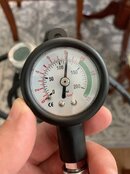
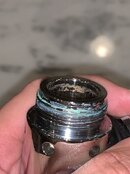
As far as your HP leak out the ambient chamber holes, that's definitely a failed piston stem o-ring. Your piston knife edge looks pretty good, just get a new seat and all new o-rings and you should have a great working 1st stage. Be really careful digging out the remnants of the old piston o-ring. That journal where it fits can't get scratched or else you'll have a leak even with a new o-ring. Make sure the 010 o-ring that you use in that spot is 90 duro (actually I think the SP kits use 85, but that's close enough). Also be prepared to make some adjustments with IP shims, because at this point you have no idea what the IP will be like with a new seat. If it's on the low side, like around 125, you can leave it. It's probably better than taking it apart, putting in a shim or two, then hoping the seat gets lined up exactly the same for the piston edge. Have fun!
 
Awesome, thanks! Got it apart earlier today. Just waiting on the parts to arrive now.

How bad does this damage look on the cylinder wall?


Best regards.
 

Attachments

  • D2A46F21-8A3F-446A-BC61-C1A74A71BC29.jpeg
    D2A46F21-8A3F-446A-BC61-C1A74A71BC29.jpeg
    62.8 KB · Views: 210
  • 8B9CF684-948D-4ADD-BDCB-45766070AE7E.jpeg
    8B9CF684-948D-4ADD-BDCB-45766070AE7E.jpeg
    74.2 KB · Views: 221
Pictures are tough to truly diagnose, but I believe I have revived one that was worse. I used Flitz metal polish, a Dremel, and the wool disc/cone.
 
How bad does this damage look on the cylinder wall?
Repairable :)
Air Barrel question - corrosion? Scubapro G250V
I`d removed scratsches and corrosion using Mini drill (like "Dremel") similar with GOXAWEE 220V Power Tools Electric Mini Drill with Flex shaft 160pcs Rotary Tools Accessories For Dremel Drill Tools 3000 4000-in Electric Drills from Tools on Aliexpress.com | Alibaba Group

some days ago I bought another one for my wife for polishing nails :) USB powered, very light and cute :)
like that one USB 3 12V Mini Electric drill Hand Drill Motor Hole Saw Aluminum Mini Electric DIY PCB with drill for Wood Plastic Drilling-in Power Tool Sets from Tools on Aliexpress.com | Alibaba Group
In your case it could be more suitable.

Than take felt polishing tip, like Fixmee 13PCS/ Set Wool Nail Felt Polishing Rotary Grinding Tool Burrs Felt Tipped 3mm-in Abrasive Tools from Tools on Aliexpress.com | Alibaba Group
green polishing wax (in our county we have so called GOI paste, chineese analog is https://www.aliexpress.com/w/wholesale-green-polishing-compound.html ) ,
and start to polish! :)
When finish - clean paste with spirit or any other solvent, than wash details well.

here is one important thing:
when you will polish it, you also can remove chromium layer, and later corrosion could be more strong.
So, you will need to check regulator condition more frequently.

btw: ours original GOI paste (GOI is Государственный Оптический Институт - State Optical Institute) you can buy also at ebay e.g. Russian paste GOI for grinding, polishing and sharpening 30gr Паста ГОИ №2, №3 | eBay
you will have barrel surface like this
s-l500.jpg
 
actually, you won't get much better visually than you have (chrome plating is gone), but it will be smooth.....

verdigris will be removed leaving the exposed brass.


YMMV
 
If it's just the chrome that's corroded away, it's fairly easy to remove the remaining chrome with fine sandpaper; I use micromesh but any fine abrasive should do the job. If there are deep pits in the wall you can try to clean them up as best you can, then when you rebuild and pressurize, make sure you check carefully for very slow bubbles (slower than 1/second) out of the ambient chamber, along with a very slight drop in IP. A good way to do this is pressurize, submerge in a tub, and turn the tank valve off. Leave an IP gauge attached. If there are no bubbles and IP is steady, you're fine. If you get very slow bubbling, just let it sit and watch each gauge (IP and SPG) to see where the slow pressure drop is. This will tell you if it's the HP o-ring (SPG drop) or the piston head o-ring (IP gauge drop). I've had both. Unfortunately, as I mentioned before, if there's a scratch where the HP o-ring is and it leaks there, you have a new paperweight.
 
Thanks everybody!

I made a couple of passes with a 1k wet sandpaper around that ring and polished it up with some metal polish. Chrome is definitely gone in that area and you can feel unevenness when running a ball-tipped brass pick over that area. Do you think it’s worth working on it some more or leave it alone?
I attached some close ups I took under the sun to really show what it looks like.
It also had a shim at the bottom of the cylinder; not sure if it’s worth trying to put it back together without it to lower where the piston head sits. It’s so thin that I doubt it would make much difference.


Best regards.
 

Attachments

  • E25DDBE1-2B7F-4B04-9899-6AE0BCBDC85C.jpeg
    E25DDBE1-2B7F-4B04-9899-6AE0BCBDC85C.jpeg
    70.8 KB · Views: 252
  • 372FEC43-178C-43FB-AC51-8A9E9E6A37BA.jpeg
    372FEC43-178C-43FB-AC51-8A9E9E6A37BA.jpeg
    73.3 KB · Views: 208
IMO, if you can feel them it's a waste of time to put it back together. Use a bit coarser grit emory cloth to get most of it smooth then switch off the a finer grade to polish it. Nothing to lose, it's not going to seal if you can feel the defects.
 
Thanks Herman,

Went ahead and worked on it some more. This seems about as good as I can get it without it feeling like I’m removing too much material. I hit it with some 800 grit wet paper and then 1k, followed by metal polish. Looks and feels much better, especially when not zooming in. The pick runs along that area mooostly smooth as butter now.
Your package should be arriving this afternoon, so I’m sitting here patiently waiting :)


Best regards.
 

Attachments

  • ECCA2843-7760-4321-9E50-54FDFF8AF0BD.jpeg
    ECCA2843-7760-4321-9E50-54FDFF8AF0BD.jpeg
    59 KB · Views: 241
  • C32F8D5C-7B09-48BF-B163-FE5336EB4759.jpeg
    C32F8D5C-7B09-48BF-B163-FE5336EB4759.jpeg
    58.1 KB · Views: 189
Well, I think this can be marked as a success story!

Pressure is on the low side, but it locks up at 115 right away, then creeps up to 117-120 and does not leak. Tested it by following halocline’s method and there was no pressure drop on either side :) I guess I’ll have to add some shims to bring it up, but I’m planning on diving with it tomorrow as is.

Now I’ll just have to take better care of it than the previous owner did and make sure to flush it really well after my dives, especially now that the brass is exposed inside the cylinder.

What is the general consensus on service intervals for mk10s and g250s that see maybe 20-30 dives per year?

Thank you all for your suggestions and support!
 

Attachments

  • 12D1CAAA-00D8-41CE-BA92-A3992E7776E3.jpeg
    12D1CAAA-00D8-41CE-BA92-A3992E7776E3.jpeg
    62.2 KB · Views: 179
https://www.shearwater.com/products/perdix-ai/

Back
Top Bottom