You are using an out of date browser. It may not display this or other websites correctly.
You should upgrade or use an alternative browser.
You should upgrade or use an alternative browser.
DIY Video Housing a success...
- Thread starter willydiver
- Start date
Please register or login
Welcome to ScubaBoard, the world's largest scuba diving community. Registration is not required to read the forums, but we encourage you to join. Joining has its benefits and enables you to participate in the discussions.
Benefits of registering include
- Ability to post and comment on topics and discussions.
- A Free photo gallery to share your dive photos with the world.
- You can make this box go away
Just pulled the housing out of the water after about 15 hours at 8feet and no water inside. Dosent look pretty, but works. Had to add 18.1oz to get it just slightly negitive.
I used a piece o 4 inch schedule 40 6 inches long with a pressure plug and end cap glued on one end and a 1" clear acrylic for the front with 3 spring latches. Used a router to cut the Acrylic and have a 4.5"od X 4"id silicon oring to sealit. I also glued 3/4" threaded 90deg PVC so I can take the handles on and off.
I used a piece o 4 inch schedule 40 6 inches long with a pressure plug and end cap glued on one end and a 1" clear acrylic for the front with 3 spring latches. Used a router to cut the Acrylic and have a 4.5"od X 4"id silicon oring to sealit. I also glued 3/4" threaded 90deg PVC so I can take the handles on and off.
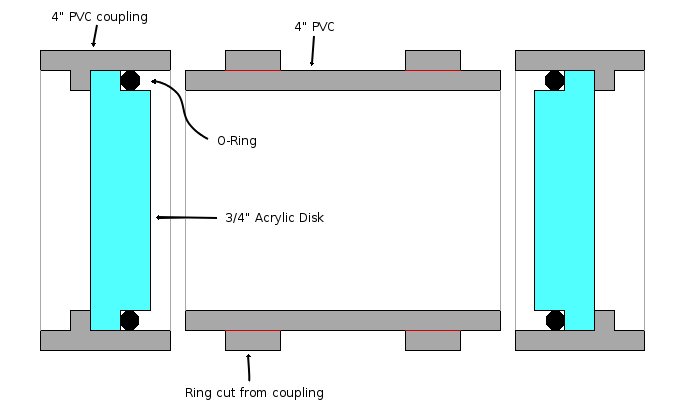
I've borrowed a few ideas from this thread and this is what I plan to build, let me know what you think.
Drawing is not to scale and I didn't include the latches or handles yet.

Note that the only glued parts are the rings to hold the latches. The screws will not penetrate the sealed section or lenses. The only spots that need to be watertight are at the o-rings.
The lenses will be trivial to replace or swap with each other if one is scratched.
The hard part will be cutting the lenses, but at $20 per square foot, I can afford some extra to practice with the router.
Drawing is not to scale and I didn't include the latches or handles yet.

Note that the only glued parts are the rings to hold the latches. The screws will not penetrate the sealed section or lenses. The only spots that need to be watertight are at the o-rings.
The lenses will be trivial to replace or swap with each other if one is scratched.
The hard part will be cutting the lenses, but at $20 per square foot, I can afford some extra to practice with the router.
Sounds like you already have the Plexiglas but I was going to suggest a slightly thinner lens. 3/4 inch is pretty thick and will withstand a lot more pressure then you'll ever be able to put on it. With only a 4 inch diameter 1/2 inch should work fine and be a little cheaper, but hey, if you already have it then it will definitely work.
Cutting the stuff isn't that hard, just go slow, take little bites and make sure it stays perfectly flat against the router face so the bit cuts a flat surface. Any imperfection is a potential leak point so make sure you wet sand it with some fine grit sand paper when you're done.
How is the camera going to mount inside the housing? Are you going to install controls or just turn it on and let it run?
"The hard part will be cutting the lenses, but at $20 per square foot, I can afford some extra to practice with the router."
-----------------------------------------------------------------------------------------
The best way I've found to cut the lenses is to first rough cut the lens to size about 1/8 to 1/4 inch larger than final size. This is best done with a band saw.
You make a plywood piece to fit exactly where you need lens to fit and use it as a template for routing with a straight cutting router bit with a bearing. make sure the template fits exactly and is sanded smoothly on the edge. By using double stick tape and even duct tape too as needed to hold the plywood template to the lens with rough cut, you can very accurately cut the edges of the acrylic lens. ( of course duct tape is for an area not being routed and can be removed and re located as you rout rthe piece.)
If you mess up making a cheap plywood template, it is easy to make another. This way , you are not destroying expensive plastic and you get a very clean edge. MK
Last edited:
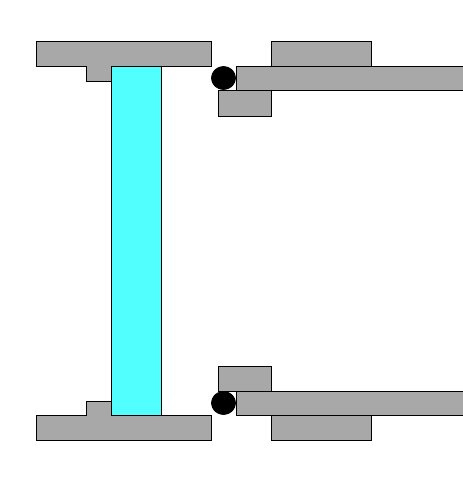
If you are going to enclose the o ring on it's outer edge then you don't need to bother with the top hat shape for the plexiglass - you can use a flat piece. This means you don't have to worry too much about the finish of the outer edges of the lenses as they will seal on the flat face which won't need machining.
Just make sure the o ring is a snug fit on the outer edge so it doesn't fall out when you take the end off. A 6mm nitrile o ring is strong enough not to extrude out of the groove up to pressures of about 60M (200 ft). Deeper than this it will start to distort but should still seal.
Make sure the lenses, or ends holding them, can slide easily over the tube as water pressure crushes the o ring.
12mm (1/2 inch) will be good down to 100M (325 ft) at 4 inches diameter. My 1 inch top hat (1/2 inch at the machined edge) cracked at the edge at 146M (480 ft). The 1/2 inch front lens was still fine. Whether the rest of the housing can stand that is a different matter.
Good luck.
regards Paul.
If you are going to enclose the o ring on it's outer edge then you don't need to bother with the top hat shape for the plexiglass - you can use a flat piece.
Without any restraint on the inner edge of the o-ring, won't it get pushed into the case? The bit around the outer edge will be exposed to the full external pressure.
Similar threads
- Replies
- 3
- Views
- 1,283
- Replies
- 1
- Views
- 767
- Replies
- 2
- Views
- 786
- Replies
- 8
- Views
- 1,608
- Replies
- 19
- Views
- 2,652


